Camera Lucida | Chambre Claire P. Berville
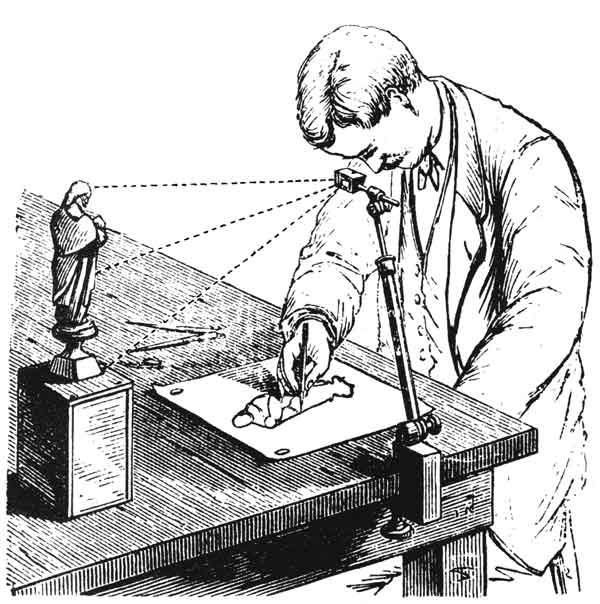
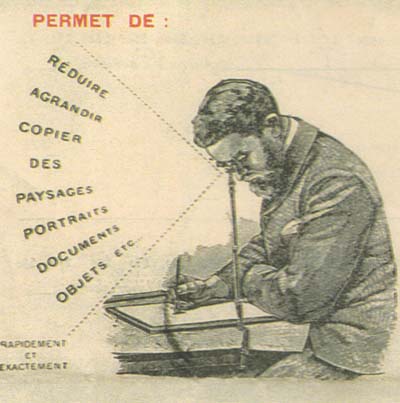
This is a device designed to assist in making enlarged or reduced drawings from originals or even straight from a real scene. The designer looks at the tip of the pencil on the paper and sees, simultaneously and in the same place, an image of what is in front of him. His job, then, is to draw the contours just by following this double image.
As seen in the illustration above, it is a stick fixed to the table where the sheet of paper is also attached so that there is no movement between the two. The stick is adjustable, being able to be close or more distant from the drawing. At the end it has a small prism that provides the double image. By moving the eye in a horizontal plane, forward, backward, right and left, the designer can cover the entire area of the sheet, always seeing at each point a double image of the sheet of paper and the subject to be drawn.
A set of lenses accompanies the device to help visualize both the subject of the drawing and, in some cases, the drawing itself. Some filters can also be used to balance the brightness of the scene in relation to the brightness of the paper.
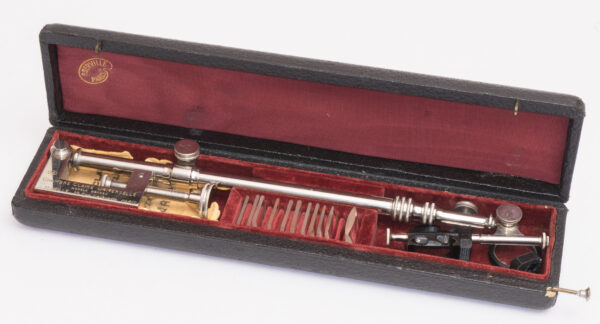
The Camera Lucida, or Chambre Claire in French, was widely used in the 19th and early 20th centuries. It was constructed entirely of metal and was considered both a scientific and an artistic instrument. This one in my collection is a classic Chambre Claire Univeselle by P. Berville. Many thousands like this have been manufactured and it is not difficult to find specimens in perfect condition even today. They were housed in cases lined with leather and velvet and the ones I had the chance to see, still have impeccable chrome, moving parts still tight and precise, even after more than 100 years.

What is the trick?
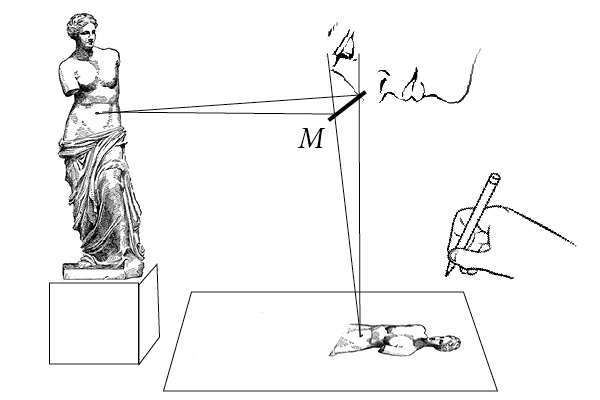
The science or technology involved in a Camera Lucida is not very sophisticated. As the basic idea is to be able to look down, at the drawing table, and at the same time forward, at a scene or original to be reproduced, any partial reflection/transmission mirror in principle would do. The Camera Lucida is an improvement on this idea.
Using a half-mirror, M in the figure above, it is possible to see simultaneously the light transmitted by the sheet of paper and the light reflected by the Venus figurine. The artist must then mark with the pencil the place where he sees (for example) the belly button and the other points and lines of his model. Using some lenses, it is possible to solve problems of proportion and focus of the two images.
The problem with this arrangement is that the drawing comes out upside down because the mirror inverts the image. If the process were really just “to mark what is seen and as it is seen”, this inversion should not be a problem. Obviously, it would be enough to turn the sheet after the drawing is finished. But this is usually the surprise, or disappointment, of those who experience a Lucid Camera for the first time: you need to know how to draw. A drawing is never just a copy of reality. There are conventions that we learn as observers of drawings and if the draftsman does not master them at all, the image will seem crooked and clumsy.
To resolve this, it is enough to use, instead of one, two reflections in a row. The inverse of the inverse is the right, so we have the image in the drawing in the same position as what the designer sees in front of him.
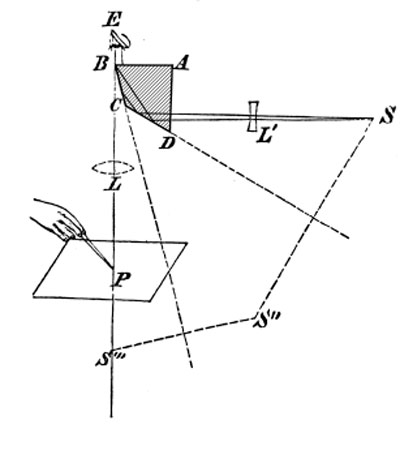
To produce the two sequenced reflections, a 4-sided prism is used, as shown in the figure above (Wikipedia source). S is any point on the object. Its beam of light passes through the AD surface of the prism as it strikes it frontally. Then this beam meets the CD surface, because the angle of incidence is much more oblique, the beam is reflected upwards. If someone could see this image of S, which is in S” (symmetrical of S in relation to the mirror plane), they would see S”, and its surroundings, upside down, as in the previous case with the single mirror.
[mks_col]
[mks_one_half]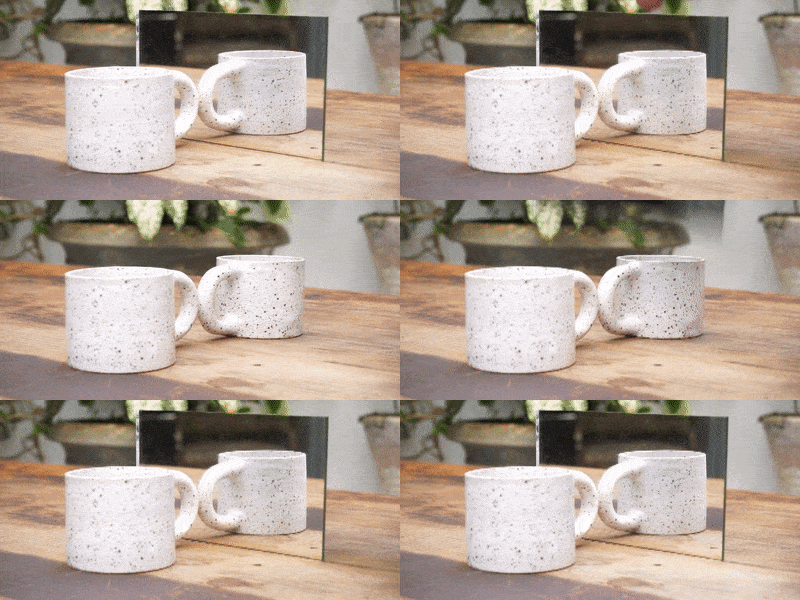 [/mks_one_half]
[mks_one_half]Remembering that looking at an object in the mirror is like looking at another object exactly symmetrical from the first in relation to the mirror plane. Note that in the diagram the points S and S” are symmetrical to the CD plane. The same happens with S” and S” ‘in relation to the BC plan. [/mks_one_half]
[/mks_col]
But the rays emerging from CD encounter a third surface of the prism: BC. They reflect on it again. This second reflection generates the image in S”’. This image is the inversion of the inversion and therefore has the same sense as the image in the region of S. This image can be seen in the rays of light, coming from BC and passing through AB, because the angle of incidence is now almost straight.
All of this is very good, but the problem now is that looking through the prism we do not see the sheet of paper as we would see with a half mirror. The reflections that the rays underwent to leave for AB were 100% and looking through AB we only see the S”’ image of S. It is in the right place but we do not see this “place” through AB in order to be able to draw on it.
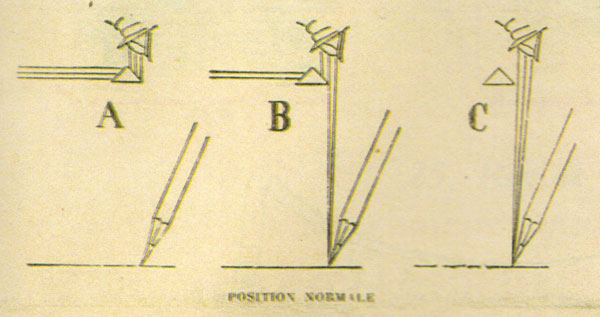
The illustration above is from the owners manual of the Camera Lucida P. Berville. Note that the prism is not drawn correctly. But with it we can understand the solution to provide a double image with both, the sheet of paper and the object to be drawn. Everything is solved with the right placement of our pupil. We must get our eye very close to the prism. In the position marked in A, we see only what has passed through the prism, that is, the paper is out of sight. In C, on the contrary, we see only the paper and the rays emerging from the prism do not reach our pupil. In B we have the solution: the top half of our pupil forms an image of what comes from the prism and the bottom half forms an image of what comes from paper.
Camera Lucida and photography

The basic concept of the Camera Lucida was described by the astronomer Johannes Kepler in 1611. But it was not of interest at the time. Almost two hundred years later, in 1806, William Hyde Wollaston patented an apparatus with the four-sided prism as described above. Wollaston was a chemist and physicist and also developed a camera obscura lens, with an aperture of around f / 11. It became known as the Wollaston landscape lens. This lens, a meniscus, greatly improved the image in relation to the biconvex or convex plane that had been used until then. It was a good basis for the first lenses for landscapes used in photography, where the next step was the correction of chromatic aberration.
200 years, between Kepler and Wollaston, that was what it took for the production of images to stop being almost exclusively devotional or political, since the overwhelming majority of what was produced was of a religious nature or historical scenes and portraits of nobles. Along those 200 years, a wide field in image making was opened for scientific or everyday topics, both with a naturalistic rendering.
The Camera Lucida, the Camera Obscura and Photography, started to make sense at the beginning of the 19th century due to a new relationship or a new view of Nature, of reality, of present time and its events. Suddenly, it was a race by mechanical means to produce live images, images that were seen. An enormous desire to no longer depend on the artist and his patrons as the sole source of the images that circulated. The images have always represented, always documented, but these “documents” were no longer wanted to be so at the mercy of the authorities’ preferences, both secular and spiritual. The mechanical reproduction of images is inserted in the ideology brought by the Enlightenment, in the possibility of a new way of acquiring knowledge through direct observation, in the appreciation of the present time in detriment of mythical or historical times and in Nature as an absolute reference.
This aspect of the emergence of photography from a “desire for photography”, much more than for any technological limitation in the times that preceded it, was discussed a little more in depth in the article about the Nicéphore Niépce Museum.
The trajectory of the Camera Lucida is totally intertwined with that of photography. Both responded to this search for automation in the process. The Camera Lucida did not perform the chemical recording of light, but it did offer an optically perfect image, ready to be copied although manually. It was very useful as a means of transferring photographs to other media. After d’après nature, an expression that means “drawing from life” and which was used to lend authenticity to the drawn images, came the d’après photographie, with the same intention to assure that the image corresponded to a real scene.
In the article on the Cottingley Fairies there is a more in-depth discussion on the question of images and authenticity.
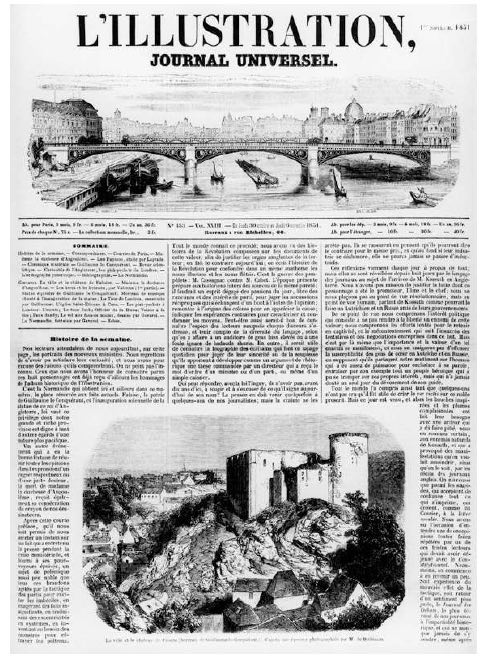
In the 1840s, the first periodicals appeared with a privileged space for images. But it was only in 1891 that photo-mechanical methods for photographic reproductions were perfected and adopted without going through manual drawing. During this period, it was very common for newspapers to carry in the caption this note that the image represented came from a photographic original. On the first page of L’Illustration, n ° 453, from 01 / nov / 1851. Under the photo at the bottom of the page we read, “The city and the castle of Falaise (birthplace of Guilherme the Conquistador, from a photograph of M. de Brébisson”) (source: D’après photographie – Premiers usages de la photographie dans le journal L’Illustration (1843-1859) Thierry Gervais)
It cannot be said that this drawing in the newspaper was made or not with a Camera Lucida. L’Illustration, in particular, used the best draftsmen and engravers in Paris at the time. They would certainly know how to make the drawing without the aid of any device. But the important thing here is to note the concern with visually rendering the images with the least possible subjectivity. The Camera Lucida served for decades as an intermediate solution between freehand drawing and photography and it was very popular in this type of use.
P. Berville Camera Lucida in use
An initial observation is that the use of this of P. Berville as it comes out of the box is only possible for those who can see well. Since I can no longer focus on a sheet of paper at 30 or 40 cm without reading glasses, I printed a 3D holder for a small lens cut from a +2 diopter glasses. I assembled the support obtaining the following arrangement.
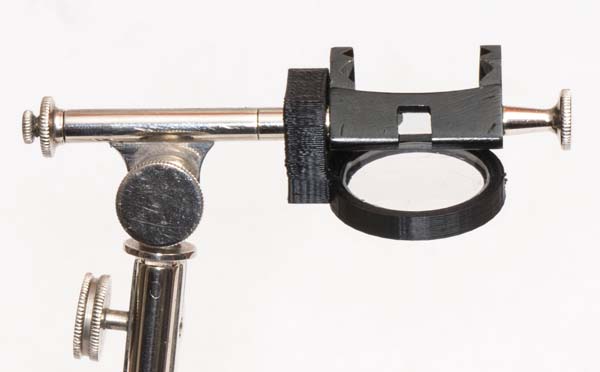
That way, through the prism I would see my subject to be copied through the lens chosen for that, and outside the prism, looking directly at the sheet of paper I would have the help of this extra lens.
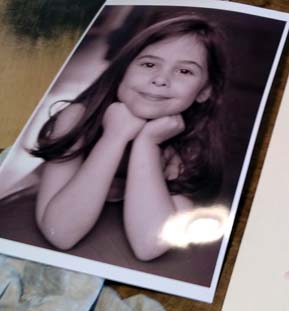
I chose this portrait and printed it digitally. However, putting it in position to be copied with the Camera Lucida, I found it difficult to decide exactly where to mark the lines of the drawing. Some contours are obvious, but others are in a transition region of light and shadow and it is very difficult to decide where exactly to pass a line. You need to know how to draw to take full advantage of this device.
To make it easier I modified the digital image with a filter in order to give more definition in the passages of tones. I used this second version to trace the drawing. The view of the overlaid images looks like this:
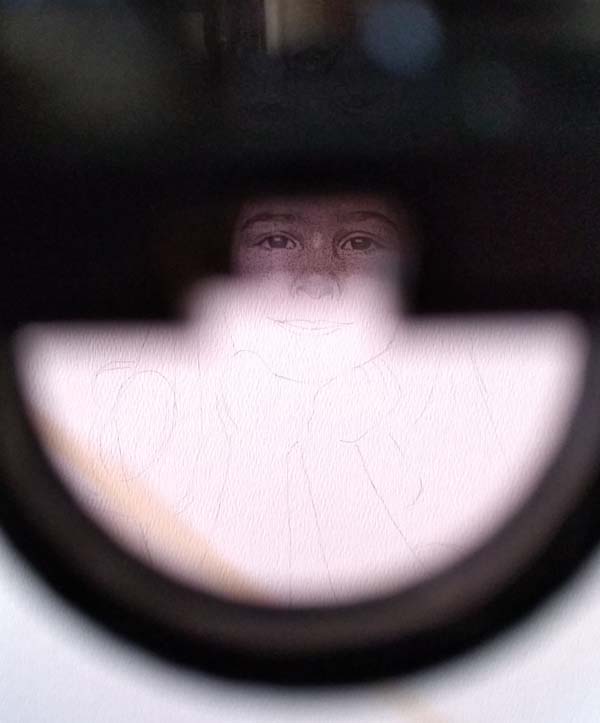
There is a transition zone between an area where you only see the drawing and another where you see only the photo (through the prism). It is in this transition band that we must draw. In the position above we could draw the nose, but not the mouth or the eyes. In the first case we don’t see the photo and in the second we don’t see the paper.
Below, my complete arrangement. It is essential that the drawing paper, the photograph and the device are fixed to each other. In this photo I had already released the sheet, but during the tracing of the lines it was hold with blue tape.
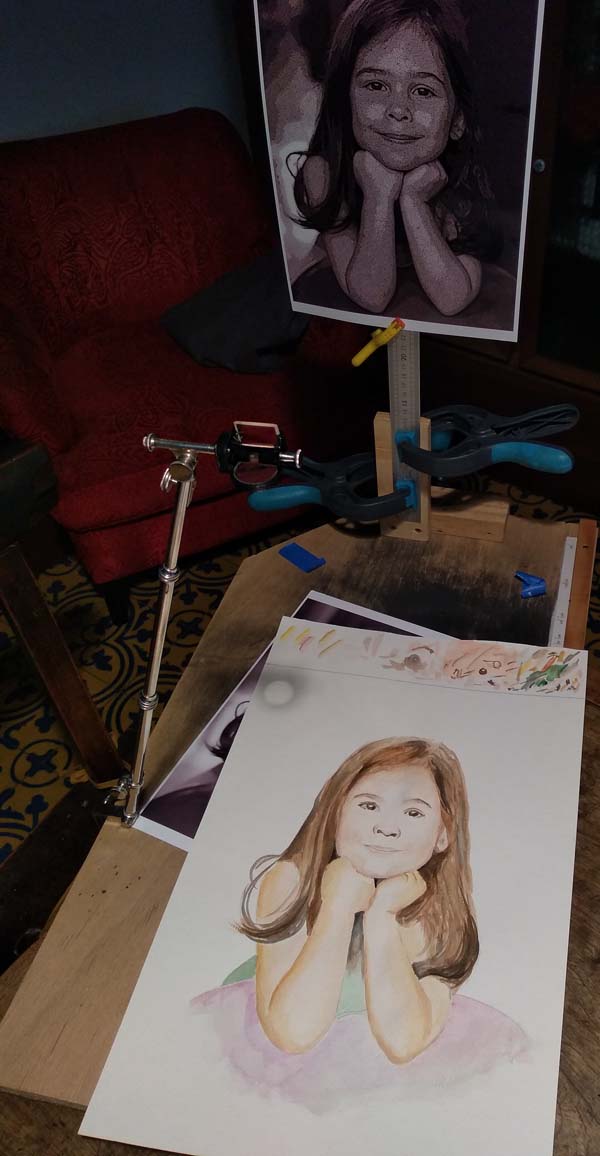
I then tried to make the key lines and then colored them with watercolors. It can be noted that it came out very awkward, but perhaps it was too ambitious to make a portrait in my first attempt. The fact is that a lot of training with drawing is necessary and even more training with watercolor if this is the chosen technique. The Camera Lucida helps a lot in maintaining the correct proportions, that is, things fall in the right place. But when it comes to executing the details, colors and volumes, it takes a lot of training to accomplish something that may look more professional.
