Respooling 127 film from 120
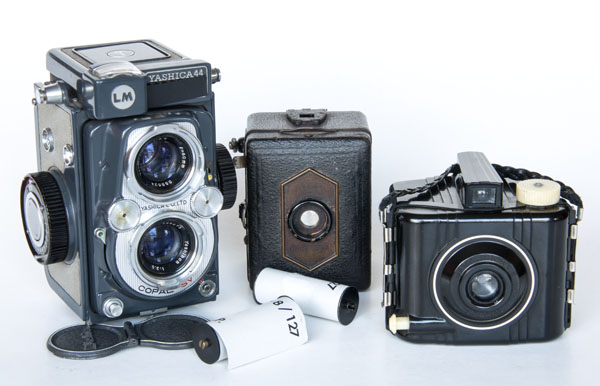
Many interesting cameras were designed to receive 127 roll film. However, this is a format that is quite difficult to find nowadays. But fortunately there is still film in 120 format, that is a little bigger, and can be cut and spooled in a 127 reel. The video below shows the complete step by step on how to go about it. Here in this article you will find tips and specific measurements.
List of materials
- Fresh 120 film and an empty reel
- Two reels of 127 format
- One camera for 120 format. It can be a scrap camera. Only film advance must be in working condition.
- A little device made of wood, the cutter, shown in the video and explained below.
- A slat with the 127 film width (46 mm) and about 1,20 m length
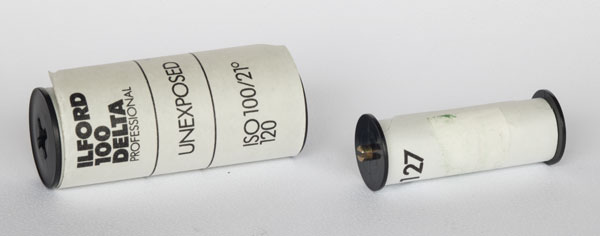
It is desirable to have, in addition to the reels, a 127 film back paper in good condition. But in case this is not possible, the very paper of 120, which will be cut along with the film, can be marked like a 127 as shown below.
Video: Respooling 127 film from 120
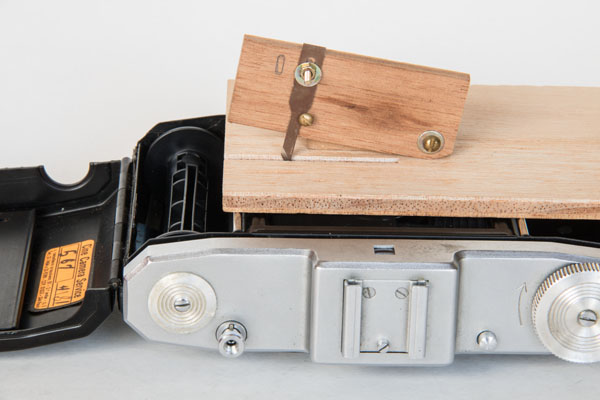
The cutter
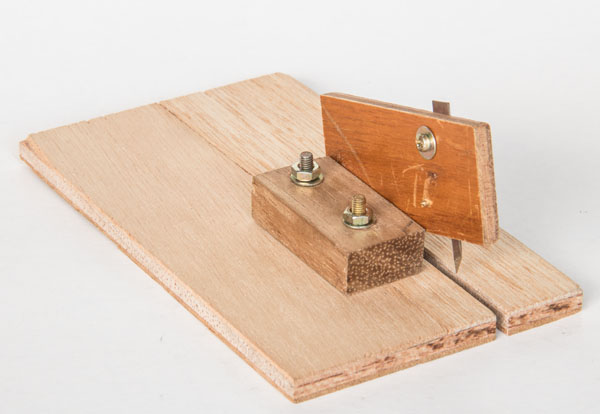
Here you can see in details how the cutter is built. There is no critical dimension except the width of the base board and blade position. In the sample above I used two M3 screws and nuts (~1/8″) for the block that allows a fine tuning on film width (see video) and an M2 (~5/64″) to fix the blade. There is also a small screw for wood showing up its tip on the picture above.
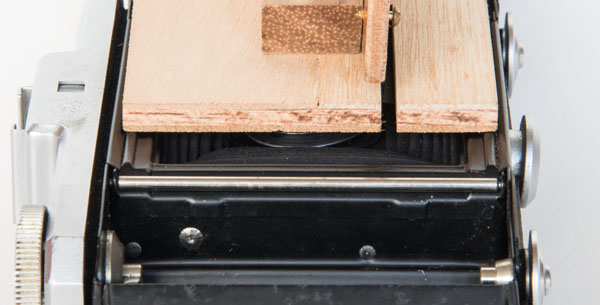
What is really important about the cutter is that the board mustn’t sit over the inner rail where the film itself is supposed to run. At the same time, it is important that it fits firmly in place and do not jiggle sideways changing the film width as you wind it. Inspect your camera carefully and decide the best way to ensure that. Normally it should have the same width of the film flattener that you find on camera body lid.
Last point about the cutter: the best results you will get when the blade is placed right at the beginning or the frame. That is because there the film is well secured by the frame and won’t have room to curve downwards and “scape” from being split by the blade.
Marking frame count in 127 standard

On the left is shown two stretched strips of protective paper one for film 127 and the other for film 120. The idea is that you will mark the backing paper length, the film positioning and the numbering of the frames, on film 120, following the template with the paper measures of the 127 film. If you have an original 127 film protective paper, this will not be necessary. But if in addition to the film if you need to use also the 120’s backing paper, these are the key measures to cut and mark it.
It is necessary, or at least highly desirable, to mark those numbers because in most of the 127 cameras the film advance is done by inspecting a window where the numbers of the photos will pass by as you turn the winding knob.
The measurements are all in millimetres and the step by step is as follows:
- After obtaining the 46 mm wide protective paper strip, stretch it over a table with the black part facing down. Use a tape that can be removed without ruining the paper (blue tape is the standard for this).
- Position and fasten also to the table, next to the strip that you will mark and cut, a ruler in millimeters. Ideally, it should be at least 1 meter long, so you can make all the markings without having to reposition it. Set the zero where you want start your strip of backing paper.
- The first quota is 136 mm. This is where you should make the mark indicating that from there onwards the camera cover should be closed while loading your film. Usually it is a triangle or a dot, in camera body, and usually a double arrow in back papers.
- The 285 mm quota is where the film end will be fixed with an adhesive tape. Make any mark there so you can position it with a clamp over the rule, as you saw in the video.
- From there on, just mark the pictures’ numbers. Film for 127 are usually marked for two types of camera 4×4 and 4×6 cm frames. You, of course, just need to mark for the camera you will use. There are two sets of numbers from 1 to 12 (in blue) or 1 to 8 (in black). This second set is marked at the center of the strip and the first set at 9 mm from the edge as shown in the picture. But ideally you should inspect your camera to actually see where the red window is placed.
- Follow the measurements in millimeters and write the numbers of the pictures. Make them in size compatible with window size. Do not use red paint because the window, being red, may make it difficult to read. Test before if your pen is appropriate and gives good visibility and does not damage the paper.
- Finally, mark the quota 900 mm. This is the point where you begin to roll the film, as shown in the video.
- Once the numbering is checked, cut the tape at zero and at 1073. Cut the ends of the tape so that a piece in the center of the tape can be inserted into the slot in the center of the reels. This needs to be done on both sides.
- You can now attach your backing paper to the ruler and respool a fresh 127 film, as you saw in the video.
Thanks for this very clear tutorial. I have made a cutter and the rig for rerolling. It all worked very smoothly, thanks to the clear instructions. I have just developed my first homemade 127, used in a Vest Pocket Kodak and very pleased with the results. No light leaks from any point in the process. Now, I’ll cut some more 120 rolls.
this is great! thank you.
I have been shooting a art photo progect with 127 for over 42 years!
Since my previous comments I have been reading about the experiences of folks who have split 120 and even 220? film to produce a roll of 127 film. The results were not to encouraging if the width of the CUT was inconsistent, as the film would not fit properly into the developing tanks if at all …. so the cigar cutter idea doesn’t seem such a good idea as you hinted as much. I have managed to source some out of date 120 film at 3 GBP ( 1 roll) so I may have a try anyway just for fun. Ian
The best combination is probably to procure an original 127 film and use its back paper with fresh 120 film cut down to size. The back paper can be used several times before it gets worn off. Maybe, that could be like a soft start before going into the trouble of marking a 120 back paper to use with a 127 camera with red window.
I have seen a much simpler method using a cigar cutter used in a circular motion ( after 1st marking the 120 film for 127 width ) gently, cutting through the 120 film medium & backing paper until the 120 film spool is reached. Then it is just a case of winding the 127 width of 120 film onto a 127 spool and then taping the end to keep it taught, wrap it in foil ready for use. There is talk that the remains of the 120 film left on the original spool can be used in 110 cassettes but cannot confirm that. Sounds a good idea to me, if it works out as planned you could end up with two usable films??
Hello, I also saw that method with a cigar cutter. I just can’t believe I can produce a nice, neat and precisely positioned cut throughout the thick film and paper roll. When the blade reaches the last layers, it may have spoiled the first ones and light leaks will probably ensue through dented edges. The tutorial I saw didn’t go up to actually re-spooling the film and that made me even more sceptic. Maybe it is possible. But I did not risk to check. Did you? Once I built my cutter the way I show in this post I am happy with the simplicity and end result it produces.
Hi, No I have not got round to it yet, but I will and let you know the outcome. I have only recently rediscovered film photography after I don’t know how many years:-) I started out by sourcing cameras I liked the look of, sort of art deco styles just for the hell of it really, then started looking for cameras from manufacturers I had never heard off, some of them with faults to stay within budget.My latest of about 3 hours ago is an all British camera an Agi Agifold camera for 120 film off Ebay . I just thought of another idea, thanks to your frame count diagram, I am going to make a roll of paper to your design marked VERY clearly, then wind it on to a 127 spool, stick it in a 127 camera as a pretend film and go through the motions of using the “film” and noting how many turns of the winder knob it takes to reach each individual film markers. I know as the roll progresses, the number of turns required will change marginally as the paper is transferred from one spool to the other, on at least that is my assumption. What do you think?
Using the substrate (base, frame) to roll up the film on is a neat idea. I hope to use this idea as the basis for rolling 16mm film for use in 110 instamatic cartridges.
Terry
wd4aon@gmail.com