The intention in this post is to explain what softwares for image editing do when you adjust sharpness of an image. Sharpning in a great many of contemporary photos, done and retouched digitally, has turned into a sort of convention and photographers may feel like missing the party if they do not produce that crispy finish in their photos. I think that in a not so far future people will look back and have the same feeling we have today towards the first colour pictures from the 50’s, with those so admired screaming shades of reds and blues. That was only ‘realistic’ to those who have lived always in black and white. As for ourselves, our successors will wonder how could we have found today’s photographs more natural or even more beautiful. They will look to our images with their relief and details as something dated and manneristic.
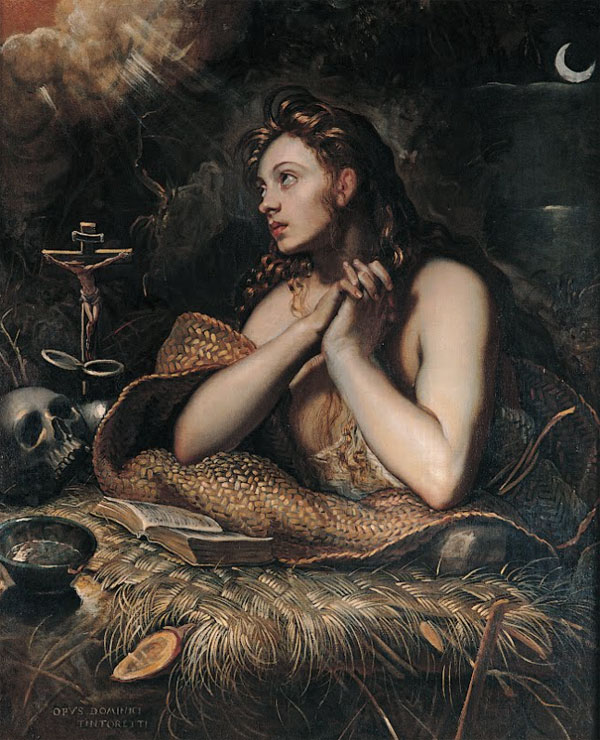
Talking about mannerism, that is a good cue to introduce the theme of sharpness, as many baroque painters, specially in religious subjects, aimed at a dramatic rendering as if the saints would materialize in front of the believer. They did the same as Photoshop, Lightroom and other image editing softwares do. They knew that sharpness has a name and that is contrast. Not a general contrast between masses of colour, but rather detail contrast. Look this Penitent Magdalene, from Tintoretto, painted in 1598/1602 and today in Capitoline Museum in Rome. When we get closer to her face we realize that the artist used a vigorous sharpening.
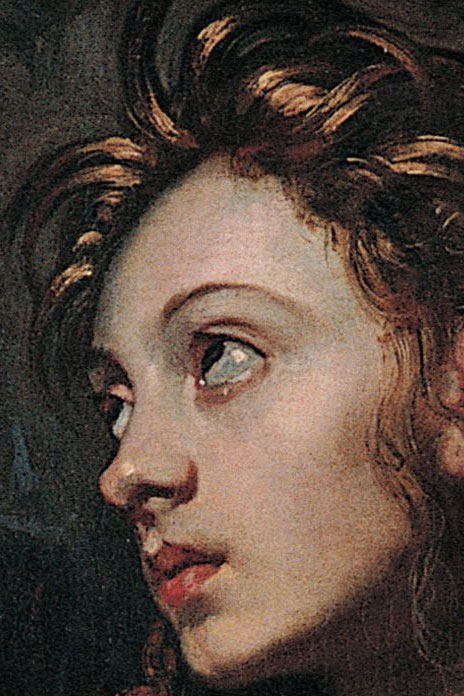
Our brain, while decoding images, has a special care for sudden changes in luminosity. Those passages work like anchors for mapping the visual field and become attention points. In order to guarantee a distinctive look to the saint’s visage, Tintoretto did not hesitate in drawing an outlinie over the border of nose making this way a more accentuated transition. Her hair, falling in delicate waves, were made by juxtaposition of fine light and dark brushstrokes and got also more prominence. The bright reflexions on hair and eye are also over enhanced. Lips received a dark contour, almost black, on its top border. All of this is sharpening. The artist deliberately introduced elements that for sure he did not see on his model knowing that due to our reading of it, it would become, ironically, more natural. If you understood the trick, then you know what is to dope an image’s sharpness: it is the purposeful introduction of local contrast. What is left, is to see how that is done digitally and how to adjust the parameters offered by software in order to get the desired effect. Those are the tricks of digital Tintorettos in the digital era.
But still about the nature of sharpness, it is very important to highlight that it does not affect the focus in a photograph in the sense of introducing a correction. Is is better defined as a transformation performed over an image that can produce a sensation that there is more focus. A photographic image, perfectly in focus, at the limit of what the equipment and materials can deliver, still may have a significant gain in sharpness when retouched for that. An image with lack of focus, also can have some gains, but it is not right to call it, or expect, a correction.
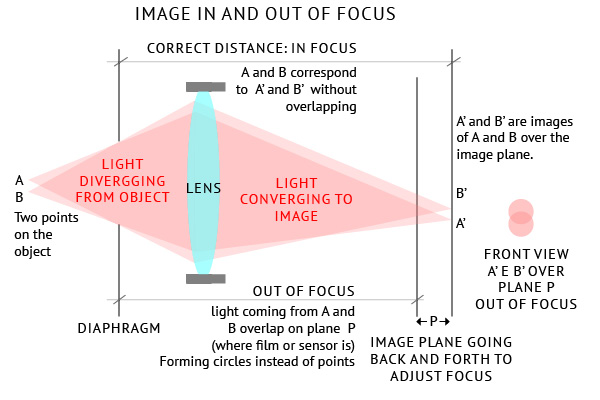
I believe that from the above scheme it is easy to deduce that there is no miracle in this world that will make an image registered out of focus to recover the information that it would have in case it would be in focus. When, over the sensitive surface, film or sensor, the lens did not lead light coming from points in object to points on image plane, but, instead of that, created circles overlapping one to another, the question of recovering focus would be exactly like figuring each number in a very large set, knowing only the sum they amount to.
Aberrations, always present in lenses in more or less accentuated manners, also generate circles and other shapes of confusion. Like sharpening that also has an aesthetic implication and in fact they are also pursued and studied by a different tribe. There is the tribe of textures, pores, hair and well defined contours, and there is the tribe of bokeh, soft focus, lomography and other evanescences.
Let us then study through examples. Following, we have two images. The first without and the second with sharpness application. The original picture was made with a Canon T3i, natural light coming from a window, ASA 100, lens EF 50 mm f/1.8, adjusted at f 5.6 and 0.3 seconds exposed. Total dimensions 5184 x 3456 and the raw file sized at 23.1 Mb. The raw file needs a ‘raw converter’ that performs some sharpening adjustments by default. For our exercise, for the image we are calling original, I set it to zero so we can observe how the interventions actually affect the image.
The image below is the original file reduced to 600 x 400 px and without any changes. It was chosen for it presents passages that conceptually are critical, that means, the door and doorknob are different objects, with different shapes and colours, but from a luminosity point of view they are close, one to another. If we would be an ant, sized as a pixel, walking over the computer screen, leaving the doorknob area and entering the door area, we could have difficulties in telling the precise step that would have made that change. That is because when we zoom in the picture we will notice that there is a certain blending of both objects. That is a typical situation when the sharpening can make a good visual difference that will please our sense that one object does not blend to another in real life. That would not be the case, for instance, of sharpening clouds pictures as those are the classic instance of objects that blend and have not definite contours.
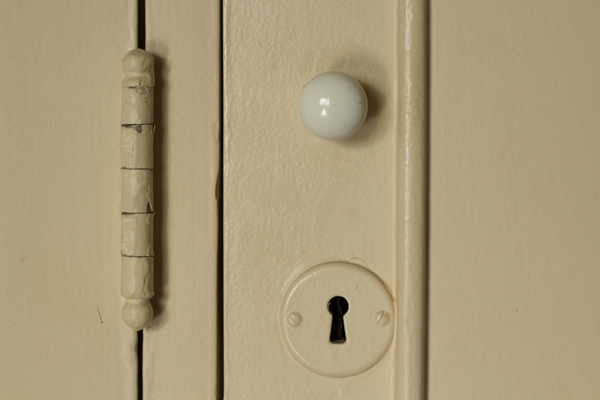
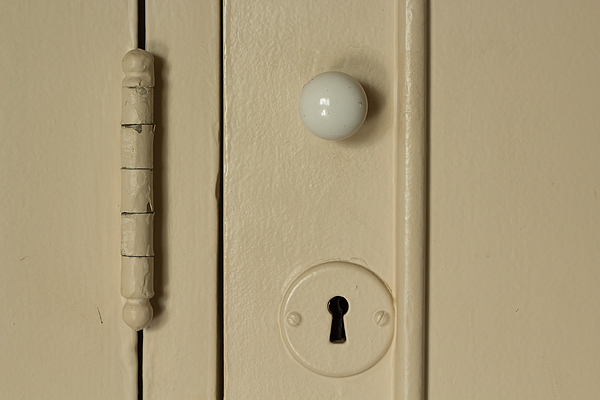
At first sight it may look a bit disappointing. But, as a rule of thumb, an evident sharpening is very likely to be exaggerated. It was given to this image, while opening it with the raw converter, in Photoshop Elements 11 (“raw converter” is the window that pops up automatically when you try to open a raw file with Photoshop), an amount of 58 and radius 0,9 pixels. We will see those parameters in detail right aftewards. By now, let us concentrate in understanding what digital sharpening does. What we can note from a more accurate observation is that there was a gain in texture over the door, it could be aesthetically speaking desired or not, the hinge has its painting peeling more accentuated and, maybe it is better to see them side by side:
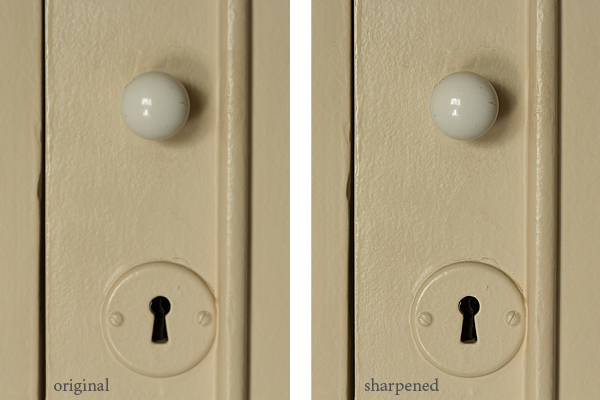
The doorknob seems to pop up better in the sharpened image. Also the relief on the keyhole plate has improved. Completely subjective question whether one is better than the other. If likeness is a criteria, being that door a door in my house, I would say that the texture that is now more prominent at the door painting bothers me a little bit, for the surface I known has a finish and touch that seems to me softer than this – not at all rough as it looks now in the picture.
But our real question here is: how was it done? Well, software follows the same principle we saw with Tintoretto, but, being here the image an matrix of pixels it demands an algorithm less complicated than the one running on the painter’s brain.
- Image is scanned in search of sudden transitions among neighbouring pixels. Areas with no considerable variations are ignored. When a stronger variation is detected and it is repeated along a pattern, it considers it detected an edge.
- Edge detected, passage from one area with luminosity characteristics and colour to another with different values, there will be applied a local treatment consisting of heightening pixels which are lighter and lowering pixels which are darker. By doing that, the transition, to our eyes, will loo more accentuated and the edge more pronounced.
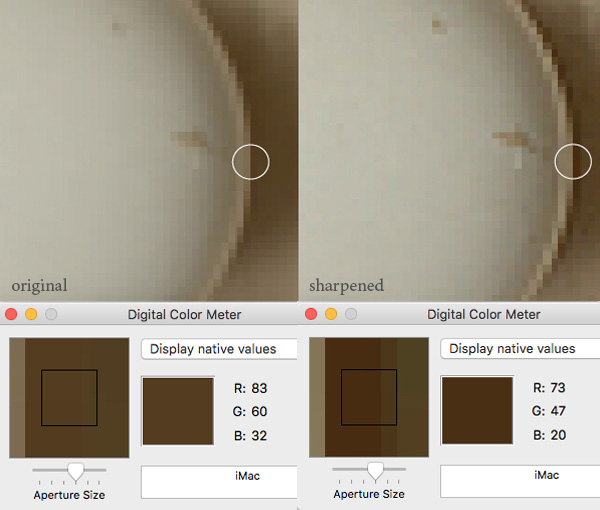
This is a screenshot of a zoom into the right side of doorknob while being inspected with a Digital Color Meter (DCM) positioned on the darker side of original and sharpened image. I think that more convincing that colour and luminosity judgments is to look at figures in order to really see sharpening in action. The square with a black outline, inside the DCM window, shows the reading area from which it averages the RGB values and presente them on the right. The colour matching that average is displayed on the smaller square. Note that the selection was set, in both cases, over the darker patch right before the bordes passing to the lighter one. The region where the meter was is marked by a white circumference on the pictures. Note now that all the RGB values were reduced resulting in a darker brown tone. But that is not all, let us check next the brighter part.
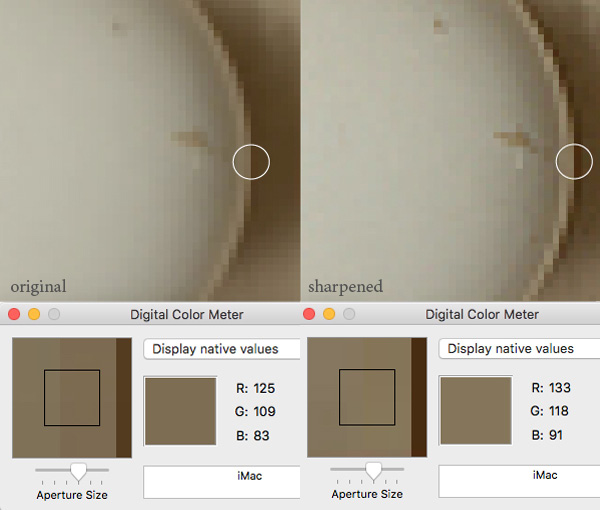
If we make the same measurement positioning the DCM selection, this time on lighter side, close to the border to the darker one, that means over the doorknob, we will confirm that the sharpening gave an extra boost on RGB values resulting in a lighter stripe. That means that doorknob contour, that was defined by too lines, one lighter and one darker (pixelated in this enlargement) by a difference between RGB(125,109,83) and RGB(83,60,32), let us say in luminosity between 110 and 63, that means, 47 in difference (luminosity was quickly evaluated giving weights 1 for blue, 2 for red and 3 for green), after sharpening, the same measurements resulted in RGB(133,118,91) and RGB(73,47,20), and with the same reasoning we get luminosities of 118 and 51, hence, 67 in difference. Final account of sharpening effects in this case: we had before a passage of 47 accentuated to 67. That means 20 points in a scale that goes from zero to 255. Note that the little stains on doorknob were also darkened although they may no be considered exactly as contours to our understanding. That is the effect, often unwanted, that makes textures more prominent after sharpening.
Those are the basic principles about sharpening adjustments. It will be now easier to understand the parameters offered by image editing software and, by doing so, make a better use of them. Let us go now one by one and after that consider a workflow for sharpening.
Parameters to be adjusted
This time we will use another image made with the same camera, same lens, f stop at f5.6, speed 1/4 s, ASA 100, lit by a large window and camera was firmly hold by a Gitzo studio tripod.

Most of editing softwares offer the same set of parameters to be user defined and based on those they run their algorithm for image sharpening. Those are amount, radius, detail, masking. Let us see now one by one.
[mks_dropcap style=”square” size=”20″ bg_color=”#ff0000″ txt_color=”#ffffff”]1[/mks_dropcap] Amount – With that figure you inform how dramatically dark shades should be further lowered and lighter areas should be lifted up in their RGB values, whenever software finds pixels eligible to be altered. The best thing to do is to experiment with different amounts and check the result. But one very important consideration: the four setting act in conjunction and the effect of amount depends on radius, detail and masking, so consider every change as approximative and subject to review after you changed the others. The point is, as soon as you understand how each one works, you will be able to start with the one that makes more sense according to your objectives.
[mks_dropcap style=”square” size=”20″ bg_color=”#ff0000″ txt_color=”#ffffff”]2[/mks_dropcap] Radius – It is related to the width to be considered for change whenever an edge is detected.
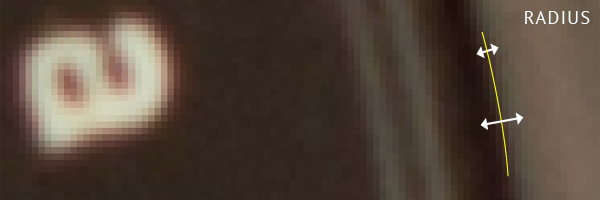
In the picture above, an edge goes along with the yellow line. An edge, from software’s point of view, is a transition that repeats, more or less the same, along a path. The radius adjustment lets you tell how far from the edge sharpening should affect pixels. Best results are reached when radius size is coherent with size of details we want to have enhanced. Don’t be impressed by pixels counted in tenths. They really do exist only in units. But if you set 1,5 px, software will translate that to routines of anti-aliasing (super-sampling), that will change values of neighbouring pixels (always whole pixels) aiming to visually emulate a smooth image when it is in fact digital and therefore discontinuous.
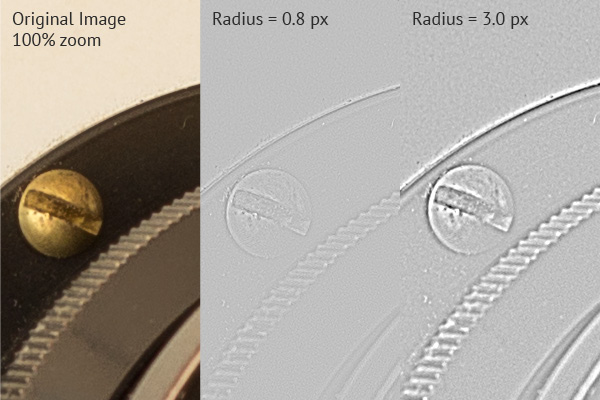
When you are using a raw converter the sharpening adjustment offers an interesting feature that is the possibility of visualising how it is understanding the edges over which it will apply the radius parameter. While you slide the pointer, hold alt/option on your keyboard. Image will change to a gray shade and contours will be displayed in white. Above you have the screenshots with original image on the left and two different levels for radius, 0.8 and 3.0 px. Note that the edges are indeed much thicker on the right.
[mks_dropcap style=”square” size=”20″ bg_color=”#ff0000″ txt_color=”#ffffff”]3[/mks_dropcap] Detail – Software can go after edges with more or less rigour. With the detail control you inform it how meticulous you want it to be. If you assign a high value it will be sensitive to minimal possibilities of considering a certain variation as an edge. If you assign a low value, or even zero, only the more expressive cases will be treated.
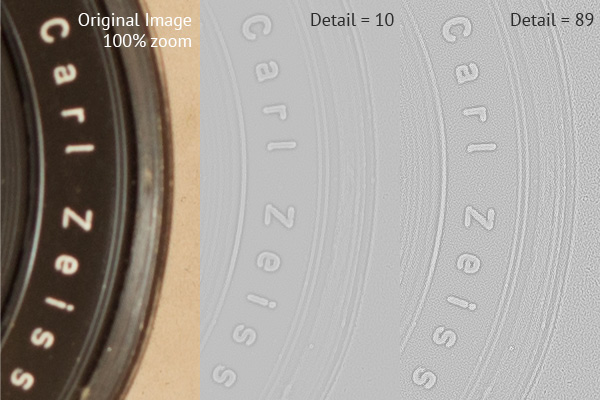
The above image shows two cases from the same original with detail at 10 and then 89. Like in radius, the gray image is obtained by holding alt/option while adjust the slider. It shows clearly that the higher the level the more software will find details interpreting light transitions as edges. When overdone, it brings out a lot o noise.
[mks_dropcap style=”square” size=”20″ bg_color=”#ff0000″ txt_color=”#ffffff”]4[/mks_dropcap] Masking – This is a way, very useful, of expressly let some areas untouched by sharpening.
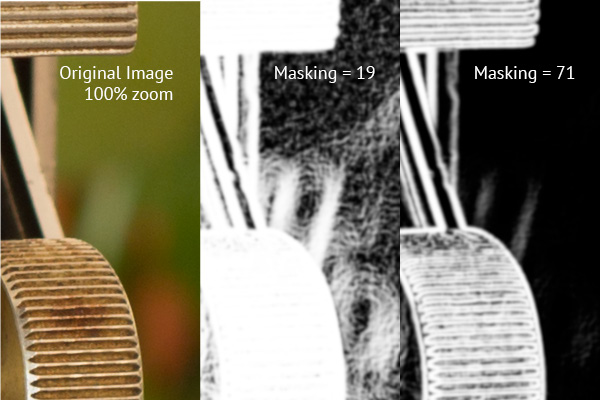
It is also adjusted with a slider and has also the alt/option preview showing, in this case, what will be considered, white, and what will be ignored. The out of focus background, that helps in giving more prominence to the metallic parts of this Linhof 13 x 18cm, would have its role compromised if a texture would ever appear due to sharpening. With masking at 19 we still have some patterns that show up and indicate that we will probably have some texture there. At 71 level the background is almost flat in black and that means it won’t be affected. Software sees only variations, which ones will result in unnecessary and prejudicial sharpening, for image reading, which ones will be highlighting important edges that will better shape objects, that is something that only the person editing it can judge and decide.
In our first exemple, the one with a door, when I commented that the texture on the door painting looked less natural, the masking control would be good ally in helping to keep sharpening out of that region.
Those are the four basic parameters to configure in a sharpening to be applied to an image. In the above example, that was at the moment of opening a raw file. It is often called Capture Sharpening. Once opened, it will be possible to save it in jpg, tiff or whatever. But after opening in an editor like Photoshop, new sharpening can be performed, specially if image will undergo a resizing.
Over the image used in this example the following set of parameters was chosen:
- Amount: 86
- Radius: 1.7
- Detail: 45
- Masking: 64
The result, seen in detail, shows clearly the transformation. The cropping below is a sample without resizing (100%) for before and after. Both were saved with the same jpg compression level 9 in a zero to 12 scale.
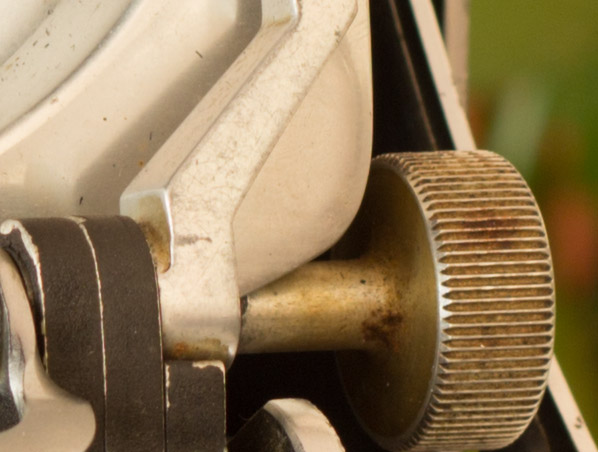
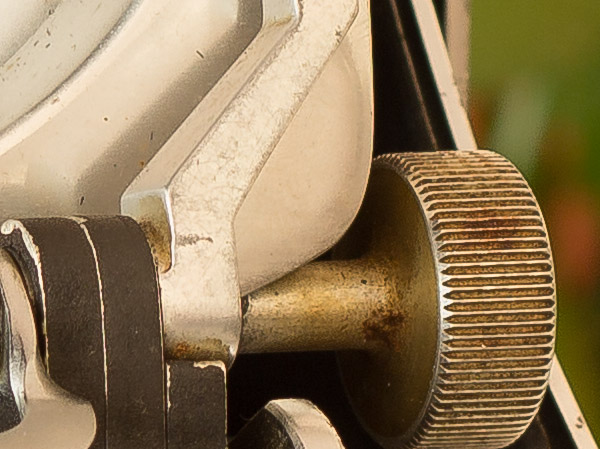
So far we were only concerned with sharpening made by raw converter. Normally, we don’t go too far in that phase and some more is implemented after opening. But as the objective here is about producing some visible changes there was a bit of purposely overdoing. Observations we can make about this image are: the background stayed reasonably protected. Some texture showed up on the passage from green to that brick color but the greens in themselves preserved their role as out of focus area due to short depth of field. The metallic mechanism gained with clearer edges, in line with their nature, specially on the big knob on the lower right. The lever positioned in diagonal, has now its scratches also highlighted. All of these facts bear possibilities of interpretation that will make this sharpening acceptable or not, an improvement or worsening of that image for a certain purpose.
Finally, looking both images, with and without sharpening, reduced to 600 x 400 px and saved with the option “save for web” in Photoshop Elements 11, rated as 60 in quality, in a scale going to 100, we have the following results:

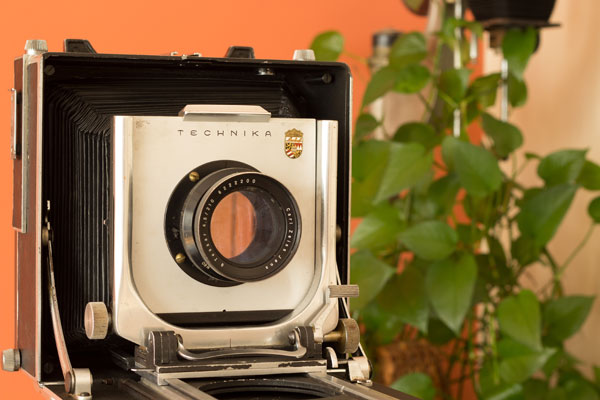
In that condition, looks like the treatment did not change anything. With some good will we can say that we can perceive somenthig here an there. But the considerable difference that we had before resizing, after this reduction to 600 x 400 px, is gone. But that is not bad in our exercise because it lead us to the next topic which is phases of sharpening.
Sharpening phases
Many image transformations that are part of editing routine and have effect over sharpness. For instance, by applying filters and resizing. That was the case with the Linhof picture. For this reason the sharpening process is normally seen as something that must be performed in more than one step. A typical sequence, that may differ from case to case is the following:
[mks_dropcap style=”square” size=”20″ bg_color=”#ff0000″ txt_color=”#ffffff”]1[/mks_dropcap] Capture Sharpening– If you are using raw then you have no way to bypass this step while opening the file. If you don’t do anything the raw conversor will do it for you using default values. Normally they are: Amount=25, Radius=1, Detail=25, e Masking=0. If that would be film, this moment would correspond to choosing a developer, time, temperature and agitation. Who simply hit OK in raw converter is like that guy that sends the film to an external lab and let them develop it according to the factory standards. Well, as you are reading this, probably your idea is to analise, having in mind what each converter parameter does, as we have seen above, and interfere in a way to open the image on the direction you intend it to go.
[mks_dropcap style=”square” size=”20″ bg_color=”#ff0000″ txt_color=”#ffffff”]2[/mks_dropcap] Creative Sharpening – Once the file is opened, it might be interesting to use sharpening as a retouching tool. In this phase it will be probably more local, over specific elements in your photograph. Typical case are eyes that we want very well defined, also texts may annoy if they look blurred because we know they are not in real life, it will always depend on the picture and the intention with it.
Specially for those who skipped the raw and opened directly a jpg or other format, image editing softwares offer in their menus Unsharp Mask, Adjust Sharpness, Smart Sharpen, and might there be other names. Basically they use the same parameters, the ones we discussed above, although running different algorithms, and they act over the image as a whole. Considering that you can set Masking or Threshold (another name) to protect some parts.
For this Creative Sharpening, when you want a really localised approach, there are two basic methods:
- Sharpen with a brush: Use the tool sharpen (in the tool box, for Photoshop Elements 11 it is together with smudge and blur). This is like a brush and can assume several formats, sizes and strengths, the latter corresponds to amount when you set an overall sharpening. There is also “mode” that is generally set as luminosity with the aim of preventing colours shifts. The reason fot this is that as in sharpening we will boost contrast it might happen that a RGB channel will be clipped, and coloured contours may show up in retouched areas. Those may not be visible on screen but will be in a final print depending on its size. Once those parameters are set then you just have to work the areas you want to sharpen with the defined brush. It is advisable to use a low strength as you can pass the brush several times and follow the effect building up slowly till the desired level.
- Sharpen with layers: The second way to act locally is using layers. You duplicate the background layer and work the new one with Unsharp Mask, Smart Sharpen or equivalent, accessible from main menu. Those methods will act over all image but, as you have the original underneath, on background layer, the last operation will be creating a mask layer and show/hide portions of the background through the new one. It is possible to create further layers and go for more complex combinations.
To the 600 x 400 Linhof’s picture I used the sharpen tool. Front of the camera, before and after, are reproduced below:
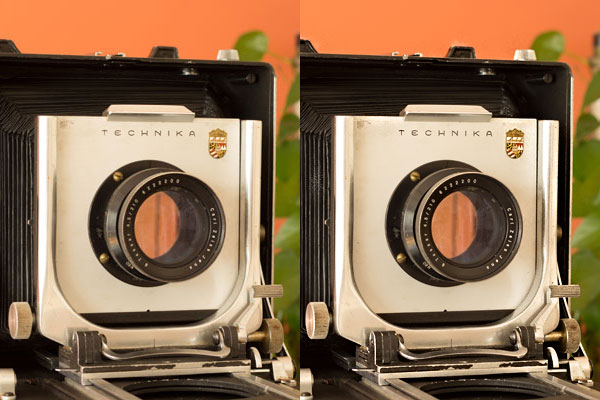
What I did was to heighten the bellows folds, mostly to show the effect, as this is not of great interest. The name Technika was also worked on and the same for text on lens ring. The highlights on lower metallic parts were also boosted and that goes well with their real hardness.
[mks_dropcap style=”square” size=”20″ bg_color=”#ff0000″ txt_color=”#ffffff”]3[/mks_dropcap] Output Sharpening – After Capture and Creative Sharpening it might be interesting to perform a last revision bearing in mind where and how the image will be displayed. In the case of print there will be differences for sharpening between mate or glossy paper, white or beige, and other parameters. The size of printed image and the distance from which it will be seen, also may ask for more or less sharpening in some areas and that could be considered in the out-put sharpening. But this is the kind of adjustment that varies enormously according to several conditions then we will leave it just as a reminder about using sharpening one last time considering the physical image and its display conditions. The basic principles and tools are the same seen above.
Which values for parameters while adjusting sharpness?
As for the values, for beginners, it is always a question mark either are we being “normal” or not. So here it goes some initial guesses to start from:
- Amount: Something between 50 and 100 is a good range to test. Use the other parameters in order to control how this strength will be applied.
- Radius: For images coming from regular digital cameras, between 12 and 25 megapixels. Values around 1 pixel are in general enough and prevent exaggerated outlines to show up. Very rare to get close to the limit 3. For web view images best bet is to stay below 1.
- Detail:Even if set to zero, sharpening applies. The only thing is that only more sudden variations will be considered. The problem, on the other extreme, is that if you raise it too much, you risk having a lot of noise, as any small variation will be considered. Try the default value 25 and raise it up as you wish but always keep an eye on noise. Specially if you shot with high ASA sensibility.
- Masking: Very useful to hold an direct the other parameters and preserve areas where you don’g want sharpenig. There is no standard value. Use alt/option key if available or make some tests. If your image has out of focus background, sky or flat coloured areas, for sure you will gain by setting something for masking.
Good practices
Finally, just some attention points that might help:
- For those knowing how to use sharpening, it constitutes one reason more to photograph in raw.
- If images are not too much big, intended for web, for instance, set them always to 100% zoom while sharpening them.
- The preview window for sharpening and the image on the main window are independent in regards to zoom. While working with bigger files it might be interesting to use a double view with 100% on preview window and the general view on main window.
- There is no general rule, but considering the principles over which sharpening works, think critically your work-flow and the ideal moment to sharpen your images. Actions like resizing or filters, should be done before sharpening, in general. The best will be always consider case by case.
- Sharpening is something to be felt and not seen. When you can clearly notice a reinforced edge in picture, when objects start to show an outline or halo, probably sharpening was exaggerated. Later, when you will have the “before” all forgotten, the “after” will disappoint you.
- Even if you know in advance that your image will be for screen view, bring it to its best in sharpening in its original size before resizing it. The second sharpening works better over an optimised image.
Well, I hope this was useful. Sharpening may help a lot in counteracting some native but unwanted characteristics in digital imaging and also allows for some stylistic tricks a la Tintoretto as they are very fashionable nowadays.