Bellows project tailor-made for you
obs: none of the fields in this form can be set to zero
The above application will create a .pdf file with a design of a bellows according to the specified measurements.
Instructions to fill:
Bellows internal dimensions
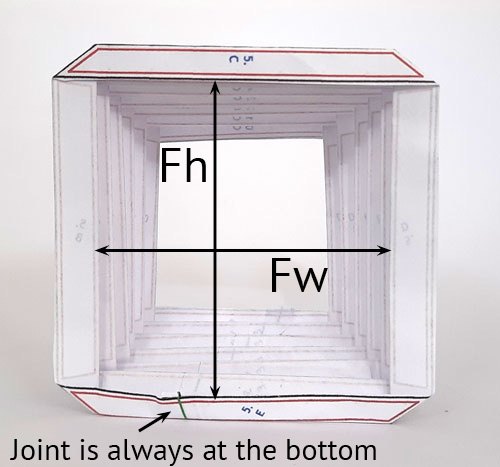
In Fw and Fh, F means film side, w means width, and h means height. These are the internal dimensions of the bellows at the film side opening. Do not trust the format advertised for the camera. A 6×6 cm, is generally not 60 x 60 mm, this measurement is approximate. Better directly measure the aperture on the back of your camera.
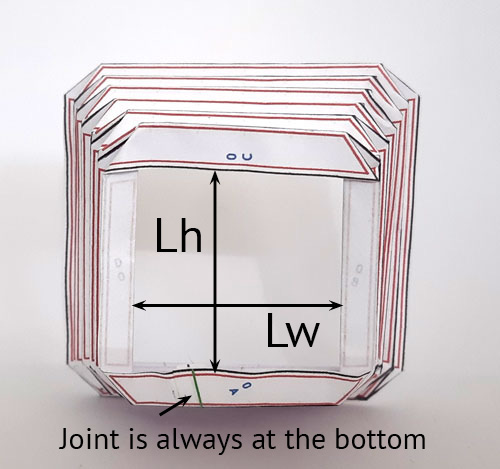
In Lw, Lh, L means lens, w again means width and h means height. This is the side that goes on the lensboard. Typically on more recent cameras, this plate has a circular opening, in which case Lw and Lh can be filled with the diameter of that opening. Consider also the lens flange as it will share this space with the bellows, that means, Lw and Lh a bit larger than the diameter may be a better choice. In older cameras, especially in wooden ones in half-plate or full-plate format, we normally find a rectangular or square frame similar to the one on the back.
Pleats width
The width of the pleats should be as wide as possible. Very narrow pleats are more difficult to fold and are too numerous to cover the same length. A very large number of pleats increase the thickness of the bellows when retracted and in extreme cases it may not even accommodate within the space reserved for it when the camera is closed.
Rear, film side
There is usually a wooden or metal frame on the back of the camera, on the film side where the bellows will be attached. Check it and make a note of what useful width this frame provides. It often has a certain dimension that in itself is OK, but at some points you will find obstacles to gluing the bellows. Hinges, springs or rods to drive a rangefinder are typical cases. Also keep in mind that the width of the bellows border will be the same on all four sides, but it might not always be the same on the camera, so you need to choose a measurement that can accommodate these irregularities. This pleat width is represented as Ft in the form.
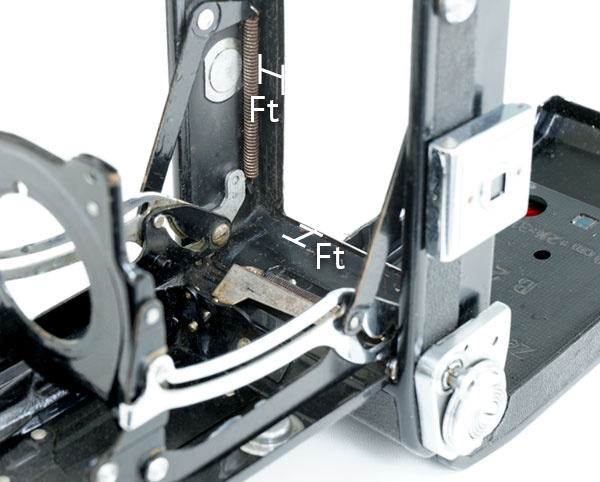
Large format cameras are usually not a problem. But for some of the small ones, the space for glueing is very limited. In this Ikonta from Zeiss Ikon, 6×9, it can be noted that the shorter side of the bellows needs to be glued to the camera wall. While the longest side, measuring ~9 cm, has a spring on the way that makes things more difficult. It is necessary to think well which width to give to Ft and set up a strategy for pasting.
I do not advise contact cement or any instant glue. Those based on epoxy with a longer drying time and which allow the pieces to be repositioned until the ideal fit is found are more suitable. Another possibility, in these more difficult cases, is to glue one side and wait for the glue to dry completely before gluing the next one.
Front, lens side
On the lens side it’s the same reasoning, observe and note, around the lensboard opening what space available you have to fix the bellows.

Again the small cameras are the most problematic. See in the image above how narrow the space for gluing the bellows is. This is again the Ikonta 6×9 cm. The connecting ring needs to fit into the folds. One thing that helps and is worth remembering is that the outer corners of the bellows are beveled. This helps to accommodate it in round spaces or when there is an obstacle at the corner. This pleat width is represented as Lt in the form.
Bellows central part
In some cameras it may be interesting to choose a smaller pleat width for the ends of the bellows and a larger one for its central part. This app allows the first 3 pleats on the film side and the first 3 pleats on the lens side to be sized independently of the middle of the bellows.
With this feature, it is possible to optimize the bellows design for cases in which the bonding area is very narrow on the film and/or on the lens sides. Especially folding cameras, like the Ikontas (example above) . They usually have a very narrow metal border on the film part.
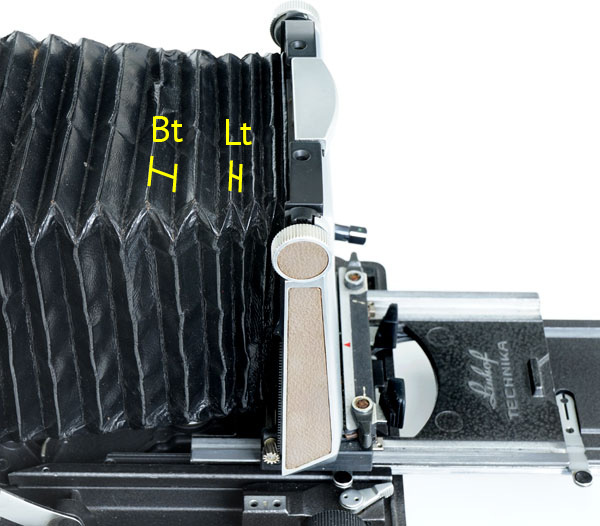
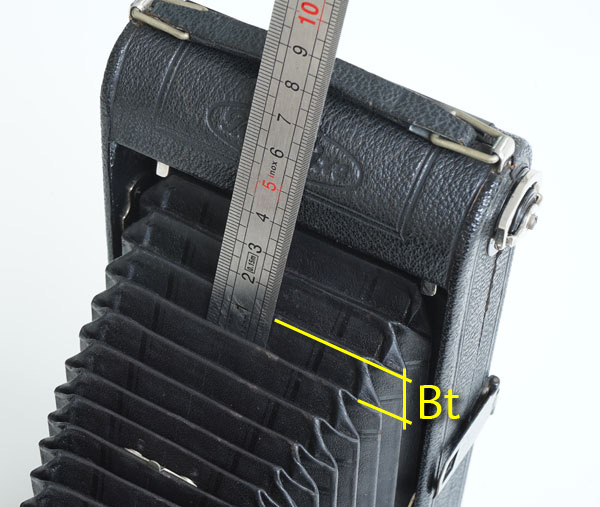
Others, like the Linhof Technika V 4×5″, have a lensboard with a large round opening compared to the lensboard itself. This is in order to accept a variety of lenses. But the result is that a very narrow edge is left for the bellows to be attached. In these cases, it is better to reduce the width of the pleats that are closer to the lens. Note that this was done on the original bellows as shown in the above piture. The result is that with a wider Bt the number of pleats is kept reasonable and with a smaller Lt it is easier to fix the bellows in the reduced area around the lensboard opening.
Adjusting parameters for pleats widths
- Bt represents pleats width on bellows central portion
- Ft represents pleats width for the first 3 pleats at film side
- Lt represents pleats width for the first 3 pleats at lens side
For most cameras, especially large and older ones, you will notice that Bt, Ft and Lt can be the same value, ie the width of the pleats can be regular throughout the bellows. When you have to change, try not to exaggerate the differences. If you have the old bellows, observe how it was made. If you don’t have one, look for an image on the internet and try to be consistent with the original. Normally, Ft and Lt will go down to no more than 60% of Bt. As already said before, very narrow pleats are also very hard to fold.
For medium format cameras, widths generally range from 7 to 10 mm. Avoid anything under 5 or 6 mm. Quarter plate cameras usually demand 10 to 12 mm. Half and whole plate can go up to 20mm or even more. The bellows is not absolutely rigid and it will always have some tolerance to accommodate it into the camera.
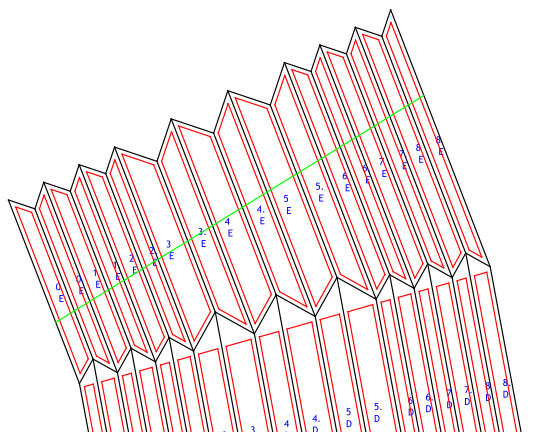
The illustration above is a bit exaggerated to highlight the difference in the width of the pleats. It is a tapered bellows that has the first 3 pleats with 5mm, then another 3 with 8mm, in the central part, and ends with the last 3 having 5mm on the film side.
Maximum bellows extension
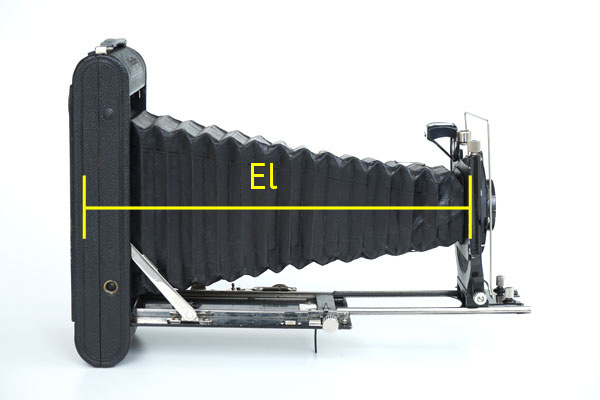
El, stands for extension length , is the maximum distance the bellows will be stretched. Folding cameras like the Ikontas have a bellows that always extends the same distance as the focus is done on the lens only. But large-format cameras typically offer wide variation. That is aimed to accommodate lenses with very different focal lengths. In these cases, it is necessary to set the camera back away from the lensboard as much as possible and measure the distance between the stops where the bellows will be glued.
.
Above is an 8 x 14 cm Zeiss Ikon Nixe that has a rack and rail and can advance the lensboard quite a bit for close-up shots.
IMPORTANT:
Do not put any “extra” in this measurement as this will be done in a more controlled way in another form field, as explained below.
Bellows extension factor

Bf, means Bellows Factor, if you put 1 it means that when reaching the maximum extension the faces of the bellows will be flat. It will be fully stretched out like a regular tube. It will present in this condition the length specified in El. As this situation must obviously be avoided, as it stresses the materials a lot, it is advisable to make the bellows in such a way that it is a bit relaxed even at the maximum extension of the camera. A typical value for Bf is 1.3 which leaves the folds still quite loose when the bellows are at full length.
The drawing above gives, for several values set as Bf, an idea of the angle at which the folds are when the bellows is stretched to reach measurement El, maximum extension. It is worth noting that for small cameras, when focusing is done by rotating the front lens element, a Bf of 1.2 may be sufficient. The larger the Bf, the more folds will be introduced and the thicker the bellows will be when closed, risking it to be difficult to fit it inside the closed camera. If you have the original bellows look at it and compare it with the drawing above and decide on what value to use for Bf. In addition to appearance evaluation, a good way to gauge this issue is to look at the number of pleats your design will generate. This is explained below.
4 or 5 faces
This decision is related to the form of construction that will be used.
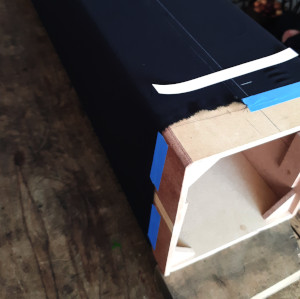
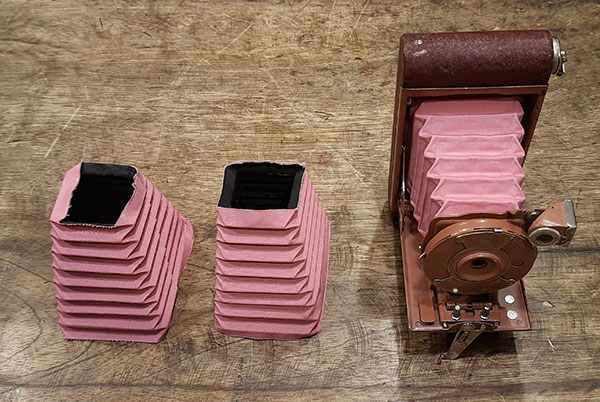
If you are going to make wood template or other rigid material and glue ribs onto a tissue wrapped around it, then with just 4 faces you will already have everything you need. This is what the photo below shows.
If the bellows will be made on a plane surface, without a three-dimensional template, then you will need the 5 faces to cut the two ends and with them make the seam to have a tube that will be folded later. The photo below illustrates this situation.
The only advantage of making the design with 4 sides is that for very large bellows the cost of printing the design can be reasonably more affordable than with 5 sides, as the value is usually charged per area. In the worst case, the printer may not even have enough paper roll width to print the 5 sides and if the 5th is not necessary it is better to keep only the 4 that will actually be used.
Number of pleats
The number of pleats that the bellows will have is not entered directly on the form. It is calculated from 3 parameters:
- Bt, Ft and Lt that define the widths of the pleats
- El, which is the maximum extension of the bellows
- Bf, which is an over sizing to prevent the bellows from overstretching.
When the preview is shown, the number of pleats that resulted from the parameters you chose is displayed as “pleats”. If you have the original bellows and notice that the new design has too many or few pleats, you can redo the design by changing the above parameters.
the smaller the Bt, the more pleats the bellows will have
the greater the El, the more pleats the bellows will have
the greater the Bf, the more pleats the bellows will have
Making a fine adjustment it is possible to arrive at the number of pleats of the original bellows or something very close. Of course, you have to consider that after changes it will be still possible to glue and stretch the bellows to the required extent.
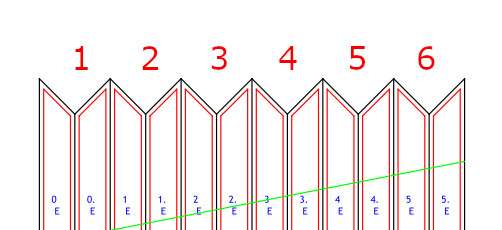
The way pleats are counted is in pairs, as shown in the illustration above.
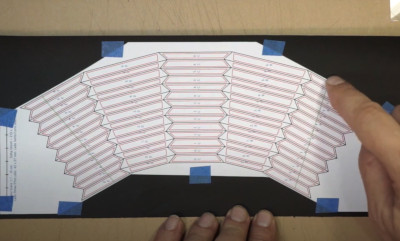
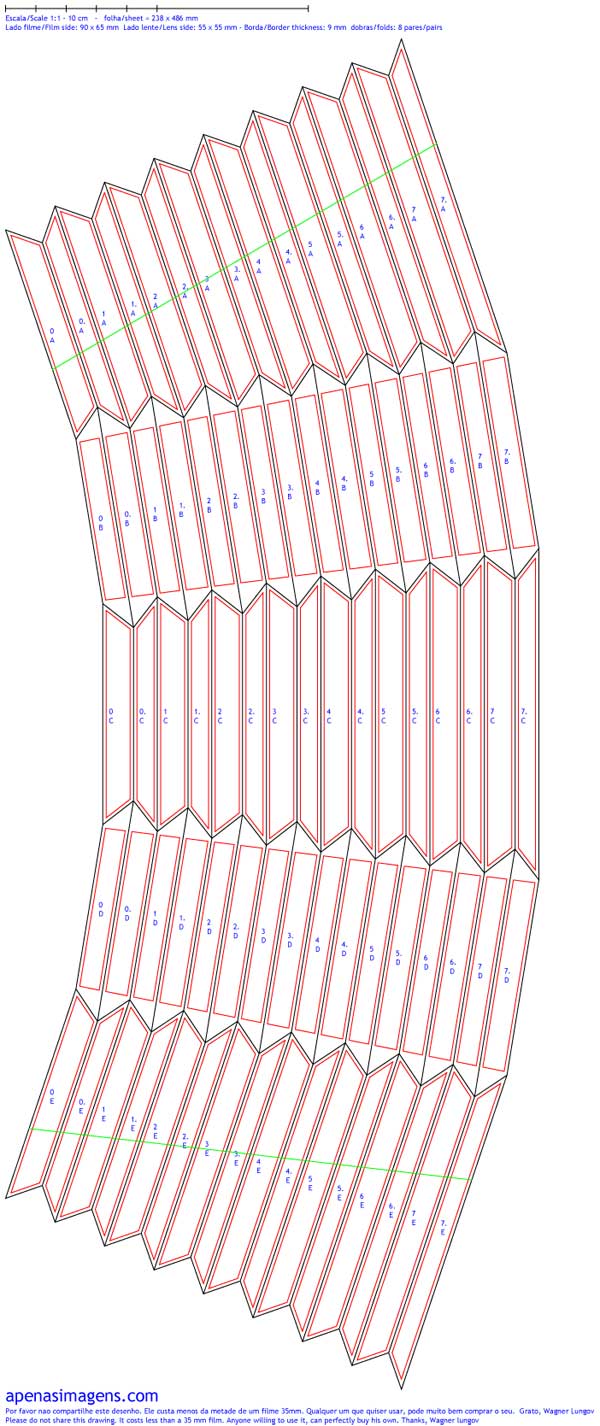
Understanding the final drawing
The drawing is already in the 1:1 scale, that means, when printed it will already be in the correct size for making the bellows. It is a recurrent problem that print shops have by default the “scale to fit” check box checked at the moment of printing and so the drawing comes out over or under sized. It is better to underline that you want it at 100% or actual size.
- The black lines correspond to the fold lines and are for the option where the bellows folds will be creased.
- The red lines correspond to the cut lines to create the “ribs” of the bellows, the stiffeners that make the fold happen in the right place. It is the option generally adopted when the bellows material is very soft and needs to be structured. This happens more in cases of large-format bellows made on three-dimensional templates.
- Text in blue is intended to be engraved or printed to easy identification and positioning of the ribs after they are cut. This may be desirable on tapered bellows. It also brings the measurements and a scale for checking whether the printing was correctly done at 1:1 scale.
Paper bellows for small cameras
For cameras up to medium format it is possible to make bellows only from paper. Watch the video below where the process is shown end to end.
Price and conditions
- The price of a project, whatever its size, is Brazilian Reais R$ 25.00
Click and check in a new tab how much is that in USD, Euros or pick any other currency in XE.com Inc website. - It is not necessary to have a Pay Pal account, you can pay with virtually any credit card within the Pay Pal environment
- Check the measurements in advance. Before you hit the “buy now” button a preview is shown. It allows you to check the overall appearance of your project and number of pleats. That denounces most of the mistakes people usually make, like wrong units (not mm) or absurd, inconsistent values. It will not be possible to obtain another project without a new payment.
- The project is for a single user and non-transferable. The low fee charged is intended to avoid spammers, to allow wide access to photographers around the world and to help with the maintenance and expansion of the site. Please do not distribute or share it.
How to access your project
Once you have paid your project using PayPal platform this site will quickly receive a notification. Normally it is a matter of seconds. But I do not control that. When this notification arrives the file will be made available online. You have to open a new window in your browser and load the following URL:
https://apenasimagens.com/wp-content/extra_code/bellows/archivB/project_number.pdf
Replace project_number with your actual project number.
Where is it? The moment you hit “preview” you will see a draft of your project and will be informed about a number like BL01830. Remember to write down this number as this is your key to access your project. The URL has the following format:
https://apenasimagens.com/wp-content/extra_code/bellows/archivB/BL01830.pdf
Save this file in your computer and that is your project. Don’t wait more than 30 days to retrieve your file or you risk that it was already deleted.
I had an automatic email sent with this link, but nowadays there are so many barriers for automatic emails and so often I had to send the file manually that I decided to go for this URL approach. I am no longer sending the link by email.
In case of any problem or doubt, please contact me using the contact link in the upper menu. Please mention your project number.
Why is that so cheap?
That is because you will probably have to do it more than once. I have done about a dozen of bellows for my own cameras and I still end up having to do it again because it does not fit correctly. Specially small cameras, like this Kodak Rainbow, that I nailed only on the third attempt. The problem is that once the drawing is rendered in actual paper and fabric or any other material, the real dimensions do not correspond 100% to the ideal dimensions. I have no means to foresee those changes so what I can offer is the geometrically ideal bellows.
Good luck with your projects!
hello, is it possible to pay directly with card without paypal?
thank you
BL07863
Hi, I don’t have means to charge directly your Credit Card. But notice that you don’t need to have an account with PayPal to use your Credit Card. They accept a one time payment without a login. If your concern is about security, you can generate a virtual Credit Card and use it to pay within the PayPal environment.