If you consider adding some chemistry to your photography, but are uncertain about the difficulties in setting up a darkroom in terms of time, work and money… then this post is for you. The idea is exactly to reflect upon ways and alternatives to leave for a while the digital. I say “for a while” as in many other areas in contemporary life, the best solution is probably something hybrid. That means that it is possible to go step by step, adding or suppressing phases, and figure what is your ideal combination of things to do digitally and things to do with films and chemistry and provide you satisfaction and good results in your photo practices.
First thing to do is about breaking down the whole process, from shooting till the final print, in three big and somehow independent steps that involve different equipments:
- Taking a photograph
- Producing a negative from exposed film
- Final print
About each one of those three steps we will try to answer the questions:
- Which are the characteristics of film photography in this phase?
- Which are the characteristics that are attractive for you in this phase?
- What is necessary in terms of equipment and processes to implement it?
From the answers you shall have a clearer vision about alternatives, attractiveness, difficulties and costs. Based on that you will be able to think a concrete project. Let us then reflect about what is possible and go opening up possibilities. In this post our focus will concentrate in the first step, “taking a photograph” so we will go through the three question in regards to camera and the act of shooting with them.
A. Taking pictures with film
1. Which are the characteristics of film photography while taking a picture?
Among film cameras there are option to every taste and every budget (not necessarily matching the desirable with the more expensive). In this post we will be oriented to used cameras, antiques, the classic ones. They serve well for considerations about different types and, later, willing to acquire a new one, if still in production, why not? So we will be talking about brands like Leica, Rollei, Linhof, Contax, Graflex, Minox or the japanese, very much linked to the boom of Single Lens Reflexes 35 mm, such as Nikon, Canon, Olympus or Pentax, and yet its ancestors like Contaflex, Bessamatic, Retina Reflex. Those form the camera’s Pantheon for the XXth century. They were the premium segment at their time and still command a certain price. But there are others which are symbols of their age for having, on the contrary, popularised photography, talking about Kodak Nº2, Box Tengor from Zeiss Ikon, Kodak Instamatic, Olympus Pen. We have yet, if we go even further in time, wood cameras from the XIX and beginning of XX centuries, using tripod and ground glass, many of them unbranded. When we enter that category the strong brands are naming their lenses and there we have Voiglander, Ross, Dallmeyer, Hermagis, Wollenkak, Goerz and so many others.
So, to start answering the above question, the first thing we can say that film offers is history. Each camera or lens from the film era has a foot in the past and blends with it. The photographer’s gesture is plenty of meanings and when you use a classic camera you, almost ritualistically, reenact those meanings in a new moment, new context, you reinstate it. You become part of a tradition. To look downwards in a Rolleiflex, to cover your head in a view camera, to look through a Nikon F, to aim a Kodak Nº2, without knowing very well what is in frame and fire anyway, to flash a Magicube in a Kodak Instamatic on your friends face, or, for not going to far with the list, to fire a GE nº11 in a Crown Graphic while looking through its sports finder, all of that has to do with lifestyle, parties, family, relationships, wars, stolen scenes, historic events, intimacies and all that forms this voluminous river we cal culture.
Passing now to the side of obligations, film photography demand a certain discipline. Either the camera has no adjustments and you have to meticulously select your subject, or, it is very flexible, plenty of adjustments, and you have to be careful with each one of them. In former times, when one would take a film to print in those 9 x 12 cm photos, the store vendor would ask “only the good ones?”. “Yes, only the good ones”. The suspense would last for 2 or 3 days and after that, many would return with a 36 frames negative film and just a few photographs. That means, it is a must to study and understand the basics if one is decided to get some results from film photography. In digital, without even counting with the maternal tolerance of today’s equipments towards user mistakes, if something goes wrong, you will know it right away and will be able, most of the time, to shoot it again. With film, when you realize it, time, opportunity and material are gone.
When people see me in the clutter to prepare a shooting with a large format camera, very often they ask me: photos made with film are much better, aren’t they? I feel that if I say “no”, they will take me for an idiod doing all of that to get something worse. Then I say, without a lot of conviction, that it is different. It is very hard to talk about better or worse quality in such a subjective matter. If satisfaction is a parameter for quality, then we have to consider since the dealing with the object camera and camera gear till the final print. Technically speaking I tend to believe that digital is much better in all aspects. From a holistic point of view, I think that traditional processes gained a lot with the introduction of digital cameras and it is better as it never was before.
Where the pictures made with film are really different is in what we can call the lens signature. I am not talking about nothing spiritual or linked to aura and the like. This is an aspect that can be seen as purely technical considering only the image as a final result, before any aesthetic consideration (being conscious that the two things never completely disentangle). Let us see how: the camera is, at the bottom line, only a darkness provider where film and lens will talk to each other. The current lenses, with a-spherical surfaces, all number crunching made by computers, wonderful anti-reflex coating allowing for enormous number of glasses, all designed to correct distortions and aberrations to the maximum, they are, in a great sense, all similar amongst themselves. If you want to see differences, it is better to look graphs published in those comparison websites because picture against picture it will be more difficult. Those are the dream lenses of our ancestors and they offer a performance never seen before. But we are very sensitive in our image perception when things go out of norm and little changes in contrast, distortions, aberrations, focus, lack of focus, how the focus lacks… all of that we can feel although not necessarily verbalize. Add to that our good or bad obstinate tendency to undervalue all we have already accomplished and there it is: it looks like something is missing in today’s perfect lenses. “Signature” is an euphemism for lenses flaws, but those flaws are easy to learn to admire when the whole process, of taking and sharing pictures is considered. There might be a latent negation of progress surfacing our feelings and I will not talk about modernity crisis. But the consequence is that all of a sudden it seems very attractive to try out a portrait made with a plastic camera from the 60’s or, why not, with a big glass from the 1860’s, a Petzval lens! We want to see the bokeh produced by a Verito with a hollywood like lighting. A perfect image does not work when we are in want of something else then perfect. And here comes an argument that is 100% technical: to somebody trying to produce those images, between simulate the effects digitally and re-made them in the same way it was in former times, the second alternative is the most economic, productive and with a better chance of reliable results. More than that, to “look like antique” is not actually the objective, that would be just a counterfeit. What a person using processes and equipment from another time is looking for, is to exploit the intrinsic possibilities of that medium today. It is about inviting that object singularised for having survived its individual parcour, for having take part in a collective history, to become part of our own today’s life. Using films and classic camera it is all an only that.
2. Why should I like taking pictures with film cameras?
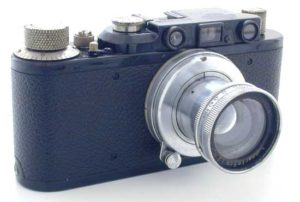
It helps if you appreciate machines and mechanism. You will get more pleasure by using classic cameras. If you are completely indifferent to the fact that in a Leica II from 1936, like the one on the left, dozens of little tiny metal parts compressed in a very small space and, notwithstanding that, move at great speed, almost in silence, every time the shutter is fired… then let us talk about other things.
It was aready said that some study is needed. As you are reading till here, study probably is not a no go for you. Study is important to help you in understanding causes and effects of each camera control, film characteristics, changes in light, etc, etc. Let us only state about it that learning is a process that never ends and mistakes will happen for ever. Unless you get accommodate with one solution and repeat it over and over again. Professionals, for instance, must stay away from risk, either they exhaustively plan and test, or keep repeating the same formula they know by heart. About those shooting for fun, very often they are to much anxious for necessary planning and testing, and are always willing to try out something new. If that is your type, be ready to endure a lot of fails with film.
Based on my observation, the most decisive attitude for people that use film nowadays, when we have digital technology, is an acute sense of stubbornness. It is a negation of what is obvious when obvious is what everybody does. It is not an exaltation towards the past, but like an alert that what is there today did not yet proved thoroughly its reason to be, so it is regarded with a bit of suspicion. If that resonates in any ways in your stomach, then you definitely should try out using film.
3. What is necessary in terms of equipment and processes?
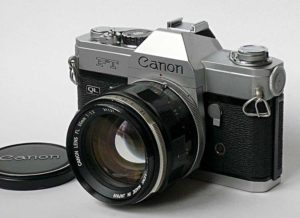
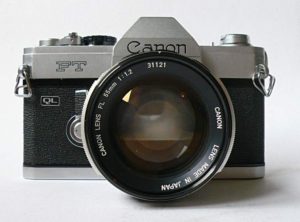
Enough for philosophy, let us talk about cameras. Among them there are two families very different and you must take that into consideration. There are those which are 100% mechanism and the ones electronically controlled. If the camera does not use a battery, it certainly works mechanically. If it needs a battery and does not work without it, or, in that condition fires with only one speed (in general at 1/60) then it is certainly electronic. Some cameras like the Canon FT, on the left, use a battery, but it only serves the light meter, while the shutter and aperture is all mechanism.
Well, I completely discourage you to start using films with any electronic camera. That is for a very simple reason: sooner or later it will stop working as the electronic circuits deteriorate over time and you won’t find replacement for those. A mechanical camera, a good one, works virtually forever if you take good care of it. Some leather parts, plastics or rubber may dry out, it may need a cleansing or adjustments, but the means to restore it to working conditions are normally a craftsman issue, while nobody will make a new chip, by hand, to replace in an electronic Canon from the 90’s, for instance.
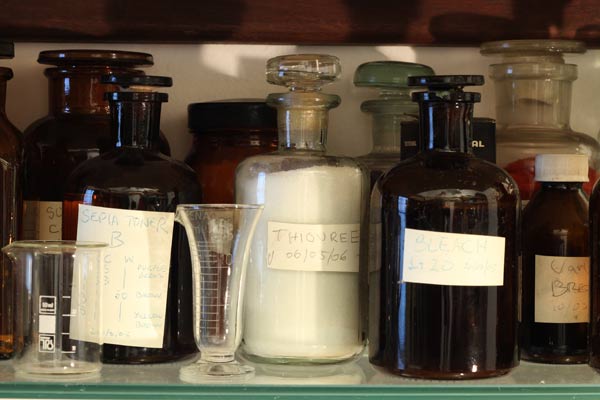
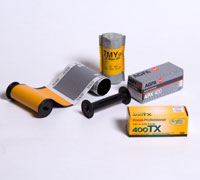
Even with that constrain, there is still a sea of possibilities. The following question is the most important and will determine the later workflow, that means, if you ever decide to really set up a darkroom, for each kind of camera there is a different process about going from negative to print. The key question here is: what will be the film format for your camera? Many people go directly to 35 mm, many people only know 35 mm, but I think that this may be a hasty choice. I am not talking here about availability of film in the decades to come. Let us consider that this is something that affects all film formats the same. The plummeted film demand for companies like Kodak and Fuji was terrible, but market is getting adapted and smaller firms in Eastern Europe and China are offering alternatives. We will not consider even the coloured film. Who wants colour, probably will opt for digital. A darkroom for color only makes sense in large scale production. Let us then consider the basic options in film formats for black and white film.
The folowing chart is not intended to be exhaustive. I will concentrate on film that can be easily found at the time of publishing this post. The smallest will be 135, although there are even smaller like the ones used by Minox. As miniature and sub-miniature are very specific, we will not consider them in this post.
[mks_col]
[mks_one_third]
[mks_pullquote align=”left” width=”200″ size=”18″ bg_color=”#dd0000″ txt_color=”#ffffff”] 135 film [/mks_pullquote]
Type 135: Always in cartridges. It is possible to buy bulk film in 30,5 meters roll and spool it in old cartridges or buy new ones designed fot that. With 30,5 metes you make about 20 films with 36 frames each. Above you see one of those spoolers that allows usage in a lit room. The normal frame for 135 is 24 x 36 mm, some camera, like the Olympus Pen, make half frame, 24 x 18 mm, and doubles the number of pictures for the same roll. Unless you use very fine grain film (slower ones) be ready to see grains in your pictures larger that 10 x 15 cm. Depending on the subject it might be nice but it can also be annoying.
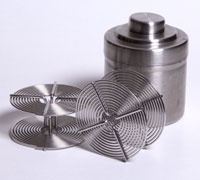
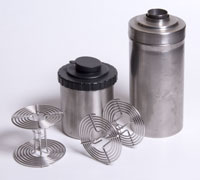
Development: You can send it for an external laboratory or do it at home in tanks that only demand total darkness while being loaded with film. Afterwards, chemistries are added and changed in normal lighting conditions. It is a very easy process to learn and not expensive. Below you have the spiral that receives the film and a stainless steel tank. There are other models in plastic that work as fine based in the same spiral principle.
[/mks_one_third]
[mks_one_third]
[mks_pullquote align=”left” width=”200″ size=”18″ bg_color=”#dd0000″ txt_color=”#ffffff”] medium format[/mks_pullquote]
Type 120 – Presented in reels, there is no cartridge, film is spooled with only a light proof paper protecting it. Format is given by camera with the condition that the maximum height must be 6 cm as this is the film width. Normal sizes you will find in cameras are: 4,5 x 6 cm, 6 x 6 cm, 6 x 9 cm and with them you can make, respectively, 16, 12 and 8 pictures. The square photo is a nice challenge in terms of composition and it was explored from 40 to 60’s thanks to the Rolleiflex, using 120 film.
Development: It is also done in small tanks using spirals. As the tank diameter is the same used for 135, the ideal situation, is to go after a bigger tank in which you will be able to process both sizes. In any case, it is always good a tank with more room than just one spiral as this helps to produce a more uniform agitation. But it is also possible, it only takes more care, to process in a small tank able to carry only one spiral.
[/mks_one_third]
[mks_one_third]
[mks_pullquote align=”left” width=”200″ size=”18″ bg_color=”#dd0000″ txt_color=”#ffffff”]large format [/mks_pullquote]
Sheet – Sold in boxes having normally 25 or 50 sheets. Need total darkness to be loaded in film holders. Sizes vary a lot and it is not as hard as it may seem to cut down sheet film to fit odd sizes from some antique cameras, you only need a trimmer. The inches system, and metric system, deal with sizes which are close but not a all the same. That means you need specific film holders and a 4 x 5″ sheet will not fit in a 9 x 12 cm. Cameras can normally handle both film holders. The common sizes are: 2¼ x 3¼”, 4 x 5″, 5 x 7″, 8 x 10 “, 12 x 16” and 6,5 x 9cm, 9×12 cm, 13 x 18 cm, 18 x 24 cm, 20 x 25 cm, 30 x 40 cm. There are even bigger ones and some different for landscape or stereo cameras.
Development: May be done in open trays, with or without film hangers, in vertical film hangers inside tanks and also drums. Normally it is performed in complete darkness till the first minutes in the fixer. It is not as hard as it may seem at first sight. In the case of sheet film there are more options and one can find a personal and creative one. In the picture bellow I show what I use, trays and film hangers in PVC homemade tanks.
[/mks_one_third]
[/mks_col]
[mks_col]
[mks_one_third]
[/mks_one_third]
[mks_one_third]
[/mks_one_third]
[mks_one_third]
[/mks_one_third]
[/mks_col]
Let us now thing what can be done with each format once you have the negative. Later we will consider the cameras that use them. There are basically three options (click + for more details)
[mks_accordion]
[mks_accordion_item title=”Contact print”]
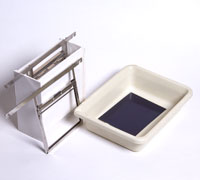
 Printing by contact is done when you sandwich the negative with glass and photographic paper or equivalent. There are contact printing frames designed for that. The ones on the left are vintage ones and work very well for sheet film. It is plainly possible to improvise with foam and a normal glass plate. Normally you set things in place under safelight, and then turn on a time controlled light, not very much diffused. A regular bare lamp 1,5 meters above the contact printer will do but ideally an enlarger produces a better quality light. Of course, the print will have the same size as the negative.
[/mks_accordion_item]
[mks_accordion_item title=”Enlargement”]
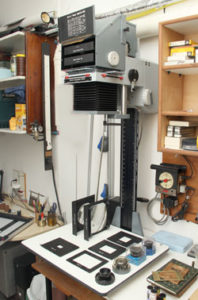 This is a process that projects a negative’s image over the photographic paper. That is the case when you want a print bigger than negative. The enlarger has negative carriers for different sizes from the smaller till the biggest one that it can handle. It has a lens that must have a quality at least matching the camera lens quality in order to make best use of a negative. Has also a column to adjust distance from head to baseboard and get the enlargement as you want it. Focus is obtained by varying the distance film/lens and there is normally a bellows for that. On the left it is a Durst Laborator 1000 able to enlarge up to 4 x 5 ” negatives. On the baseboard you can see different negative carriers, lenses, and condensers.
[/mks_accordion_item]
[mks_accordion_item title=”Digital Scanning”]
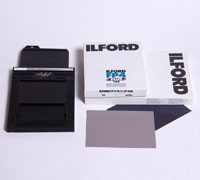
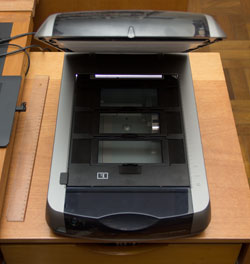 There are home scanners able to scan films. Basically they turn off the light for documents and use another one on the scanner lid. This one scans together with the reader that still goes beneath the glass. It is very important to have negative carriers suitable to your negatives. But is is possible to improvise with cardboard if your production is not high. The point is that negatives can’t be touching the glass as this causes optical interference (same nature that makes colourful reflexions over dark oils over water) and they spoil the scan. The scanner on the left is an Epson 4870 I bought in 2006 and still works very well.
[/mks_accordion_item]
[/mks_accordion]
Options for final print according to film format
Film 135:
Contact print: Thinking now on 135 film, I would say that, unless you have a special project, contact print is not an option. You would end up with 24 x 36 mm pictures without cropping.
Enlarger: That would be the default solution for this format. It involves two steps: develop the negative and print it, enlarged, over photographic paper. You can send your film to a specialised store and receive your pictures, that was what most people did before digital when there were photo booths everywhere. Or, you can develop and print at home, develop at home and print outside our develop outside and print at home. It is easier to develop but it involves more risks as you are dealing with the matrix and some mistakes may be fatal. But the process is simple and can be carried out in any bathroom with the possibility of complete darkness. Enlargement demands more resources but is in a sense risk free, you can play around, test, do it again and again till your satisfaction. If you are going to try doing your own enlargements I recommend, at the beginning, to send your film to be developed by professionals. In this way you secure quality at this initial phase, get to know what a good or bad negative is, and later you can start developing by your own with a standard in your mind. We will talk in detail about developing in the next post.
Scanner: It might be very iteresting option if you want to avoid any chemistry. If you appreciate the usage of classic cameras but prefer digital for post production, you can send your negatives for development and either receive them back for your own scanning or, receive already scanned in files. There are many shops offering that and also very affordable scanners for 35 mm film. Of course you can also develop and scan at home and that is still relatively low labor and investment option. Once you have it all in files, then you need to go for digital printing. At this point home printers will probably disappoint you and you will be most likely going to send your prints, at least the best ones, to be done in a specialised digital bureau.
Medium Format:
Contact print: In this case, it might start to get interesting. A home improvised darkroom for only development and contact print is relatively simple to set up and low budget. Picture sizes will be still small as the negatives are not that big. But a contact print yield such a sharpness and grain free image that in a way makes up for the size. Specially if camera lens and subject are good in details. In the past, many collections of small pictures were sold at sizes like 6 x 9 cm. That would be a good option to start with low engagement and test how do you really like dealing with film and darkroom. But in any case, I would recommend you at the beginning to send your films to a professional lab to get yourself aware of a standard. In this way you adjust one variable at a time. If negatives are not good, change your shooting, if the copy is not good, rethink your printing. Finally, if among your negs you find one that is fantastic for a big enlargement, you are, of course, free to send it to be printed the size you feel like.
Enlargement: The same considerations as for 135 apply. Add to them that an enlarger able to handle medium format will cost a bit more and demand some more room. But it is a good investment even if you are actually starting with 135. Because if you like it, and later decide to try medium format, you won’t need to go after another enlarger. Furthermore, it is possible to find very good deals with people just willing to get rid of a useless (for them) gear that needs reasonable storing space. About quality, it is a step change compared to 135. A negative 6 x 9 cm has 6.25 more area than a 24 x 36 mm. All subjects with larger surfaces with flat colour or delicate gradients will show in the picture a far more convincing image.
Scan: It can be also interesting if you want to leave film processing right after shooting. But about the question of scanning it at home or sending it to a professional digital lab, it is important to bear in mind that prices for medium format film scanning are higher than 135 film. I think they assume that it is a more professional format and charge more for that. It is a fact that files are bigger and more time consuming also. So depending on your volume and interest in doing it by yourself, it might be interesting to acquire a film scanner able to handle medium format. I believe that at the price of 30 or 40 scans you can buy a scanner and make thousands of them. So the equipment pays for itself quickly and you get full control over your image files. Check carefully if the specs give you sufficient autonomy towards the final size of your prints. Bear in mind also that digital printing, as it was said before, today is more likely that you will want them printed in an external bureau and that must be considered in terms of your budget.
Large Format:
Contact Printing: This is a very interesting option in this case and maybe not very much considered by those thinking about film photography. From 9 x 12 film size and bigger, a contact print is very beautiful and has image qualities which are limited only by the negative in itself. Compared with enlargement, the contact print has the advantage of eliminating one optics (enlarger lens) and then the final result will be at its best in terms of tonal range and sharpness. There are 13 x 18 cm and 18 x 24 cm films and at those sizes the contact print will be even better. Beyond that, it will be more difficult and expensive to find camera and lenses so let us stay at this threshold. A darkroom to development and contact printing is still very simple even in large format. Maybe even more that roll film as you can develop your negatives in trays. You can develop at home and also send it to an external lab. Prices for developing large format negatives are high and maybe you will even have difficulties to find a lab doing them, depending on where you live. So you probably will prefer to do it by yourself.
Enlargement: Untill 4 x 5″ an enlarger still has more human dimensions. It is normally a table top model and goes up to 120 to 140 cm in height. In regards to a 13 x 18 cm it is almost certain that it will be a floor model, harder to find and equip. If you are lucky enough to find one with all its accessories, and if you have space to accommodate it, don’t let it go. It is valid the theory that who does the big does the small, but you need the right film carriers and condensers if your are about to use a 13 x 18 cm enlarger to do 135 film. My advice is to stay at 4 x 5″ in most of the cases, considering that it also needs accessories for flexibility of doing smaller formats. A print made from a 4 x 5″ negative, at arms length size, gives excellent results. You normally won’t see film grain and tone gradations will be very smooth and pleasing if the negative was well done. It is a very attractive option, but a 4 x 5″ darkroom is something that demands more investment of space and money.
Scan: The same considerations as for medium format apply. A table top scan is limited only by the window size and the ones doing medium format can normally scan a 4 x 5″, normally one at a time. Again you can send them for scanning by a professional but the prices are quite high and you will probably be willing to buy your own scan. You have certainly a gain in quality (an size of your files) that won’t pass unnoticed. It is hard to compare but the amount of readable information in a large format film is something that if you are to get the same with a digital equipment, at least at the time of this post, you would need one of those digital backs for Hasselblads or Linhofs and they cost a fortune. From this point of view, shooting and scanning a large format film can be even an economic option for those aiming for extra large prints.
Cameras by film format
Finally, let us go through the options more frequently available if we consider the three formats above mentioned. We will talk about used equipment that can be found in antiques fair, flea markets, auction sites, camera stores, specialised fairs and yet found in a forgotten drawer in anyone’s house. Taking about cameras it is impossible to cover all possibilities so only the main types will be mentioned.
Cameras using 135 film
[mks_col]
[mks_one_half]
[/mks_one_half]
[mks_one_half]
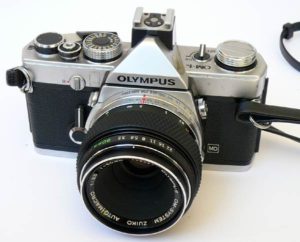
As stated before, let us stay away from electronic cameras, unless you have already one that is still working. In that case, of course, it is better to use it, at least in the beginning, and change it only when it breaks. If you plan to search with your friends, those are the easiest to find as they were sold by hundreds of thousands in the 70, 80 and 90’s. Most of them, intended for the serious amateur, are SLR and offer good resources and flexibility. That generation of cameras, has a visual more or less in line with the Olympus IS10 on the left, rounded shapes and mono bloc aspect, not that far from what we have today, plus a LCD display or Leds (both old type) where it is possible to read some camera adjustments. It is absolutely a must that you read the manual. In case you don’t have it, it is certainly possible to find it on the web.
[/mks_one_half]
[/mks_col]
[mks_col]
[mks_one_half]
[/mks_one_half]
[mks_one_half]
Going back in time we find the classic all mechanic japanese Single Lens Reflex cameras. Some examples on the left. That kind of camera offers a good control on the main parameters for picture taking: time, aperture and focus. Some present auto-exposure with a coupled meter, some just a meter visible or not in the viewfinder and some no meter at all. But they are all completely manual if you want. A good advantage is that many of those cameras were part of a “system”, and there are many lenses available, going from very wide angle till very long tele objectives, and many other accessories. If you have a Digital SLR, or DSLR, know that it probably accepts directly or with an adapter ring, old manual lenses. I have a Canon Rebel T3i and a very good Zuiko-Olympus set of lenses. I bought an adaptor, made in China, and now all of my Olympus lenses are suitable for the camera. Not bad, using a 50mm f1.4 or a 300mm f4 and feeling like you didn’t buy it. This is something to consider while looking for an old SLR.
Those cameras are very versatile and can be adapted for many different subjects. But exactly due to that flexibility they tend o steal photographer’s attention keeping him preoccupied with adjustments. The remedy for that is to practice a lot till it all becomes natural and intuitive. But bear in mind that it requires dedication and may take some time till you will feel really at ease with those cameras.
[/mks_one_half]
[/mks_col]
[mks_col]
[mks_one_half]

[/mks_one_half]
[mks_one_half]
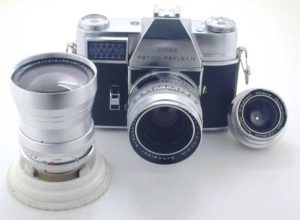
Going even further in the past, we will go up to the first Single Lens Reflexes. We will find the Contaflex, Bessamatic and Retina Reflex, among others. Those are beautiful cameras and their optics do not disappoint. We have to consider that later lenses in the 70’s, calculated with the aid of computers, logically, offer a better performance. But when you hold a Contaflex in your hands, all of a sudden, logic does not matter that much and you will be ready to love all that it does. As the optics in those lenses are actually also technically speaking very good, you end up seduced by them. But for anyone used to more recent cameras that generation will show the face of their age. The mirror does not go back in position, that means that after firing the shutter viewfinder is blind till you rewind it again. The finder shows a slightly smaller part of what is actually being captured. Focus through the lens had yet to be improved with finer ground-glass. The weight of this cameras may also be an inconvenient to some photographers. Well, try it, it is harder than with recent SLRs but probably you will be willing to get used to all of that.
[/mks_one_half]
[/mks_col]
[mks_col]
[mks_one_half]

[/mks_one_half]
[mks_one_half]
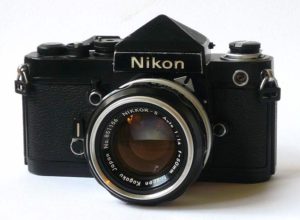
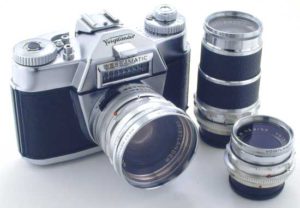
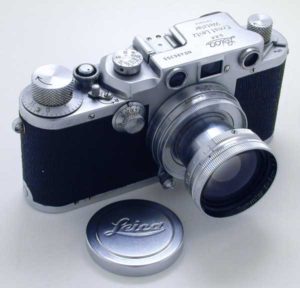
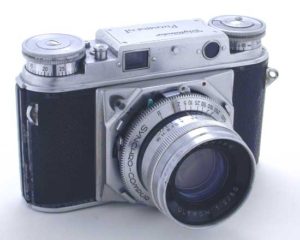
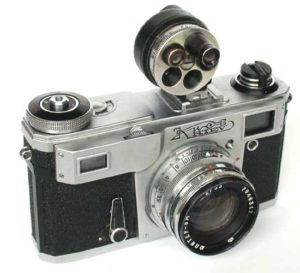
Another family inside the 35mm format is the viewfinder cameras. In that case, the lens is used only for picture taking while the framing is performed using a parallel optical devide. For that purpose there is a viewfinder somewhere above the lens in camera front panel. Among those cameras some have and some do not have a rangefinder. The ones with rangefinder present a second, maybe a third, small window at front panel. The ones with only one extra window (like the Contax or Prominent on the left) have a coupled rangefinder. That means you will find at the center of image viewed through viewfinder a second image captured by the second window. When you turn the focus ring the two images will split or coincide. When they coincide the subject at the center is in focus. The ones with uncoupled rangefinder work the same way. The only difference is that you have one viewfinder for framing and another for focusing (that is the Leica on the left, square is a finder and round ones the rangefinder). It is not that hard as it seems when described. One advantage of that system is that the viewfinder is brighter than in SLR, as it is a direct image without mirrors, prism and ground-glass. That might be a difference in night photography. In general, those who use SLR find the rangefinder cumbersome and vice versa. The point is that it takes training till you find yourself at ease with anyone of them.
Among the rangefinder cameras we have the hyper classic Leica, used and loved by Cartier Bresson, for instance, there is a Contax from Zeiss Ikon that also brought a lot of innovations and it is an excellent camera. There is of course a great attractiveness due to the history of those cameras and lens and overall quality, are at a very high standard even if compared to far more recent equipment.
[/mks_one_half]
[/mks_col]
[mks_col]
[mks_one_half]

[/mks_one_half]
[mks_one_half]
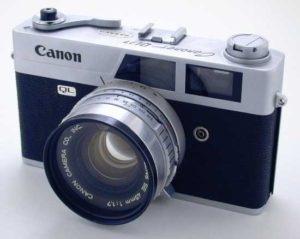
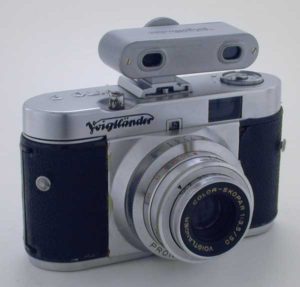
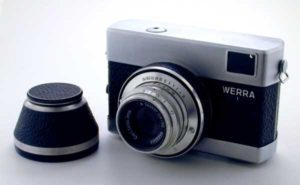
There is also a category of more popular cameras using 135 film, sometimes referred as compact cameras, and they still deliver a very good performance. That is the case of many Canonets, very easy to find for a budget. There is a far more antique and plenty of charm Vito B from Voigtlander and the futurist Werra from Zeiss Ikon and many, many others from Yashica, Agfa, Minolta and yet the half frame Olympus Pen, a real dynasty that sold 17 millions of cameras throughout its history.
One point to be considered is that viewfinder cameras, with or without rangefinder, is that they fall behind SLR in close-up situations or even in portraits that frame only head. It is harder to take pictures in those situations when what you see is not what the camera lens is seeing. That type of camera, normally, do not even focus closer to 90 cm. They are more suitable for groups of whole body pictures and for closer portraits it gets more difficult. Some rangefinder cameras, as Leica and Contax, offer the possibility of longer lenses and parallax correction viewers and that may help if you attach a 90 or 135 mm lens that will also feature better perspective for portraiture.
[/mks_one_half]
[/mks_col]
Among these three option you will find one that suits you in 135 film range. The SLR are more flexible, but their usage implies, as it was said before, in a stronger commitment to technical aspects. Who uses a SLR will probably be thinking about time, aperture, depth of field, tonal range and the like. Those cameras push the photographer to consider image quality as intrinsic to photograph’s subject. The rangefinder ones, as Leicas, bring a little bit down that kind of concern. That is good and bad depending on your style. Many people consider those technical question the real fun of taking pictures. On the other hand, compact cameras, the ones with a viewfinder without rangefinder, they force you to a more wild guessing game and you will concentrate more on the moment of firing, the action, the event in itself. One using them will not be very much afraid of right focus and exposure as long as we can recognise what was in front of the camera. Those are cameras that demand spontaneity and are funnier to use for that reason.
The reaction of people in face of the equipment, and your relationship to it as a photographer, are things that show up in the picture. If you present yourself overwhelmed by your equipment the person may react to that in a stiffer attitude. A very sophisticated camera can raise up anxiety in your sitters. While a compact camera may set them in a more relaxed and playful mood. If you are attracted to do more social snap shots maybe a camera with viewfinder will be a better fit. Think of a SLR if control and flexibility are important for you.
Medium Format
[mks_col]
[mks_one_half]


[/mks_one_half]
[mks_one_half]
The classic of all classics in this category is for sure the Rolleiflex. Since the late 20’s there are Rolleis but you will hardly find one of those because they are most probably in collections and, for usage, maybe you will be better off with one from the 50’s. They produce a negative 6 x 6 cm with excellent quality. It is not easy to frame with that kind of camera. Viewer is not that bright and has influence from external light. If you do not have patience to dedicate yourself, practice and get used to the camera it may become frustrating. But it is very flexible, once you passed the first hurdles, you will enjoy it. It was used by photo journalists and marriage photographers for a long time. Nevertheless, for snapshots and action pictures I would not advice a Rolleiflex. It goes better with a tripod in studio work. Lens is 80 mm and a 6 x 6cm negative are very good for half or whole body portraits. It becomes a bit exaggerated to use it only for face. In that sense, the Mamiya 330 offers interchangeable lenses and there is a nice 135 mm that is perfect for more close-up portraits. There is a Rolleiflex with a 135 mm but it is a hard to find item.
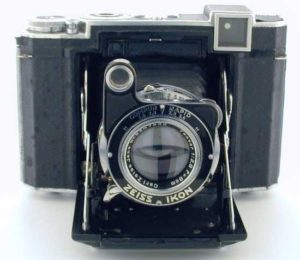
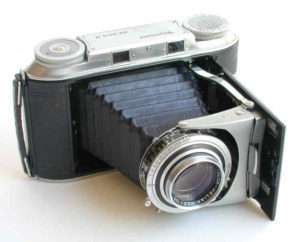
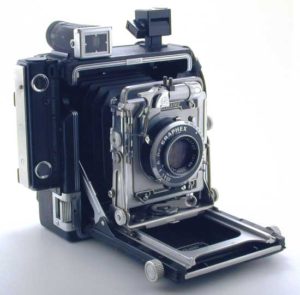
My favorite option in terms of medium format goes to the folding cameras. They are light, and become relatively small when folded. In general they accept 120 roll film as default or with an adapter. That is the case of Pacemaker Crown Graphic and Patent Etui. But the ones which are very easy to find and reliable in results are the Ikontas. Among them, the Super Ikonta with a rangefinder. They were produced in 4,5 x 6 cm, 6 x 6 cm and, the top on a wish list, the 6 x 9 cm. With these cameras it is possible to take pictures with a negative medium format with the same agility and spontaneity as with a 35mm compact camera. Don’t be scared with focus manually adjusted, it is not necessary an absolute precision to make good pictures. You can stop down the aperture and, compensate in development and get more depth of field, concentrating this way fully on the framing and right moment.
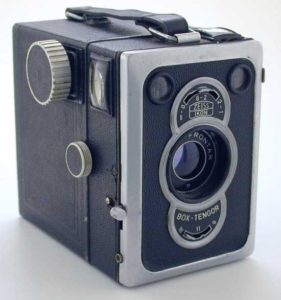
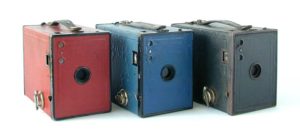
Finally , if you like the idea of 6 x 9 negatives, there are box cameras that are also very easy to find. They are normally low priced and can be really fun depending on the type of photography that you intend to do. Lenses are simply meniscus or, the top ones, have an achromat. That means only one glass in first case and two glued glasses in the second. They demand outdoors photography as the maximum aperture goes around f9, the ones with a doublet, and f16 the ones with a meniscus. But you can use them also indoors with a tripod and release cable. I appreciate Holgas, Lomography, so on and so forth, but there is a high share of pure marketing in that story and the first time I learnt about the concept I asked to myself why these people interested in medium format with simple lenses don’t go for a box camera? The Box Tengor, from Zeiss Ikon has even a flash sync, tripod screw, double exposure prevention and it is a robust metallic camera that will serve you for the rest of your life. Are the pictures sharp? Well, not that much, but they can be ghostlike, evanescent, idilic and other possibilities as interesting as sharpness.
[/mks_one_half]
[/mks_col]
Large Format
[mks_col]
[mks_one_half]
[/mks_one_half]
[mks_one_half]
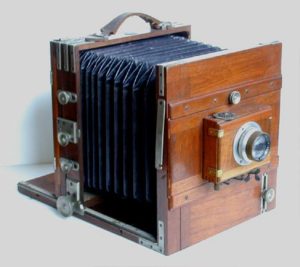
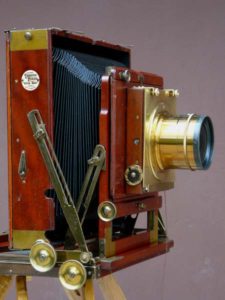
This is the category that I consider unjustly least considered by amateurs thinking of film photography. Maybe it looks too much complicated and expensive. It can be if you go after a Linhof Tecknika. But it can be very affordable, more than a SLR, if you go for a wood made View Camera. Specially if you built it up yourself. Of course it all depends very much on the type of photos you intend to do. But if you are thinking of studio photography, then the option for large format can become very interesting. Leave your snapshots, travel, street, family, etc. for your digital camera, of for your mobile phone, and enter the sect of ritualistic photos with tripod and large format cameras.
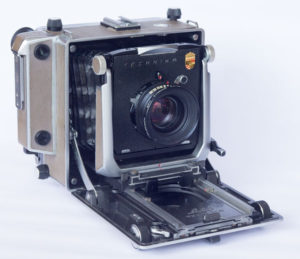
9 x 12 cm is good, 13 x 18 cm is better, 18 x 24 cm is heaven. The option here will be contact print and leave the large ones for digital that you can very well produce from scanned negatives. There are the hyper classic ones like Linhof Technika or Graflex. Which are indeed a mix of features like folding, bellows, large format, hand-held, view cameras, rangefinder and, for all of that combined, are normally referred as press cameras – for the Graflexes Graphic were extensively used by photojournalists. There is a Linhof Technika 13 x 18 cm, very desirable, but hard to find in good working conditions and accessories like film holders (which is obviously essential). For a beginner I would go for an old wood made camera. There are view cameras still in production like Canhan, Deardorf, Wisner, Gandolfi and some antiques like Thornton Picard, Ica, Nettel, Dubroni and many others. The best option may be the unbranded ones. Limitation for film size will be set probably by lenses that you will find. A 18 x 24 cm negative asks for at least a 300 mm lens. A lens at this foci and having aperture around f4 or f6.7 or 7, but not less than that, it is already a considerable glass and beyond that the prices and diameters grow exponentially. For a 20 x 25 negative you need at least 320 mm. If you intend making portraits than you might need a 400/450 mm and from that point onwards it all becomes heavier and heavier in all senses.
[/mks_one_half]
[/mks_col]
What a workable view camera needs is the following:
- ground glass – easy to make in case it is missing or broken
- film holders – better use the original or you will probably face light leaks.
- general light tightness – still workable with some easy, not always cosmetic, refurbishing
- lens installed – compatible with camera and film size
- means to control exposure time – dependes on the time range you may need a lens with a shutter
A view camera opens up a countless number of possibilities with old lenses that go from the “worth nothing” to the “unaffordable” price range, but all of then offer the actual capability of producing beautiful images with interest and personality. Another world that opens up is the alternative processes like cyanotype, collodion (wet plate), Vandyke Brown, salted paper, gum-dichromate and many others that demand normally a larger negative. Many of them must be done by contact print for the request a light intensity (UV light) that enlargers are not able to offer. That offers too the possibility of printing over many different papers, as long as they support being soaked in water, on wood, fabric, porcelain, glass and whatever you may want to experiment. It is true that you can print digitally a negative at the size you want and use it to alternative processes as well.
Conclusion
As the objective in this post was to go through the today’s possibilities for film usage in photography, without covering all of them because that would be impossible, I hope the raised points were relevant in giving you a general view about the chain of consequences from the moment you fire the shutter till the final picture. That counts in the choice of photographic equipment, type of camera and film format. On the next post we will concentrate on the negative development trying to answer the same set of three questions: 1. What does the process offer? 2. Why is that good for me? 3. What do I need to implement it? Later we will do the same about printing the final copy.
In regards to decision about equipment, about which camera is good for you in using film, what can be said right now, before examining in detail how to develop and print, is that it all dependes in first place on the kind of subject and photographic style you are aiming at. Landscapes, places nearby where you live, travel, portraits, street photography, nude, friends, parties, animals, architecture or a bit of everything. Each one of those themes dictate very much the size, weight, easiness of usage, optical quality and price for equipment. I suggest that by now you keep what you consider viable and get to know more in the upcoming posts what comes next in terms of workflow, before you make up your mind. At the end you will be able to go for the right decision and search the right gear for you.