Many people are curious about using a classic large format lens, such as Symmar, Sironar or Planar, for example, in a digital camera. I think the main reason is the desire to try out these legendary optics and the difficulties in making real large-format photography. The problem begins with the simple fact that it is analog. In addition to the film cost, there is a need of a well-equipped darkroom if the ultimate goal is a print in silver gelatin paper.
This article will discuss what can be expected from this hybridization. First theoretically and then with a practical test. The reason I decided to do this check is because I like these old optics a lot, but in theory at least, their performance shouldn’t be better than that of a native digital system lens. If it is better, it is either due to an excellence totally out of the curve or because the digital optics used in the comparison is really mediocre.
Angle of view x picture format
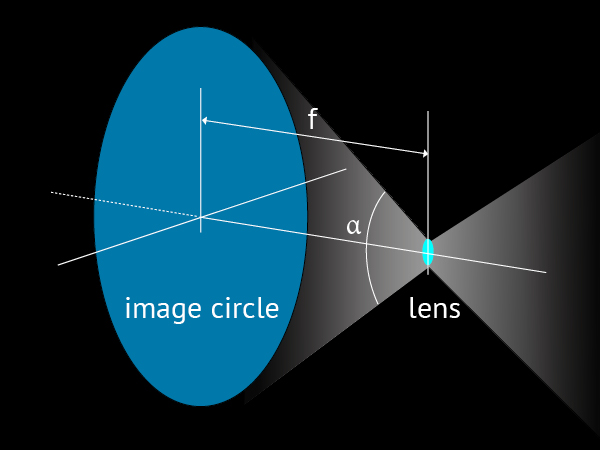
The focal length and the angle of view α determine the image circle and all
possible formats for that lens
The first point to note is that we are talking about very different lenses between Large Format and one designed for full-frame or APS-C. We more often think about lenses from the point of view of focal length, aperture and frame. But the picture size is relative, it is variable, it is not inherent in a lens design. Lenses are scalable. If a 100 mm lens covers a 1/4 plate frame, the same design scaled to 200 mm will cover an entire plate. That is why, when photography was done in many different formats, lenses were offered from 50 to 500 mm in sometimes something like 15 different focal length options. That was the rule for successful designs like Goerz’s Dagor, for example.
The viewing angle of a certain design, however, is absolute. If a lens is angular in a short focal length, it remains angular in a long focal length. Except for specific constructive minor adjustments to conform to a process or a camera, when small variations may occur, lenses designated with the same name, have essentially equal viewing angles.
The three really determinant characteristics of a lens are: focal length, angle of view and maximum aperture. After that, what comes in are aspects of image quality, of the focal plane being more or less curved and how it deals with all sort of aberrations. But these three numbers are like the key specifiers of a lens. The size of the frame is just a consequence of the relationship between focal length and viewing angle.
Large angles x narrow angles
While wide-angle lenses are called and understood as angular or super-angular, which corresponds roughly to 70º and 110º, approximately and respectively, there is no good name for those that cover only a narrow angle. “Long focus” is used but I think it only feeds the confusion, because from what was explained above, a lens can have a focal length of 800 mm and be a wide angle. “Tele objective” is even worse because it actually refers to a lens whose optical center is located in front of its first element, that is, it is shorter physically than optically. This is common with 35mm cameras so that a 300mm lens does not need to be more than 300 effective length. So I am going to adopt here the unusual but correct narrow angle as a contrast to wide angle.

In optics, lens manufacturing is much simpler when they have spherical surfaces. Aspherical ones were only commercially introduced in the second half of the 20th century. The reason for this is that even a round iron cap with relatively weak accuracy in its radius, from one point to another on its surface, when rubbed against a glass block with abrasives, manages to give precision to the radius of curvature of the glass which gains several decimal places compared to the original cap. It is for this statistical principle, which makes the radius of curvature of glass to be an accurate average of all the inaccurate radii of curvature of iron, that great lenses have been manufactured since the 18th century when there was a growth in the optical industry for astronomy.
The case with spherical lenses is that they generate a curved focal field and the films and sensors, on their construction side, are easy to build flat. With this conflict, the image quality tends to be good only very close to the lens axis, at the central point of the image and its immediate surroundings. For those who remember mathematics, it is in the region of the cone base where the sine of the cone angle is very similar to the value of the angle itself in radians.
The consequence of this conflict of interest between lens manufacturing and sensor/film manufacturing is that it is much easier to manufacture lenses with narrow viewing angles than lenses with wide viewing angles. That is, it requires much more elements, much more calculations and much more inspiration to design a lens that can cover 45º or 90º than one that covers only 8º or 15º, with a sharp and the least deformed image.
The negotiation
To overcome the difficulty in designing angled lenses there is always a negotiation to be made by the designer. To increase the angle, he will face the obligation to sacrifice something. The most obvious is aperture. An excellent lens like the Zeiss Protar V, with an angle of 110º, has its maximum aperture at f / 18, for example. Another possibility is to give up image quality on its periphery. This means admitting more aberrations and distortions. But while for a portrait lens one can more easily admit this deterioration, in the wide-angle, more used on landscapes and architecture, sharpness and no distortions are desired for the whole field. Another possibility is to admit a loss of general resolution. Resolution is the lens’ ability to not confuse two very close points. A car with two headlights on, but still very far away, appears to us as if it has only one headlight. Our retina also has a finite resolution and only when our angle of view separating the headlights is greater than ~ 0.02º will we see the two differently. Both the optical system and the sensitive system (retina, film or sensor) have this limited power to distinguish contiguous elements in any scene. In optical systems this leads to the concept of a “circle of confusion”. That is currency in the designer’s negotiation when he is going to design a lens. To gain more angle, one usually gives up the lens resolving power, up to a certain degree.
Circle of Confusion x Format
The points on the object and the points on the photographic image, in the real world, are actually small circles or disks, not points. With infinitesimal calculation, these disks can be approached to points, for the purpose of calculations, but in the luminous image the smallest point that can be produced on the object will be something like a little cloud projected on the film or sensor.
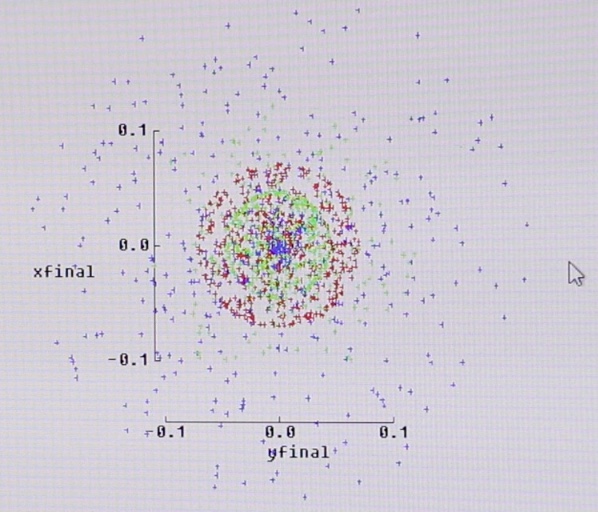
The photo above is a screen capture of an optical tracer from the firm Dioptro, precision optics, from São Paulo. The radii of curvature, spacing and indexes of refraction and dispersion of the elements of a Petzval type lens were entered in this simulation software. With these lens data, the tracer simulated, in a few seconds, 4000 rays coming from infinity, that is, from a hypothetical point so far that its luminous rays reach the lens perfectly parallel. In this case, they are also parallel to the lens axis, and are therefore focused on the plane and in the center of the image. 3 colors were drawn. Green, for being the center of the light spectrum, blue and red for corresponding to the extremes of shorter and longer wavelengths, respectively. What we see in this image is a “point” on the object when its image is projected onto the film plane for a real lens. Green is more concentrated but red and blue are already dispersed over larger clouds. The x and y scales are in millimeters and we can say, somewhat arbitrarily, that this “point” has a diameter around 0.15 to 0.20 mm. But we still have to consider that this is a point in the center of the field. In practice, it is also necessary to investigate what happens at the periphery, that is, when the parallel rays reach the lens obliquely and go to the edge of the image. It will certainly be much worse than that and the points can take on elliptical shapes, sectors of a circle and even more complex shapes.
This reality of the “point dimension” is what can be understood as a “circle of confusion”. The circle of confusion is usually calculated or simulated on computers and corresponds to the actual size of the image from a theoretical point on the object. There is a bit of psychology of perception in these assessments. What is the “size” of this little cloud is something that needs some subjectivity to be estimated because it obviously has no clear contours. This is resolved when conventions are established that determine the maximum circle of confusion that will generate an image considered humanly sharp and in which very close points and lines can be seen as distinct. One of these conventions, widely used in photography, says that the circle of confusion must have at most the diameter / diagonal of the image divided by 1500. Such a rule, based on studies of perception with people with vision considered healthy, results in a table like this below for the various formats in photography (Wikipedia source).
Circle of confusion diameter limit based on d/1500
| Format name | dimensios | CC |
|---|---|---|
| Small formats | ||
| 1″ sensor (Nikon 1, Sony RX10, Sony RX100) | 8.8 mm × 13.2 mm | 0.011 mm |
| Four Thirds System | 13.5 mm × 18 mm | 0.015 mm |
| APS-C | 15.0 mm × 22.5 mm | 0.018 mm |
| APS-C Canon | 14.8 mm × 22.2 mm | 0.018 mm |
| APS-C Nikon/Pentax/Sony | 15.7 mm × 23.6 mm | 0.019 mm |
| APS-H Canon | 19.0 mm × 28.7 mm | 0.023 mm |
| 35 mm | 24 mm × 36 mm | 0.029 mm |
| Medium Format | ||
| 645 (6×4.5) | 56 mm × 42 mm | 0.047 mm |
| 6×6 | 56 mm × 56 mm | 0.053 mm |
| 6×7 | 56 mm × 69 mm | 0.059 mm |
| 6×9 | 56 mm × 84 mm | 0.067 mm |
| 6×12 | 56 mm × 112 mm | 0.083 mm |
| 6×17 | 56 mm × 168 mm | 0.12 mm |
| Large Format | ||
| 4×5 | 102 mm × 127 mm | 0.11 mm |
| 5×7 | 127 mm × 178 mm | 0.15 mm |
| 8×10 | 203 mm × 254 mm | 0.22 mm |
When a designer is defining a lens project, with a certain angle of view, focal length, aperture and a “budget” in mind, it is very important to consider also the production cost, he will need to decide what the circle of confusion will be in the center and periphery of the image. More than often it will be something in line with the table above as it is the industry standard. But if he chooses a very large circle of confusion (CoC) he will have more freedom for other lens parameters, but he will get a bad image, with mediocre sharpness, because points in the object will be rendered as rough disks in the image. If he chooses a maximum value for the CoC rather small, less than the standard, thinking about making the sharpest lens on the market, he will be forced to increase the budget, he will have to put more elements, or he will be obliged to stop it down and make it darker , or he will have to wait for a divine inspiration and create a new milestone in the history of photographic optics.
These conventions and decisions about what the degree of resolution of a lens should be, what its circle of confusion should be, are based on two hypotheses that are at least reasonable:
- If the photographer is going to use a lens that, due to its focal length and viewing angle, can cover an 8×10″ negative, why would he use this lens in a camera with a much smaller negative or sensor, say 24×36 mm? It is supposed that the person normally intends to use the lens to get the most out of it, and not a small fraction of its image.
- The second hypothesis is that if one is going to make an 8×10″ negative, one will probably need a smaller image magnification because the negative is already large in itself. A size for an album of memories, for exhibition, for decoration, for press, for a digital screen, in short, the mode of circulation of images understands a size that is comfortable and that allows the observer to discern an amount of details compatible with his own ability to perceive these details, neither farther nor far below. It is again more connected to the angle of view than to the format. No street panel, no billboard, is made to be seen at arm’s length and no family portrait is made to be seen in a microscope.
With that in mind, lens designers admit a greater circle of confusion when the lens is intended for a larger format. This is one of the trade offs for a more imposing angle of view when the picture is large format.
The problem of adaptation
The problem then in adapting a large format lens to be used in a full-frame or digital APS-C, goes beyond the question of finding adaptation tubes or fixing the digital camera on the rear of a large format camera. The problem is that this lens will not work as well as a lens designed for full-frame or APS-C format and smaller ones. Its circle of confusion will be much larger than that of native lenses for the same format. This should deteriorate the image and the photographer will tend to erroneously conclude that the optics are not that good. If it is a Tessar, Planar or Apo-Symmar, for example, it will certainly be a slander! A 135, or 240, or 300 mm made for 4×5 “or 8×10” will not work as “telephoto lenses” for the small camera. They will, of course, project an image and it will look like a long lens in a small cameras, but the image quality will not do justice to what the large format lens can actually render.
The test
Of course, a fantastic wide-format lens can eventually outperform a narrow-angle lens made especially for digital. But that would be the exception. It would be either because it is too wonderful or because digital is too bad. The test that I will describe below is just an example, it does not prove anything, but it indicates and illustrates how the reasoning above is valid and what really happens.
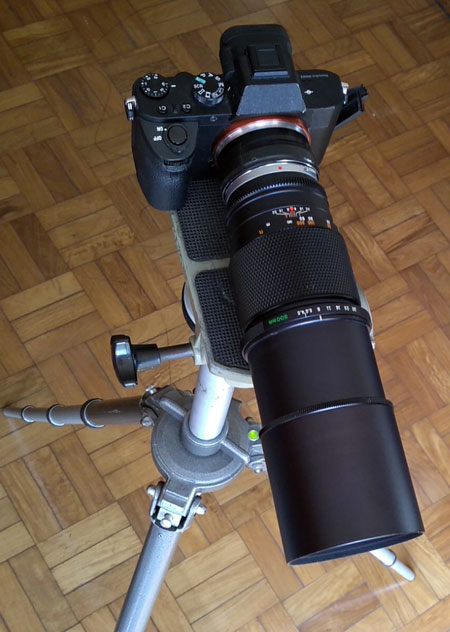
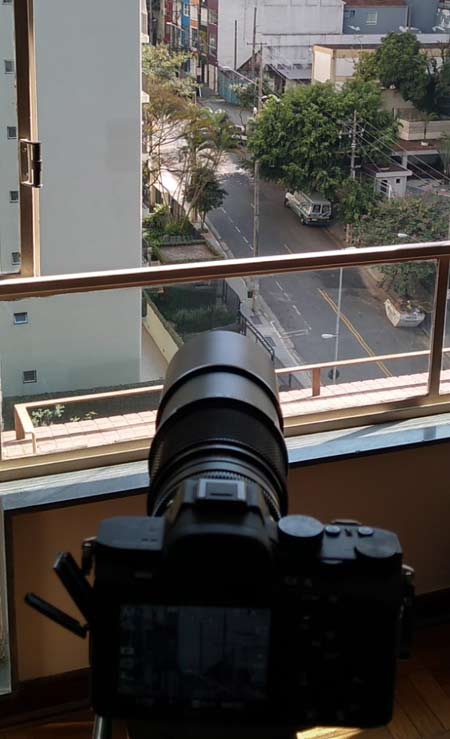
Zuiko Olympus 300mm f/4.5 mounted in a Sony α7 II
Two 300 mm lenses were chosen for the test. The first is an Olympus Zuiko for the OM system. The second is a 300 mm Tessar from Zeiss – Jena. The reason for the choice was, in the first place, because I have these two lenses. But the coincidences don’t stop there and I believe that as a whole it was a very valid test. The two lenses are f/4.5. Zuiko’s first production was in 1974. Tessar, by the serial number, was produced at that time as well. This indicates a certain parity in terms of available technologies, since the two come from companies with tradition and reputation. Although the design of Tessar is from the beginning of the 20th century, it has been recalculated several times and a Tessar from the 70s is for sure a lens with technology from the 70s. Another important point for comparison is that Tessar is a lens whose most important feature is sharpness, in all specialized literature this is the characteristic that always stands out. To learn more about it, follow this link. Both already have anti-reflective coating. Tessar has 4 elements in three groups, while Zuiko has 6 elements in 4 groups. This is an important difference in favor of Zuiko, but the goal here is not to know who does more with less, but what can be expected from two lenses well designed by renowned brands and similar characteristics. The big difference between them lies on the viewing angle: only 8º for Zuiko and 62º to 72º for Tessar (depending on the aperture) and consequently the format they are intended for since the two focus at 300 mm at infinity .
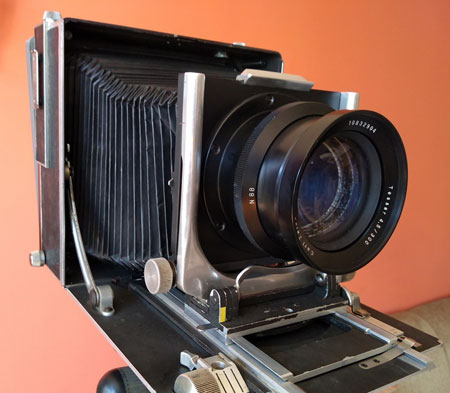
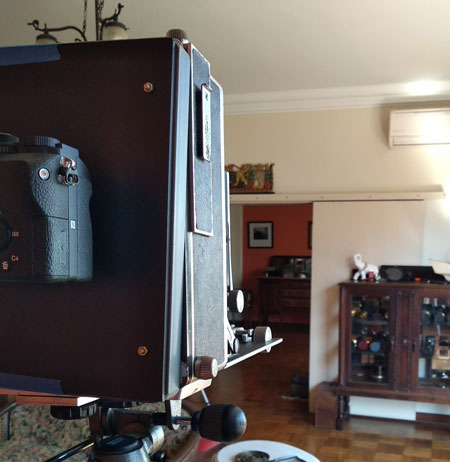
Tessar 300 mm f/4.5 in a Linhof 13×18 cm
The digital camera was a Sony α7 II, it has a 6000 x 4000 pixel full-frame sensor. This is important because considering that the frame is 36mm long, we have a theoretical resolution (without considering interpolations, grids, etc.) of 36/6000 that gives us 0.006 mm, well below the circles of confusion considered standard for the formats to which the lenses fit intended (see table above).
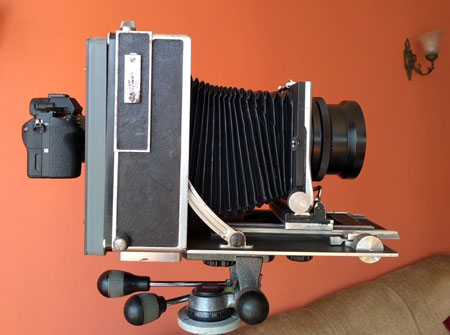
Sony mounted on Linhof’s back
With Zuiko it was necessary only an adapter ring and for Tessar, the camera was hung on a Linhof 13×18 cm with the aid of Zuiko’s ring and a 3D piece that I printed in ABS.
3 targets / subjects were chosen. For both lenses, the aperture chosen was f/8. RAW files were opened in Photoshop with default settings and were not modified individually. Several sample photos were taken to choose the one with the best appearance due to the manual focus.
[mks_pullquote align=”left” width=”30″ size=”24″ bg_color=”#dd3333″ txt_color=”#ffffff”]1[/mks_pullquote]The first subject was a group of antennas at the top of distant buildings. The two lenses / cameras were mounted on a robust Gitzo tripod.
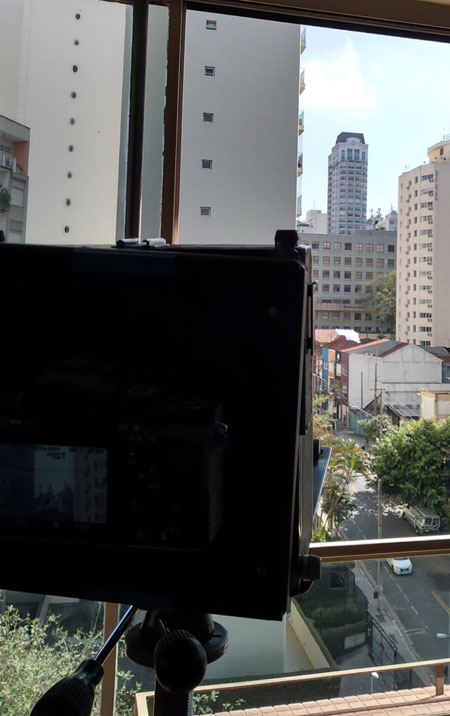
Picture taking with the Tessar lens
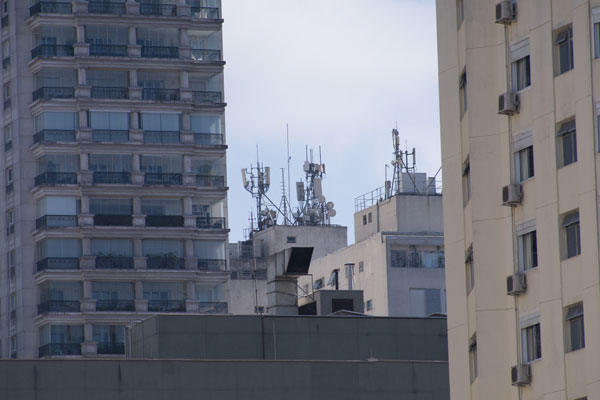
Sony’s full frame: Zuiko 300 mm – f/8
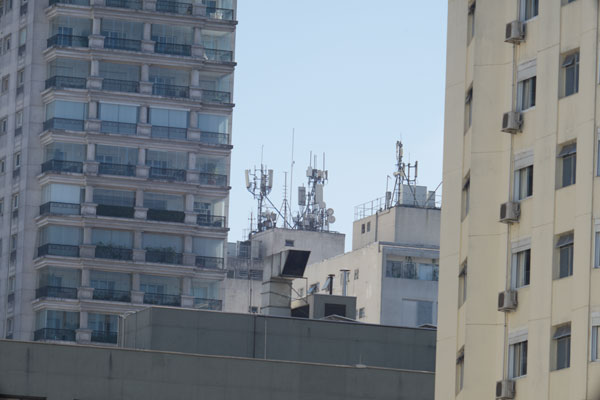
Sony’s full frame: Tessar 300 mm – f/8
Obviously, the frame is the same. Looking at the full picture we notice already differences in favor of Zuiko lens, but still in the territory where an adjustment of curves and sharpness could help a lot. But it is in the detail below that we see how much the Large Format lens is losing. In the next photo we have an image cropped to 300 x 300 pixels. If you are viewing on a desktop or lap-top screen you are probably viewing at 100%, that is in the ideal ratio of 1:1, 1 pixel in the file corresponding to 1 pixel on the screen.

It is very evident that there is a loss of resolution in the case of Tessar.
[mks_pullquote align=”left” width=”30″ size=”24″ bg_color=”#dd3333″ txt_color=”#ffffff”]2[/mks_pullquote] The second test was with an object in the shadow in order to observe also a low contrast situation.
I simply lowered the camera axis and focused on the parking plate that you can see in the photos below. Looking at the photos with the full frame, we see that without the backlight, which is always a difficult situation for a lens, it seems that Tessar has recovered more ground compared to Zuiko.
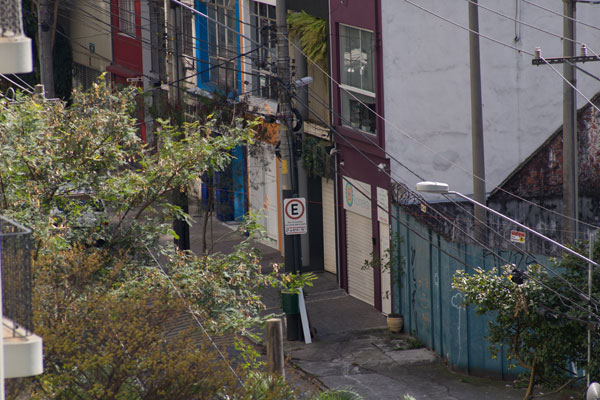
Full frame: Zuiko 300 mm em f/8
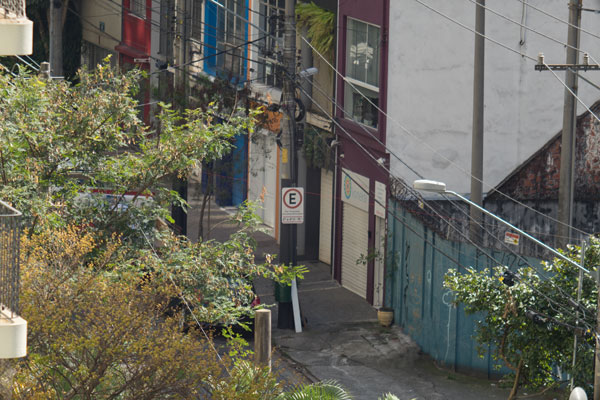
Full Frame: Tessar 300 mm em f/8
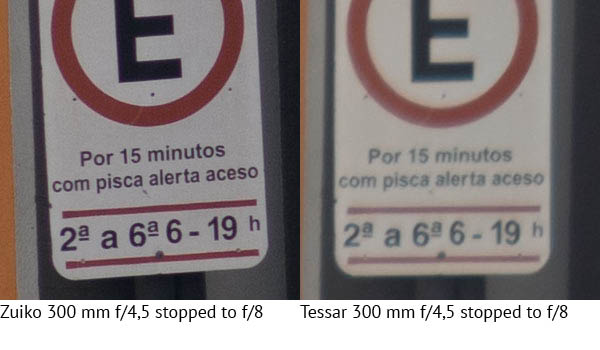
However, when we look again at the detail we see that Zuiko’s does much better in sharpness again. There is a flare effect that creates a more pronounced haze in Tessar, however, the question of the circle of confusion, which is certainly greater in it, is the real responsible for smoothing the contours, the passages of the printed letters to background. A random flare would only reduce the contrast as a whole.
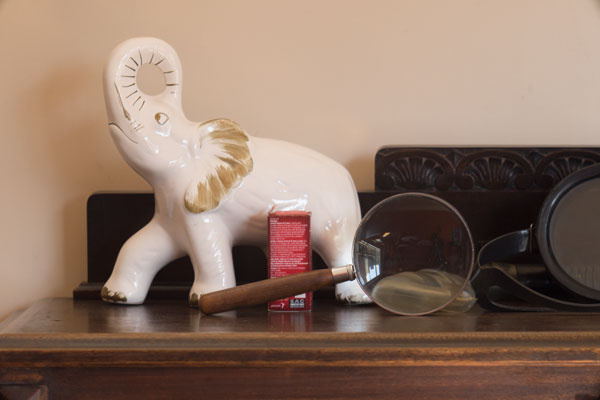
[mks_pullquote align=”left” width=”30″ size=”24″ bg_color=”#dd3333″ txt_color=”#ffffff”]3[/mks_pullquote] The third situation was indoors at a distance of 5 approximately 5 meters.
I put a Tylenol box next to this earthenware elephant that has been my model in so many other photos. The photos below were not taken right away and therefore the color changed with the day as it was natural light. The framing was also not strictly the same and therefore there is a difference in sizes in the painkiller box images as well. But it is still possible to compare.

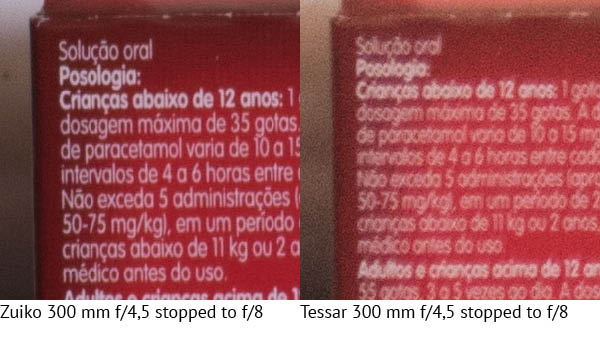
Quadro cheio: Zuiko 300 mm em f/8
Full frame: Tessar 300 mm – f/8
In short distances the same effect is observed. As the letters are white on a red background, the larger circle of confusion creates a halo effect.
Conclusion
All that can be said with certainty is that if you are to crop only 24 x 36 mm of those images, the 300 mm f/4.5 Zuiko generates much higher a sharpness than the Tessar 300 mm f/4.5, having both at f/8. At least this case confirms the theoretically assumed expectation that the design of a large format lens, intended to cover a wide angle, in the case of ~ 62º, will need to open the circle of confusion much more than the design of a lens that will only cover 8º. The consequence is a shuffling of local points and loss of sharpness.
Would there be an expensive lens, Apo-anything, that would be able to rival a native lens for digital format? I highly doubt it. Can we conclude from this that Tessar is not a good lens? No way. Looking here on my screen as I write, I see that this 300 x 300 px image is 77 mm on my computer screen. As the Sony α7 II has 6000 px in 36 mm, doing the math, we see that these 77 mm correspond to 1.8 mm of the sensor, that is, 1.8 mm Tessar’s image. But the total image of a Tessar, if we throw 300 mm of focal and 62º of angle of vision in this tool, we have an image circle of 361 mm. Let’s say 300 mm diagonal for an 18 x 24 cm frame, as photographic images are rarely circular. So these 1.8 fit 133 times in the 24 cm of the image (240 mm ÷ 1.8 mm). Multiplied by 77 mm, that’s 10.2 meters! I’m looking at a piece of image that could have been 10.2 meters in total if ever decided to take advantage of the entire Tessar field! Now, this Tessar is not bad at all, right? It is actually excellent. Images 10 meters wide are not to be inspected 30 cm away as I am doing at the moment.
The final conclusion then is that to optimize the quality of an image, the best strategy is to use lenses designed and manufactured for the format in which we are photographing. If it’s just for fun, of course anything goes. But it will be funnier the day we may have large format digital sensors at affordable prices. Then it will be the time and the turn, it will be the rematch of the vintage ones that will be able to show all their excellence. Let us wait.
Bom layout e habilidades de comunicação perfeitas.
I have aerial photography lenses some with a length measured in feet! So the circle of confusion issue becomes really evident and so not just chromatic aberrations. I’m grasping what the CoC is finally and thankyou for the article.
If you had a sliding back the in allowed you to capture the full 4×5 images in the multi-tiered
pano, I bet you would see the full optical quality of the large format lens then.
Yes, I have also experienced when I adopted medium format Haseblad Zeiss lenses on Canon 5D camera. Canon native L lenses outperform the HB Zeiss lenses.
Also the convince of using native lenses is far a better experience.