Focal length and image circle
(image source: wikimedia commmons)
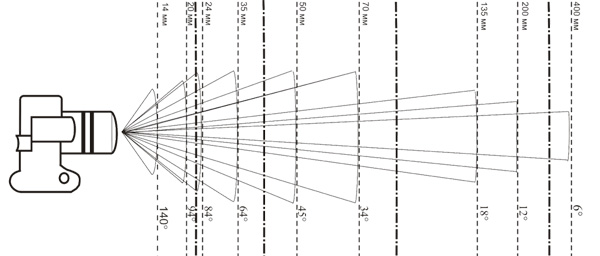
You certainly saw already a diagram more or less like this one. It shows a relation between focal length and angle of view for different lenses. It is a standard way to explain what focal length is. This is how camera makers talk about focal length and they have a good reason for that: for them, you just need to know what focal length means in the context of their products, not necessarily in optics or photography.
What are you missing if you take that as focal length? Well, if you do so, you will be limited to a single brand or camera type. That means you won’t be able to understand other formats, other sensors or other film sizes nor what a lens really is. The right way to approach the subject is to see focal length in conjunction with other concept that is image circle. Those two, together with maximum aperture, are the three key parameters that describe a lens. There is a forth one: circle of confusion. That tells the size of a point projection on film or sensor. It should be dimensionless, like a geometrical point, but in real life there are no geometrical points. Small circles are the best we can make. So circle of confusion is the size of that small circle produced by an imaginary point in an object. In this post we are going to look only into focal length and image circle.
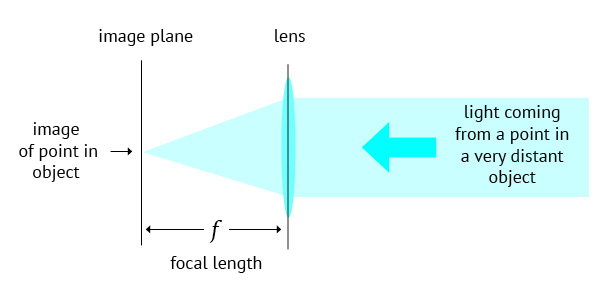
You may have seen also a diagram like this one above. This is the one that better illustrates what focal length really is for a photographic lens. It can be enunciated like this:
Focal length, in a photographic lens, is the axial distance between the optical centre of the lens and the formed image, when the object is far enough to be considered at an infinite distance.
Confusing? It can become just intuitive. Let us work on it. Let us consider one little statuette as our object, and study the image that a photographic lens forms of one single spot on its forehead. We consider only one spot in order to make things simple and diagrams readable. But it works the same way for all parts of any scene or object. As you may know a photographic lens is a device with a certain light converging power. If that is not familiar to you, please read this very short post beforehand: what is a photographic lens?. The animation below shows how this constant converging power works the light coming from that spot and reaching the lens surface.
Let us analyse what the animation shows:
- At the beginning, the observed spot is very close to the lens, so light diverging from it diverges so abruptly towards the lens that even applying its converging power the lens is not able to concentrate that light again and form a point image of it over the film or digital sensor. We can see that it is converging but towards a further point beyond the camera back.
- When the object begins to move away from lens, its light diverges less towards it. As a consequence, the lens, with its fixed converging power, starts to converge those rays in a narrower image.
- When the spot is so far, out of the frame, that we can’t tell anymore whether light rays coming from it are divergent or parallel, the converging power of the lens is just enough to make all the light it captures, coming from that spot, to converge to another spot, precisely over its film or digital sensor.
- That is exactly the situation described in the focal length definition. We may say then that the distance between lens and image is the lens’ focal length, normally represented by the letter f.
- When the statuette comes back, the previous situation will present again. The converging power remaining the same, it will send image to a place beyond the camera back. But this time, lens advances and makes up for the proximity of object and forms an image of the white spot right on where it belongs: over film or digital sensor. That is the basic way by which lenses are able to focus objects which are not as far as to be considered at infinite distance. Either lens advances towards object or film retreats, or both.
Focal length and angle of view
As we can see now, focus length is a figure, a very important parameter of a lens, which in first place has nothing to do with the angle it embraces. What a lens intrinsically has, according to its construction, is a focal length and an angle of view which are independent one to another. The angle of view is determined by lens construction and design. When it is more than 60º or so, we call it wide angle lens. In former times they were developed specially aiming for landscape photography. When it is less than 30º or so, we call it a narrow angle lens and historically were basically intended for portraiture.

For a given focal length the angle of view will determine what we call lens image circle. It is easy to note that once f and α are set the lens image circle is also fixed. Famous wide angle lenses throughout the history covered more than 90º. The Zeiss Protar V, for instance, which is a usable lens nowadays, goes up to 110º. The same design was manufactured in different focal lengths, from 40 to 950 mm, all of them super wide-angles.
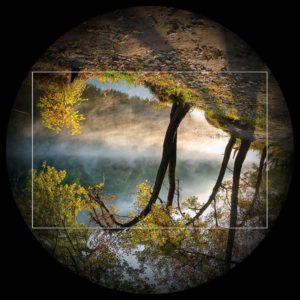
Above we have a typical image projected by a photographic lens. It is a circle and the white frame represents what the camera can use of it if an image with a 3:2 ratio is desired. The corners of the frame are almost touching the limits of that circle. A camera maker can use instead a smaller portion of it making the film or digital sensor smaller than image circle. That will be the case if the camera design allows lens shifts and tilts, otherwise it will be just a waste. That is the case in field cameras and also in modern lenses for full-frame or aps-c digital sensors when the lens itself incorporates the possibility of those shifts and tilts.
Camera makers must use lenses that project images with an image circle that is bigger than picture frame size, otherwise image will fade out at the corners. Lenses with wide angle of view are more complicated and expensive, because aberrations are harder to control unless you sacrifice aperture. The above mentioned Protar V had a limiting maximum aperture of f18. Narrow angle of view lenses are relatively more simple and demand less from lens design. Are also easier to produce with more luminous apertures. (Landscape with trees, source: Wikimedia Commons, author: Balkhovitin)
Two very different 300mm lenses
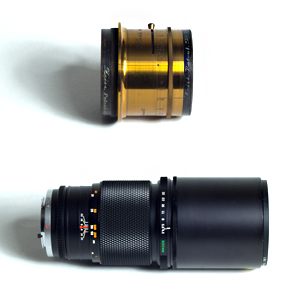
The Zeiss Protar from Ross and the Olympus Zuiko telephoto lens, above, are both 300 mm. The first one covers an angle of 70º and the second 8º. First one is a wide angle 300 mm and the second a telephoto lens 300 mm. What does that mean? It means that the Protar design allows us to fit that lens in a camera using a film 180 x 240 mm (we normally call that 18 x 24 cm, using cm) and yet leave room for generous shifts and tilts, because its image circle has a diameter of 42 cm when focused at infinity, far more than the diagonal of a 18 x 24 cm rectangle demands – that is 30 cm. More than what is needed to have a decent image over a 18 x 24 cm. Said yet in another way, there is as surplus of image that is not used by a camera/film with that size. The telephoto Zuiko-Olympus is also a 300 mm, but its image circle is just enough to cover an image of 24 x 36 mm. Image circle diameter is certainly close to 43.26 mm, that is the diagonal for a 24 x 36 mm rectangle.
One remark about telephoto lenses: What we call telephoto lens is a special type of lens that is physically shorter than its focal length. That means, a 300 mm telephoto lens does not need to be 300 mm away from film or digital sensor and its optical centre is in fact in front and outside the lens.
Useful tools for you
Now that you understand what focal length, angle of view, circle and image format are, you might want to do some comparisons and find these parameters in your lenses and cameras. It’s easy to do these maths. It involves the Pythagorean theorem and some very basic trigonometry. But to make it even easier, here are some ready-to-use tools to calculate these parameters:
Calculate the image circle of a frame format. Let us say you know what the format of your camera is, film or digital, and you want to know what is the minimum image circle to cover this format, that is, what is the image circle of your lens. Follow this link: Minimum image circle for a given film format
Calculate the angle of view. You already know the focal lenth of your lens and the film/sensor format and would like to know what your lens’ angle of view is. If it is a zoom lens, you may want to calculate the minimum and maximum. Follow this link: Angle of View for a photographic lens based on image circle and focal length
Calculate the image circle of a lens. You know the focal length of your lens, you’ve searched the manual or data sheet for its angle of view and would like to know the actual image circle it provides. Follow this link: Image circle from angle of view and focal length.
Calculate the focal length of a lens. On most modern lenses this is written on the front ring. But if you have a precious 19th century gem (when the focal length was not usually written on the lens body) or want to use a magnifying glass or any lens you found as a photographic lens, follow this link and see how to, experimentally, calculate the focal length of your lens: Finding the focal length of a lens.
Advanced
Now some useful calculations for those who do large format
Horizon line and lens elevation. When you take a photo with the lens axis horizontal, level, the horizon line, visible or not, splits the frame exactly in half. You often want to raise the lens (front raise) to keep the vertical lines of the scene vertical in the image as well, because if you just tilt the camera these verticals will converge at some point in the sky. An interesting piece of information when choosing a lens might be how far it is possible to lower the horizon line by making a front raise without vignetting the image. To have this calculation follow this link: Front raise and horizon line.
Framing simulator. Let us say that you know the focal length, the aperture you want to use, film format or sensor, height and/or width of what you want to photograph and you want to know how far you have to position the camera, the depth of field, how far the lens will have to advance (size of the bellows) and how much you will have to compensate for the exposure if you stretch the bellows too much. Follow this link: Lens/subject/format – an online simulator.
The “normal” lens
We often hear about a normal lens. A normal lens is one that is neither short and nor long. It more or less corresponds to human vision if we consider our most central field. In numbers, this roughly corresponds to a 45% viewing angle. Translated into format and focal would be the 50mm lens for full-frame 35mm film (24x36mm). If you use the tools listed above you will see that this shape with a 50mm lens actually gives a 47° angle, but these things are approximate. The result is that when we look through the viewfinder of a camera with a normal lens we don’t get the impression that the objects have gotten significantly bigger (long lenses) and not even smaller (short or angled lenses). The camera, with the normal lens, gives an image that corresponds well to what we see with the naked eye.
Reconciling the focal length representations
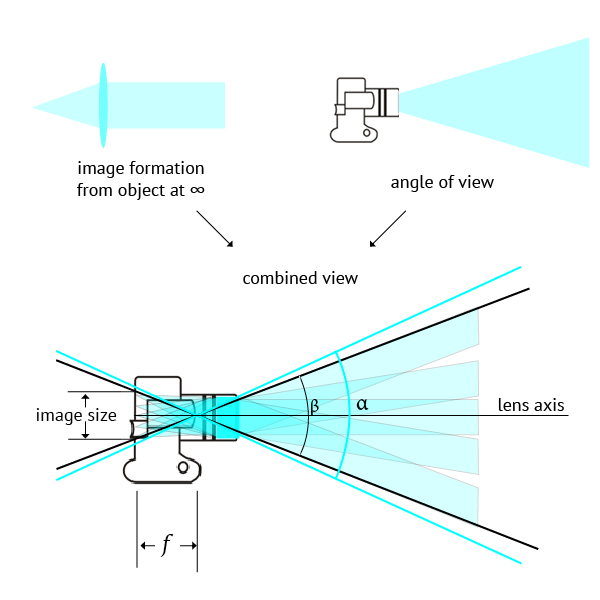
At this point it should be understandable that the first two diagrams shown at the opening of this post, are not in conflict. We can conciliate them if we consider this:This is not a technical drawing, no formulas were used – it is rather an illustration. What it shows is that the diagram with camera angle of view is like many overlapping diagrams with image formation for distant object points.
What we are calling here camera angle of view β is smaller than the lens angle of view α. This is to ensure that film or digital sensor fit into lens image circle and no vignetting will occur. It is slightly smaller for cameras with no movements and fairly smaller in cameras that allow for lens and/or back movements. If you understand that, then you know what focal length really is independently from brands or formats.
The same reasoning applies to full frame or APS-C digital sensors. While the former is 24 x 36 mm in size, the latter is 16.7 x 25.1 mm. The lenses designed for full frame have more image circle than what is needed for an APS-C digital sensor, while the reciprocal does not apply. A full frame lens will work in APS-C but not the contrary. If one manages to fit a lens designed for APS-C in a a full frame camera, there will be a vignetting effect producing dark corners on the image.
Why lenses are not made to be always plenty of coverage and image circle? Given a certain focal length and intended image quality, production costs grow with image circle. As said before, wide angle lenses are the tricky ones to make. For this reason camera makers do not design lenses that will cover more than what is necessary according to the digital sensor format camera uses. Besides being useless and more expensive, it would demand to implement barriers and means to avoid that unused light to reach the image in an uncontrolled way, through internal reflexions, and deteriorate image quality.
Some people are retrofitting large-format lenses into digital cameras with their small sensors. At first glance this seems quite feasible, but it actually implies a considerable loss of quality. It is a fact that “there is a lot of image” and it seems that we are just throwing part of it away. But the specs of a lens made for a large format camera are not the same, it is usually much softer than what is required for small cameras. See an experiment showing this difference in the article: Large Format Lenses in Digital Cameras, does it work?
With the introduction of medium format digital sensors, like the one in the Hasselblad H5D-200c having a 50MP 43.8 x 32.9mm CMOS Sensor, and also digital backs for film cameras, the real nature of focal length and image circle must be considered if one doesn’t want to be confused about what a lens can deliver. Camera makers don’t like any promiscuity among brands, bodies and lenses, the bayonet mount is their standard barrier to avoid it. But throughout the history of photography exactly that possibility of mixing film formats and lenses has been part of the fun, creativity and mystery of the medium. So let us look forward for the day when digital photography will produce sensors with sizes and prices allowing photographers to use simple lens boards and fit in them whatever lenses they feel like.
Took a long time to not answer a basic question . How does an object at infinity form an image circle if you originally show it as a point ?
Just skipped right over that – like all articles on this subject
R, I think that the right way to approach that subject is using infinitesimal calculus. Start with a “disk” or a circle on the object and calculate the corresponding disk image. Having a mathematic representation of that function, you have to make the radio of that circle on the object go to, or approach zero, and check what happens with the circle image. It won’t go to zero (I hope). I never did that sort of algebra. But my experience with other branches of Physics tell me that this is the way to go. You are right in your reasoning, geometric points are not light emitters, one has to consider an infinitesimal surface and go from there.
If modern sensors were square, could the image include more information (since the lens is transmitting a circular image)?
Make sense?
In other words, are rectangular sensors missing out on usable light?
Considering that the image from a lens is a circle, it is true that the “rectangle” with the largest area fitting inside that circle is a square. Any other proportion will be smaller (in area) and in this way it will be sort of “wasting” image. I believe that camera manufacturers use other ratios than 1:1 because most of the final images are rectangles and, if the destiny of a squared image is to be cropped to a rectangle, portrait or landscape, then the initial advantage of using most of the lens image in a square sensor is lost. In that case, it would be better start with a rectangle from the very beginning. Square frames are good in the sense that you can shoot always with camera standing up and let the choice of portrait or landscape to a later image cropping or, leave it with its native squared shape. That is the case of classics like Rolleiflex or Hasselblad. Your point is interesting also from an aesthetic point of view. I think that the instrument dictates our view. I already noticed that whenever I have a square frame camera im my hands I start “thinking” square. I go after compositions that do not need cropping later on.
Just a detail – the diagonal of a 24x36mm sensor is 43.26 mm, not 50mm.
Thank you, it is corrected.