Measuring lens aperture
Only at the beginning of the 20th century that all the important makers consistently started to engrave or print the maximum aperture and focal length on their photographic lenses. But the fact is that there are still many interesting vintage glasses from the 19th century that can be used today. Problem is that aperture information is either not available, or, comes in a scale that is not in the now standard f stops we are used to. In this post you will learn a simple method for assessing the f number yourself. It is not only interesting for old lenses, if you are building up a camera intended to use with alternative processes or soft focus experiments, it might be useful in those cases as well. Film has become very expensive to go into wild guessing with it.
Lens aperture
In a preliminary approach we can say that the aperture, in f numbers, is simply the ratio between the focal length and the diameter of the diaphragm, the smallest opening through which light passes inside lens body. Both combined, expressed in f numbers, give an idea of how bright or fast the lens is.
The problem in using the diaphragm opening to build up a scale for apertures is that more then often we have lens elements in front of it. That means it may be enlarged by those front elements and then a small diameter will work as if it was bigger. To deal with that we call to our aid a concept called “entrance pupil”. That is the apparent diaphragm that work as real. So the formula is:
f number = focal length / entrance pupil diameter
The difference between “entrance pupil” and diaphragm may be ilustrated by the picture below. It shows how the diaphragm looks like for this lens with and without the front element. It is clear that there is an increase when the front element is present. In this Rapid Rectilinear the effect is not so dramatic, but that can be the case in other lenses.
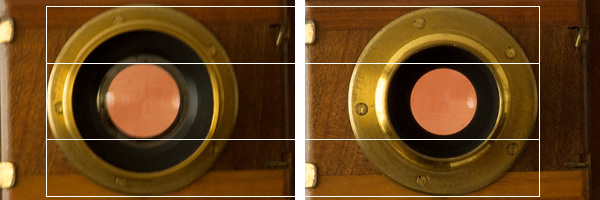
That means also that fortunately, we don’t need to undergo into formulas and calculations to assess that diameter. We don’t even need to dismantle the lens and measure something inside it. It is enough to inspect the image that the diaphragm produces when light comes from the back of the camera. That is the basis for a method to assess the lens aperture considering the enlargement provided by front element. So let us see how it goes step by step.
The method

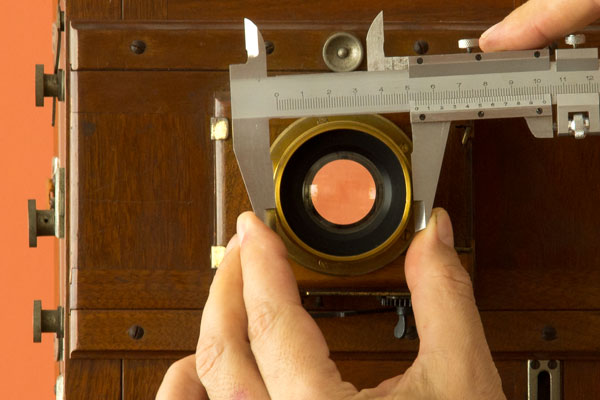
[mks_dropcap style=”square” size=”20″ bg_color=”#ff0000″ txt_color=”#ffffff”]1[/mks_dropcap]Take a picture: Place the lens you want to evaluate in a place where it is lit more or less equally in both front and back parts so the lens is not all black. Take a digital picture of it from a distance of 3 to 5 meters. You can use a long lens, but don’t get too much close to take this picture. It could look like the picture above, no need for close-ups. My taking camera, Canon Rebel T3i was ~4 meters away set to 135 mm focal lenght. The inspected lens is an old brass lens, from the last quarter of 19th century. It reads Rapid Rectilinear, nº 11509 A.Bauz, Opticien PARIS, and that is it. No other information I could collect, either on the web, except that the A. stands for Adolphe.
[mks_dropcap style=”square” size=”20″ bg_color=”#ff0000″ txt_color=”#ffffff”]2[/mks_dropcap]Measure the image: A reasonable distance from subject to camera is needed in order to keep the proportions of the entrance pupil and its external parts which are not necessarily on the same distance from taking camera. If we could place the taking camera at an infinite distance from the subject the proportions would be rigorously exact. But in real life we don’t need such precision.
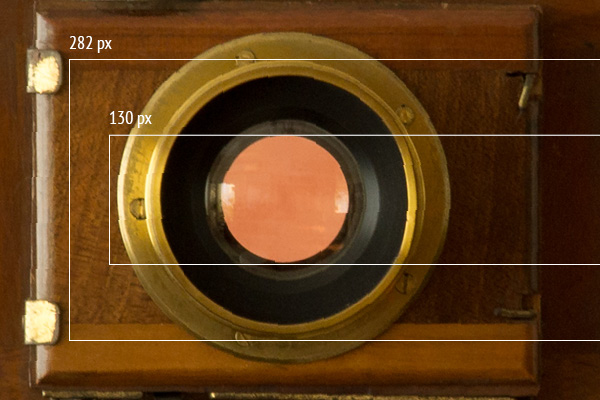
Second step is to inspect the lens image on a computer screen. It should look something like the picture above. Quality is not top because it is a small portion of original. The external ring diameter in the lens measures 53 mm. I checked that with a caliper rule, as it is also shown in the first image. That is a bit of overkill for the situation, a simple rule would do the job. Now, on my computer screen the same diameter was 282 px and the lens opening 130 px. As we are interested in ratios there is no problem having that in pixels and it is very easy to measure it this way. I just made a rectangle, using InDesign, and checked the height in pixels. Otherwise, a rule over the screen would also work, in mm or inches.
[mks_dropcap style=”square” size=”20″ bg_color=”#ff0000″ txt_color=”#ffffff”]3[/mks_dropcap]Calculate entrance pupil: Now, it is a simple calculation. If we say that E stands for entrance pupill, R for the external ring, r for real, and i for image. We have the following equation:
Er / Rr = Ei / Ri ⇒ Er = Rr x Ei / Ri
or, substituting the correspondent values:
Er = 53 x 130/ 282 = 24,4 mm
and that gives us the the entrance pupil, or, the diaphragm size as seen through the lens. Could we measure it directly with a rule or a caliper rule? Yes, we could, but I felt a bit uncertain about parallax while trying to match things which are not accessible and yet separated by a lens that makes them look bigger. The flattened digital image supplies a more reliable condition.
[mks_dropcap style=”square” size=”20″ bg_color=”#ff0000″ txt_color=”#ffffff”]4[/mks_dropcap]Calculate aperture: As it happens that this lens has 220 mm focal length (see how to figured it out in another post: assessing a lens focal length) we apply the two values in the f numbers formula:
f = focal length / entrance pupil diameter
and that gives us finally the maximum aperture for this lens as f/9.01 let us round it to f/9. This is a reasonable aperture for a Rapid Rectilinear from 1890 or so.
Making Waterhouse stops
Very often you find lenses that use Waterhouse stops but those are missing. You can use the above method to cut your own set using a scale that matches what is probably displayed in your lightmeter, like 4 – 5.6 – 8 – 11- 16 – 22, or any other values you may want.
To start, cut a provisory Waterhouse stop with any material. It can be any white paper or cardboard that fits nicely in lens slot. Make a well centered circle with a diameter about half the total lens opening and insert it into your lens.
The idea is to use that reference to evaluate how much the front element of your lens enlarges a diaphragm opening. That is a constant and will be used in the reversed way to figure the sizes that will match the openings that follow a standard aperture scale.
Now you have to digitally photograph your lens with this fake Waterhouse stop, like it was explained above, and use the same formula to find the yielded Entrance Pupil for the hole/circle you made.
Er = Rr x Ei / Ri
Now you have the two key figures you will need: The Entrance Pupil and the actual circle diameter. Find their ratio:
ratio = entrance pupil / actual diameter
That is how much the front element of your lens enlarges any opening you place in a Waterhouse stop for this lens.
Now you need the lens focal length. In case you don’t have it, it can be calculated: assessing a lens focal length.
Remembering that the f numbers are:
f number = focal length / entrance pupil diameter
or
entrance pupil diameter = focal length / f number
You just make a table with all the f numbers you want to have, in you Waterhouse stops set, and their correspondent Entrance Pupil, now you just complete your table with one more column that is the found entrance pupil divided by the ratio entrance pupil / actual diameter those are the sizes of the holes you need to drill in your Waterhouse stops.
| focal length | f number | entrance pupil | ratio to actual diameter | actual diameter |
| 200 | 4 | 50.0 | 1.1 | 45.5 |
| 200 | 5.6 | 35.7 | 1.1 | 32.5 |
| 200 | 8 | 25.0 | 1.1 | 23.7 |
| 200 | 11 | 18.2 | 1.1 | 16.5 |
The above example is for a lens with 200 mm focal length and a front element that enlarges the diaphragm by a 1.1 factor (10%). The f/4 aperture needs an entrance pupil of exactly 50.0 (200/4). That means that a hole with 45.5 is needed in the Waterhouse stop in the sense that when enlarged by the lens by 10% it will result in a virtual or optical hole of 50 mm as an f/4 aperture demands for a 200 mm focal length.
The same method can be used also to mark stops in an iris diaphragm. After calculating the actual diameters you will need to open the lens, set one by one the actual diameter for a corresponding f stop, and mark the aperture lever position to that aperture.
Testing the method
Convinced about the theory but not yet supported by practical evidence, I run the same procedure with a Tessar 210 mm f4.5 just to check how close the method would get to factory specifications.
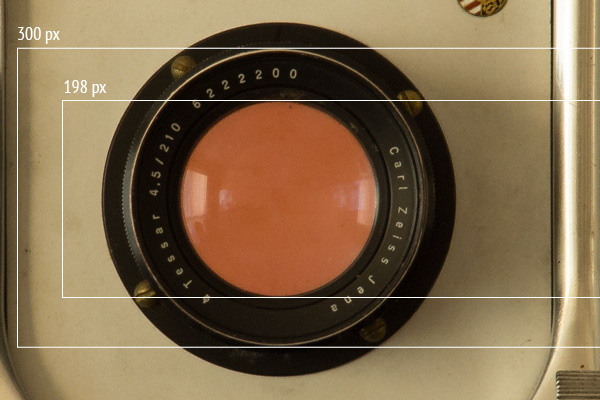
The actual external ring diameter is 70 mm. Replacing the values:
Er = Rr x Ei / Ri —- Er = 70 x 198 / 300 = 46.2
If we now use again: fstop = Flength / Er
We get fstop = 210 / 46.2 = 4.54 which is not bad at all compared with f4.5 as marked by Zeiss. Feeling more reassured now.
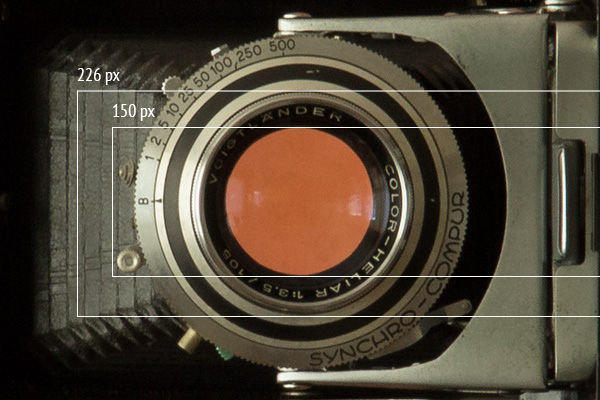
Then I tried yet another time with an Heliar, original for a Bessa II, camera from Voigtlander. Lens is marked as 1:3.5 / 105.
The actual diameter of the outer ring is 37 mm. Proceeding the same way I found entrance pupil to be 24.6 mm
Oops, dividing the focal length by that value it gives f4.3, instead of f3.5. I was of course disappointed and went checking if I had miss-measured the outer ring. Diameter was right, but what had not been so far taken into consideration is that the lens was not fully opened, but actually at 4. something.
I want to take advantage of that mistake to point that this method can, obviously, be used to assess other entrance pupils for any smaller than fully open aperture. We can even reverse the whole thing and find out what should be the diaphragm diameter in order to yield a certain desired aperture. For designing Waterhouse stops, for instance, and also for projecting cameras using unknown lenses, magnifying glass lenses, parts of other lenses and whatever glass able to focus and produce an image.
For Waterhouse stops, or any diaphragm behind the lens, if we assess the entrance pupil, then remove the front element, assess the largest opening without any stop inserted, we can get the ratio Entrance Pupil / Diaphragm Diameter. Using this ratio we can then project new Waterhouse stops or whatever kind of rounded diaphragm to match desired f numbers.
The 0,99 cents lenses
When we talk about projects home made, about building up cameras, alternative processes in photography, probably what pops up in our minds is a sort of “science fair” quality level, images that can barely be understood and are there just to confirm the founder principle and how our today’s technology is much better. That is absolutely not the case. With a little of care it is possible to produce beautiful pictures even with very limited resources. What makes a lot of difference is do not go out guessing and moving by trial en error. That is more than often frustrating and sooner or later leads anyone to give up about it.
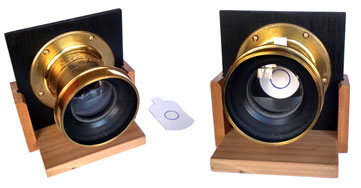
Mark Sawyer is a photographer and photography teacher in Tucson – Arizona. In one of his courses, talking about soft-focus, came up the idea of actually producing some pictures with that orientation. Afraid of having his own cameras and lenses suffering in the hands of his teenager students, he went to one of those dollar stores and bought some magnifying lenses. Pack of two, or a single bigger one, by 0.99 cents. He measured the focal length, and apertures, and found values between 9.5″ and 14″, and similar aperture f3.8 for all of them. Mark Sawyer attached the lenses in a Cambo 4×5″ and, together with his students, produced a couple of shots. They used a flash for lighting, but with f3.8 it would be possible also to go for natural light provided some sort of time control would be set in place. A more complete description can be found at Large Format Photography Forum, with the suggestive thread title “A new line of Chinise pictorial lenses!”. I would like to thank Mark for letting me add these pictures in this post.


I have used the information here to figure out that my lens is a 225 mm F/8, but still need to create Waterhouse stops. I’d like to make them standard sizes like F/9 F/11 etc, but I didn’t quite understand how to calculate their diameters for given values like f/11.
If you could give me the equation required and a little explanation it would be greatly appreciated.
Hello Cedridk, I added that procedure to the post itself. Thanks for raising this point. It helped me to improve the article.