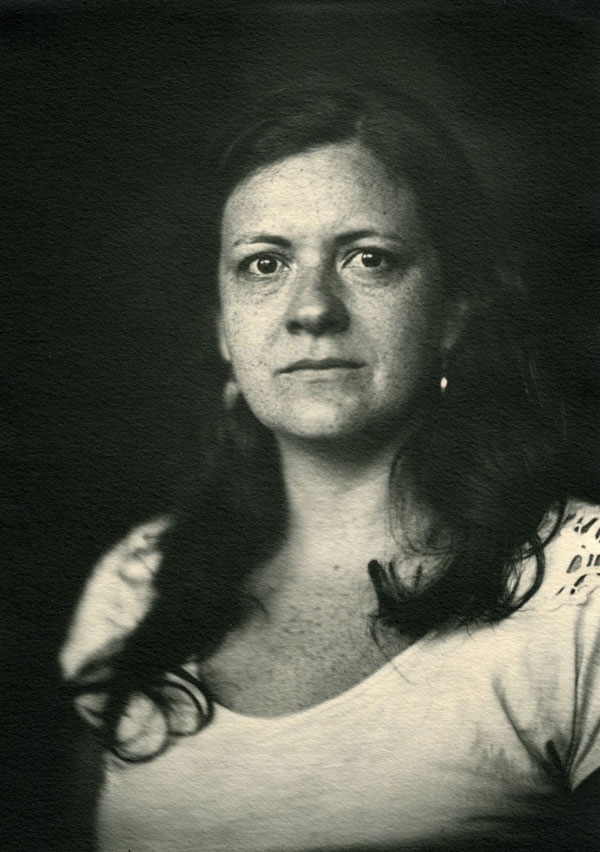
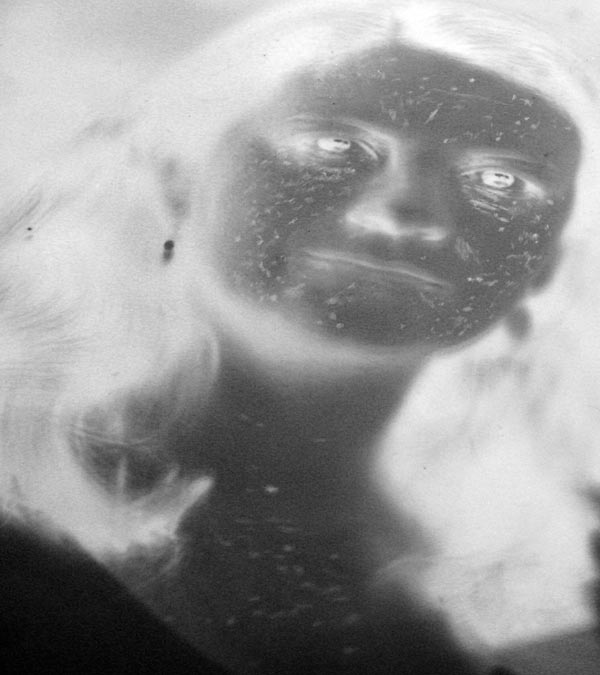
I made this picture on a homemade 18×24 cm glass dry plate. The lens was a “recent” Petzval type, an Hermagis #5 for portrais, from 1909. This negative format is larger than what the manufacturer’s catalog recommends. What is typical of this optics is sharpness around lens’ axis a blurred image towards the bondaries. In this case that was even more accentuated due to the oversized negative. Sharpening out of the center of the picture required moving the lens. This procedure is explained in the article Using a Petzval lens for portraits. The print was made by contact on a very rustic and warm tone paper called Fomatone MG Classic.
But the biggest problem is that being sensitive only to blue and ultra-violet, which is the most energetic part of the visible and near spectrum, any slight variation in the red tones on the skin appears as blemishes because from green onwards, towards red, where we find the “weaker” photons, the emulsion is not sensitive and reads like black. It took many decades to the photographic industry to developed panchromatic emulsions capable of having their silver halides “marked” even by that spectral region in which photons carry less energy. Photography began where the photosensitive effect was most likely, or where it was easier, to find traces of exposure later tapped by the developer.
The result is that freckles that do not appear when you look at the real person are very evident in the picture when silver gelatin emulsion is prepared with simpler formulas. This gives a very pronounced and artificial effect. If it were to rejuvenate the portrayed, it would probably be seen as a virtue of the medium. But no, the effect is to grow old with those marks that look typical of age.
The remedy for this is retouching. Both spectral response marks, wrinkle marks, and other surface irregularities are dark and appear in the negative as more transparent areas. The former are because of this peculiar reading of colors and the latter because of the shadows that are created. In both cases the remedy is to darken those portions of the negative so that they clear in the final copy giving a uniform and smooth appearance. This article will talk about a kind of retouching that has exactly this purpose: depositing opaque material on the negative in order to improve the final copy. There is also the retouching going in the opposite direction, which would make areas of the negative more transparent and hence adding shadows, but this is done with scraping or what is called chemical reduction. Still another type of retouching is to mask the negative by giving it an effect similar to dodging/burning or something like soft focus. But this article is specifically about pencil retouching directly over the emulsion surface.
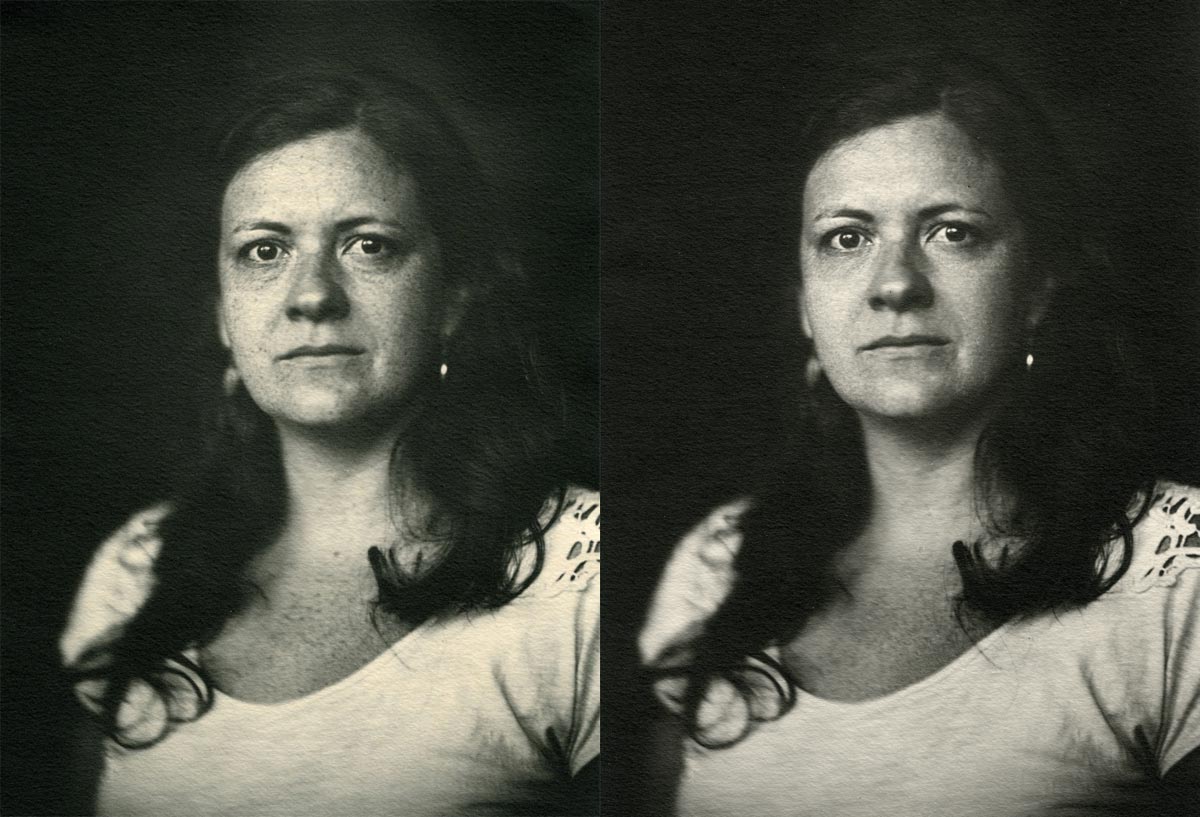
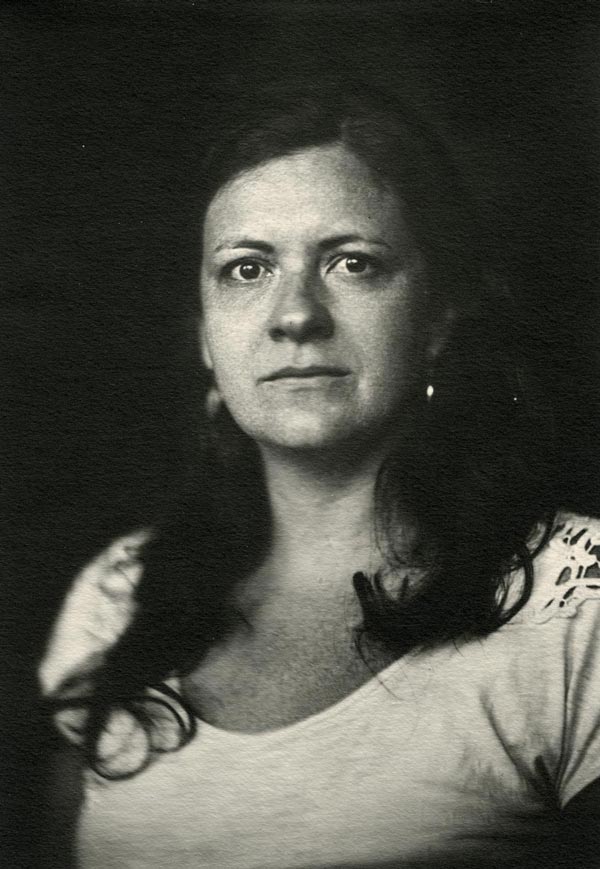
Side by side above we have the same negative printed before and after retouching. Much has been discussed since the beginning of photography, and it is discussed to this day, about as far as retouching can go. In absolute terms this is a sterile discussion. It is as if there would be a fair and reasonable boundary and excessive retouching is reprehensible. There is no such universal rule separating the false from the authentic in photography or any means of imagery representation. In the example above I just intentionally tried to avoid an artificial look that would make the image strange and in conflict with the straightforward style of the portrait. For that, I almost only took care of the spots due to the limited reading of the spectrum that this homemade emulsion provides. I think the action is more discreet, less astonishing the difference “before x after”, but the “after” alone, which was the ultimate goal, is more balanced and beautiful.
Retouching that adds material to lighten correspondent parts of the negative can be done with ordinary pencil. The literature generally recommends very hard pencils like HHH. But in this example I used a Faber-Castell HB. The problem that needs to be resolved before using the pencil is that the gelatin does not scratch because it is very hard and smooth when it is dry on the glass or film. So you need to prepare a liquid called “dope”, which gives the surface a bit of roughness and allows the graphite to wear out and deposit on the gelatin.
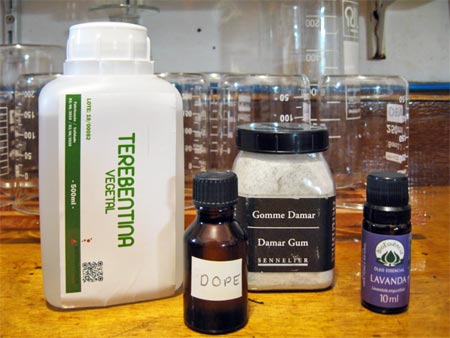
The ingredients are turpentine, damar gum and lavender essential oil. Note that white spirit replaces vegetable turpentine in many applications, but NOT for the preparation of Dope, as only vegetable turpentine dissolves Damar gum while white spirit does not.
The formula is as follows:
- 30 ml tupertine
- 1 g dammar gum
- 15 drops of lavender essential oil
Simply put everything in a small beaker and stir it to dissolve. This dissolution takes a little time. A magnetic stirrer can help a lot, or maybe if the ingredients are allowed to rest, it may occur naturally. As I had no patience to wait I did not test this possibility. After this first touch up, it seemed to me that these 30 ml will last for years and years. A small drop carried by a toothpick is applied to the center of the retouching area. From that point on, with a finger or other non-leaving medium, a non-threading fabric, for example, spreads the dope in a circular motion. Take care that the edge of this area spreads by fading over the emulsion. Drying is fast and the negative is ready for retouching. The surface is not that much rough, hardly noticeable, but for the action of the pencil is enough.
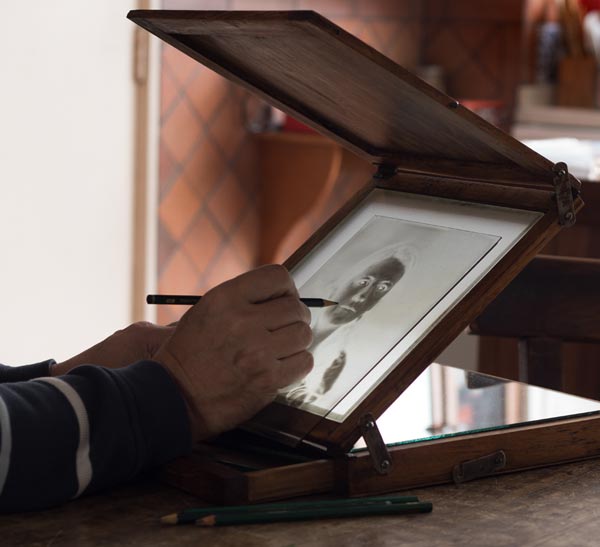
The retouching itself needs to be done by looking at the transmitted light. The idea is to work the white dots filling them until they disappear becoming indistinct about what is around. This part is made on a light table or an antique retouching desk that uses only natural light. These desks are hard to find these days. But even making one can be quite interesting as they are much more comfortable than most common light tables. By using a natural light and therefore in harmony with the environment you are in, they seem to tire less. This table I used is probably from the turn of the nineteenth to the twentieth century. It is very simple compared to others found in the literature. In the retouching desk article, there is a complete description and examples of retouching performed on old negatives.
Shooting the emulsion with the camera tilted, thanks to the different way graphite reflects light, one can see the marks left by the graphite. I was surprised to see how easy it is to fill in the light spots (which would turn out dark in prints) using the pencil. When light crosses the negative perpendicularly, when contact or enlarger printed, the retouch marks blend very well.
I think one can do the same process with film negatives, because the top layer is also gelatin. Again, it’s incredibly easy and effective, it looks like Photoshop. Pencil movements in one direction or another do not appear to affect much. I was just passing a very thin pencil tip, lightly, making little circles or hatches, and the holes were filling and fading one by one.
In the past, photographers retouched much smaller formats or much finer details than those I retouched. Do not be shy if you do medium format or even 35 mm. Of course, using panchromatic films, retouching needs will be different. But practice says you just have to have the tool to find occasion to use it.
I have some plates from the middle of the last century, with faces that are only 6mm (~1/4″) high (which would fit loose on 35mm film frame) and they were well retouched. It is just a matter of sharpening the pencil and using a magnifying glass. Some examples can be seen on the Retouching desk article.
There is a lot of material online, copies of old nineteenth- and early-twentieth-century manuals dealing with the theme of retouching negatives. But one in particular that I consider the most complete and from which I drew the Dope formula I presented here is part of a great photography collection available on the Internet Archive: Complete Self-Instructing Library of Practical Photography – 1909, Schriever J. B.
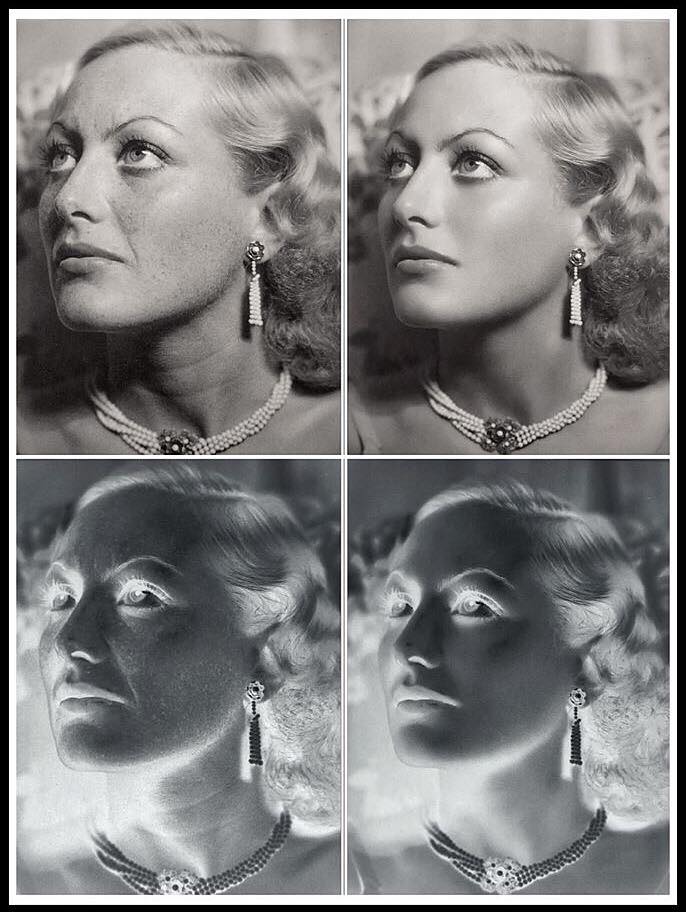
Joan Crowford photographed by George Hurrells and negative retouched by James Sharp – 1931. I believe that the many spots on the actress’s complexion would not be visible, or would not be so striking, live. It must have been the recurring problem of photographic emulsions not sensitive to red that makes them so prominent.