An image made with divergent light is a contradiction. Pinhole is a contradiction. There is no focus because light diverges and yet there is an image. Somewhere between brightness and sharpness the picture happens. The larger the hole the more light passes, however, more light overlaps and blurs objects’ contours and details. Less light demands longer exposure times for image recording. Beyond a certain threshold the very idea of image dissolves; it becomes a heap of fugitive scenes, separated in time, mixed up and incomprehensible.
While photography with lenses almost succeed in hiding it, pinhole photography highlights how much image is nothing but a concept. Far from anything we could possibly call reality. That might be the reason why photographers, when they use pinhole, find in that a good opportunity to challenge the concept of a camera as a specialized, professional and scientific instrument. They line up with Lomography, Toy Cameras, photographic gadgets and other ways to scorn “serious” photography.
My first was a can
Pinhole cameras are not bought, they are homemade. Perhaps because of my scientific background I cannot get very much into the spirit I just described. The two pinholes I made were attempts of a certain level craftsmanship that work like a confession of a deeper respect for images.
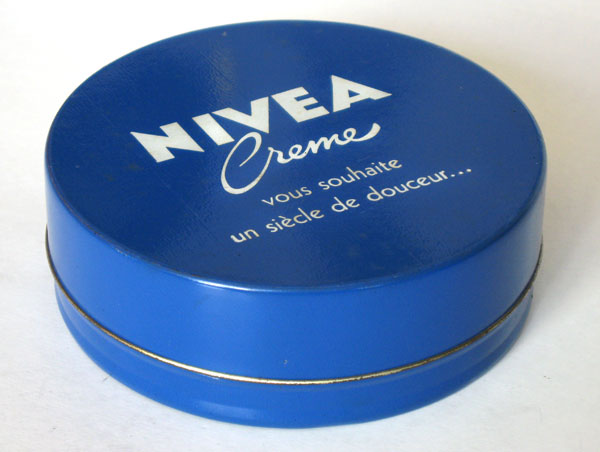
In the first of these cameras, maybe not so much, because it was made with a Nivea Cream tin – a left over in a sense. When I got the tin I recognized the height of a 35mm film and then I already knew what its destination would be. But the idea of fixing a strip of film with tape and going out for just one shot seemed to me of very low productivity. Specially considering that I rarely get my pictures in my first attempt. That’s how I decided to shape an internal circuit with PVC to store some more film.
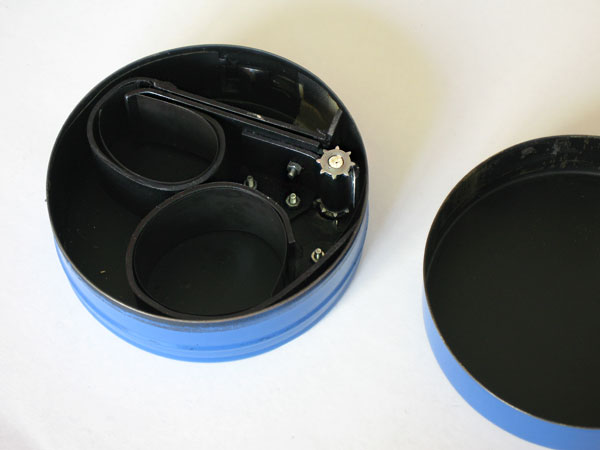
Film advance is made with a rack taken from a real camera and, in order to keep the “camouflage” character as a Nivea Cream tin, I need to carry a small screwdriver in my pocket to advance the film. It is necessary to turn the screw at the bottom part of the can, giving it two and a half turns.
That gives a panoramic photo of 24 x 85 mm. There is no spool for the film, it is simply loose and curled into a rounded chamber and the rack trips it through the frame where it will be exposed and then roll it again into another smaller chamber. One can take something like 8 photos with this system. With more than that, the film already begins to resist a lot to wrap itself in the second chamber.
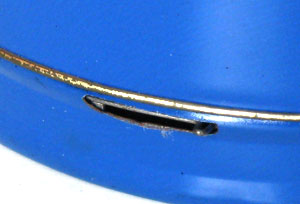
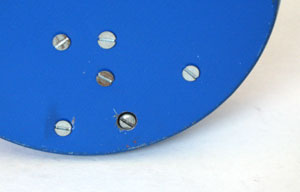
To shoot there is a slit on the side of the tin where a lever, that barely comes out, makes an inner cover slide and open the hole. Being a sort of a disguised camera, would not make sense to include in it a tripod thread. It would be a bit bizarre a tin of cream mounted on a tripod. But it certainly needs to be firmly placed on a surface to be able to hold for the long exposures that pinhole requires.
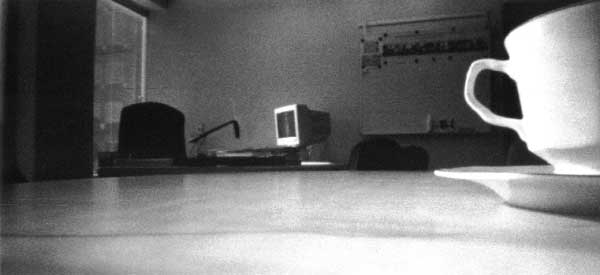
With pinhole I like to explore very close objects with a distant background. I find interesting the indifference with which the little hole treats what is 10 cm or 10 meters away. Our eyes / brain, accustomed to photographs made with lenses, realize that there is something strange on top of the blur. It is as if the image, very good in depth of field, at the same time there shows no proper focus anywhere and that looks strange. You can see that this photo is already old by the design of the monitor in the background. This Nivea Creme was a giveaway about the arrival of the 21st century. I built the camera and took the picture right away.
The second a woodwork
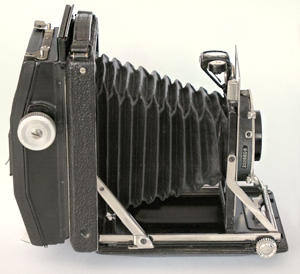
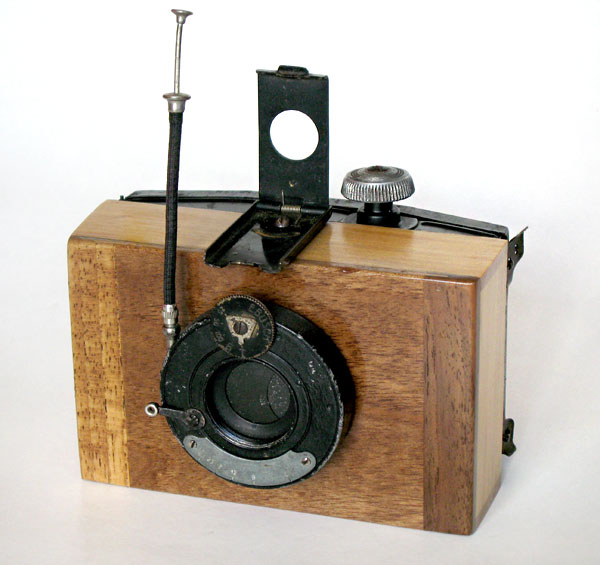
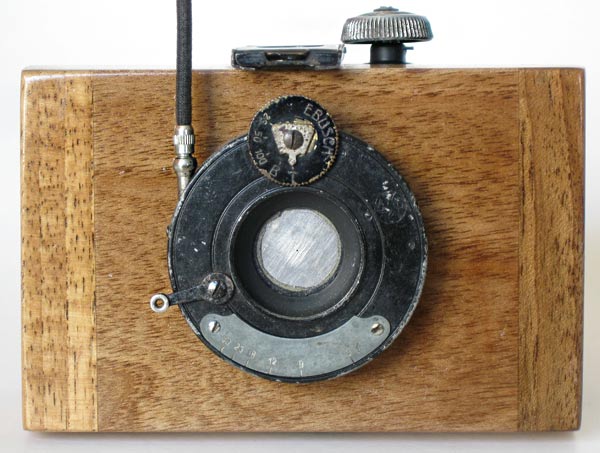
The other camera is the one that appears in the opening of this post. It was made having a wood body aggregating parts of real cameras. A friend of mine gave me a 120 film adapter that would be used on 9×12 film cameras, such as the one from the Patent Etui at Kamera-Werkstätten – Dresden (on the left), which was originally for 6 x 9 cm sheet film. Manufacturers of accessories sold many of these adapters in former times. I just removed the parts that would be to fit it into the 9 x 12 cm rail and, left with only the adapter itself, I fixed it with four screws onto the camera body.
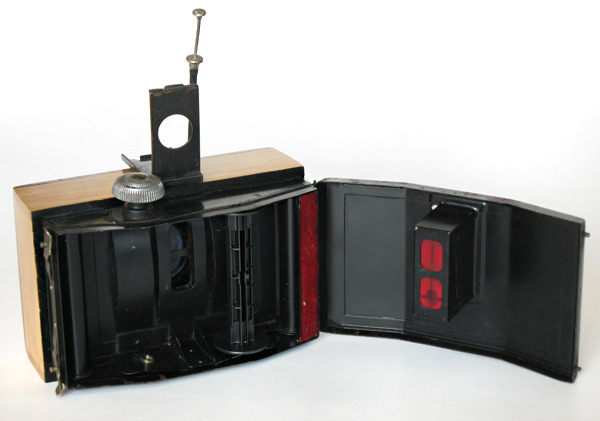
I had also in store, from a box of photographic odds and ends I bought in Bièvres, a German shutter from Emil Busch (a major lens manufacturer) that probably fitted some mid sized drop bed camera. Then it was only necessary to adapt into the shutter a metallic plate with the pinhole and use the shutter flange to fix the assembly in front of the camera.
The reduced size and huge angle of view, 111° (see calculation here) provided by the 35 mm focal length in a 6 x 9 cm (real 58 x 83 mm) format, allows photos just like this one below, taken from inside a cupboard. I even planned to put a wire frame and make framing more precise through the “eyepiece” I installed, but belatedly realized that with 111º, no matter how far I could squeeze my eye into the eyepiece, I could barely see the edge of the wireframe. Then I left only the folding eyepiece that came from a scrap of an Ica camera. It is possible to guess the center of the photo only with the eyepiece, when there is access to it. That was not the case with this picture from inside the cupboard.
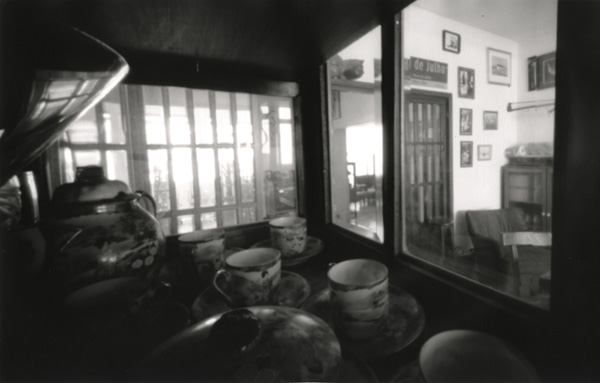
The exposure was 12 minutes. The film was T-Max100, 120 format, shot as ASA100 and developed for 16 min in Pyrocat HD, dilution 1 + 1 + 100 at 20 ° C with agitation every 60 s. Above is a scan of a 20 x 30 cm enlargement on Ilford fiber matte. I find interesting, when making pinhole, to avoid interference from film grain. Otherwise you mix two softening effects of the image, that means, it gets a bit mixed up what comes from pinhole diverging light nature and what comes from film grain. This combination of TMax with Pyrocat HD is great for this purpose. The difficulty is to focus on the enlarger because even with a magnifying glass you hardly see the grain and the “sharpness” of the contours are not really there to help.
The third one, 3D printed
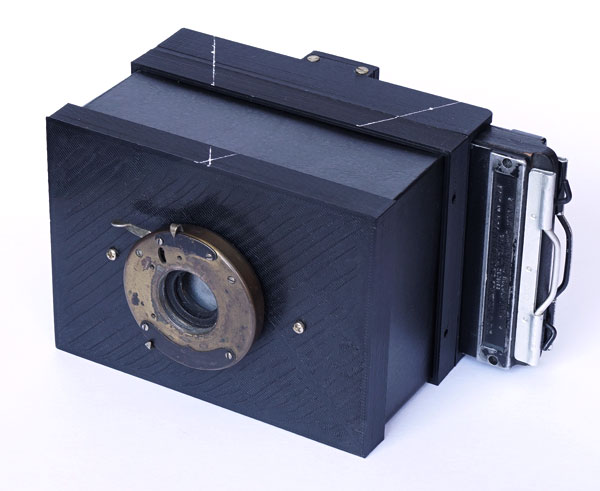
This is my third pinhole. This time for 2¼ x 3¼ inch format plate films. Classic format of Graflex Baby. After making the second camera I concluded that I would rarely want to spend an entire 120 film in a pinhole. As I recently acquired a 3D printer, I decided to make a new one for sheet film. I made a front to receive an old shutter that works only in Time mode. The rear was made to receive the film holder. Connecting the two parts I made a square cardboard tube lined with binding material. If I want to lengthen or shorten the focal length and viewing angle, I just need to change this tube.
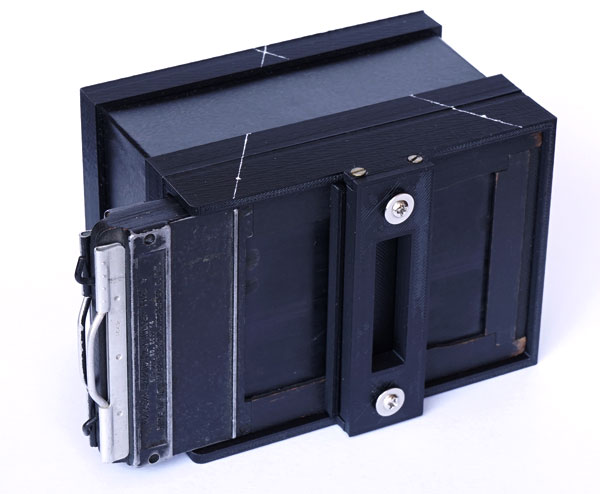
Since ground glass for pinholes does not make sense, the project becomes very easy. One just has to make a drawer-like structure for the film holder and arrange it so that it can enter and lock into position when pushed against the camera body.
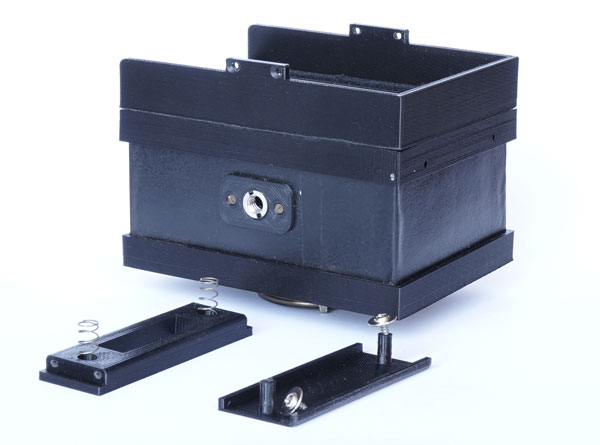
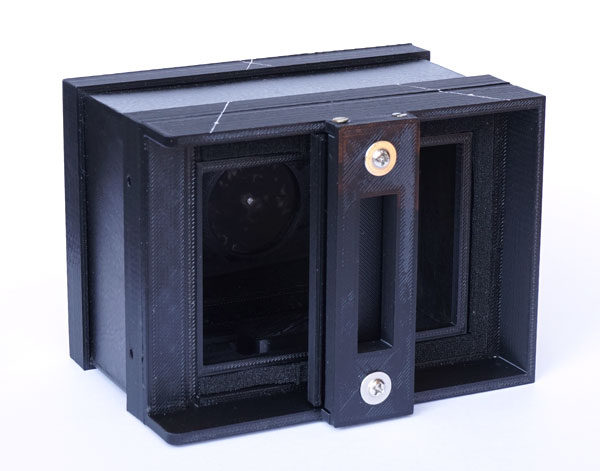
I think the photo above is self-explanatory of how this pressure is applied. I also placed a tripod socket at the bottom of the camera, since I will hardly do pinhole handheld photography. The base of the camera was designed flat so that it can also be placed on any other flat surface.
As a precaution I made a groove to receive strips of velvet and better seal the light. But the adjustment was so fair that I believe it would work even without it. The white lines drawn at the top of the camera serve for a slight orientation of what is in the horizontal field of the photo.
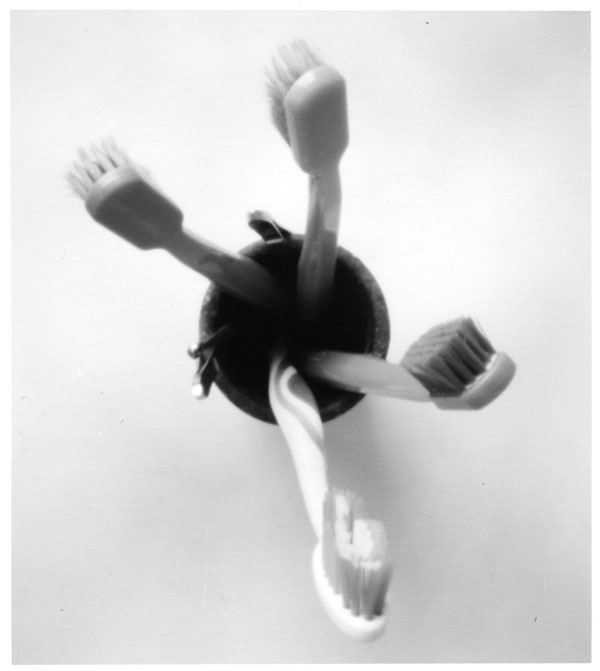
Above, the first photo I took with it. The hole was drilled in an aluminum plate that was already thin and was further refined. It was like a soda can. From the ~ 60 mm focal length, I knew that the ideal hole size would be 0.3 mm. I punctured with a needle and sanded with water sandpaper to improve the finish. At the same time, I kept checking under a microscope until the hole had a more or less uniform circular shape and the right diameter.
How to calculate exposure time in a pinhole
The first issue to resolve is knowing what aperture your camera has. This is easy in mathematics but can be difficult in practice.
Aperture is simply the quotient of the focal length by the diameter of the hole opening. If you want a more detailed look at aperture or f stop follow this link: Measuring lenses’ aperture.
The focal length is simply the distance that goes from the pinhole to the center of the film, or paper, where the image will be formed.
The hole diameter can be more complicated to obtain unless you are producing a huge pinhole. Here are some suggestions:
- The ideal is to use a microscope with a scale. In this case, it will probably be necessary for the metal plate with the hole to be small and removable because then you can simply read it very accurately by placing the plate on the microscope table. It’s very easy and accurate. If you don’t have a microscope it might be worth looking for someone, a laboratory or a school that does.
- A less accurate option is to use a thread counting magnifying glass.
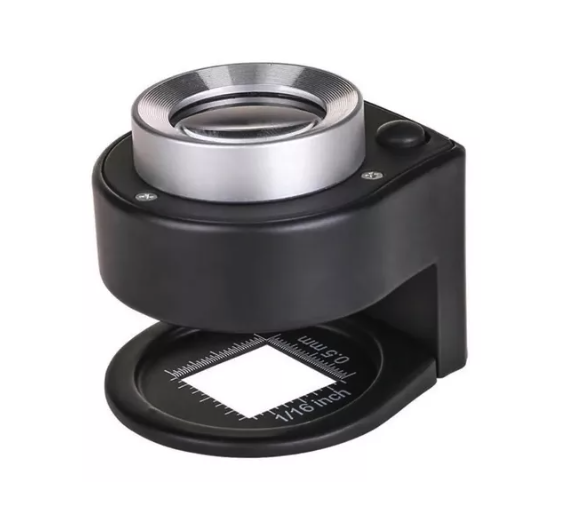
It consists of a magnifying glass mounted on scales in a square field. You can find these thread counting magnifying glasses online at very affordable prices. To measure, simply place your camera hole in the field of view and compare it to the scale to estimate the diameter. The one in the photo above has a scale of 0.5mm. With it it should be possible to estimate something from 0.10 to 1.00 mm with some precision. - If you’re going to do pinhole maybe have a darkroom. A good way to measure the diameter of the hole is to place the flat tin with the hole in the negative holder, along with something with a known size, a good transparent plastic ruler, for example, set the enlarger to maximum, focus well, and measure by comparison the hole size.
Once you have measured the focal length and the hole size just make the division. For example, if your hole is 0.4mm and your camera’s focal length is 200mm. Its f-stop is 200 / 0.4 which is 500. For those who are used to the familiar scale f 2.8 – 4 – 5.6 – 8 – 11 – 16 – 22. This seems strange, but that’s how it is.
The problem now is that most light meters go up to f/64 or a little more than that. In particular, photometers on photographic cameras, which can very well be used, rarely go beyond f/22. The question then remains of how to calculate the exposure time for an aperture so small that it doesn’t even appear on the scale of your photometer?
So we need to extend the scale by going beyond the familiar zone into the “pinhole zone”. The formula generating f-stops is (√2)n
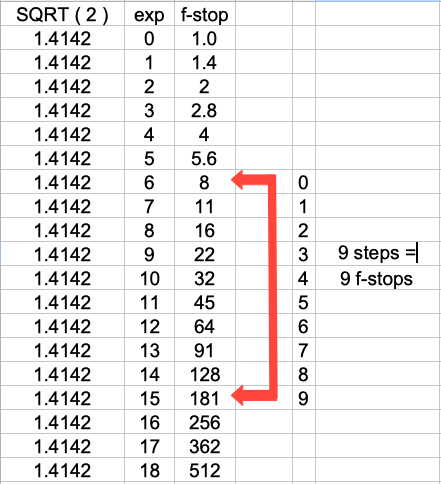
See in the table above that after the figures you are probably already familiar with, up to f/22, we enter much smaller apertures and this is the pinhole region. Now just remember that with each f-stop we advance, the need for light doubles, that is, the exposure time doubles.
For example, looking at the table above, if you measured the light with your dedicated lightmeter, the one in your camera or from a cell phone app and the time to f/8 is 1/2 second. Let’s say your pinhole is f/181 or something close to it. To go from f/8 to f/181 we have to skip 9 lines. Then the time needs to be multiplied by 2 x 2 x 2 x 2 x 2 x 2 x 2 x 2 x 2 = 512. Also known as 29 (in exponential form).
So the time of 1/2 second that you read (0.5 s in decimals ) for f/8, needs to be multiplied by 512 and results in 256 s. Your exposure will be, a priori, 256 seconds or 4:26 min (4×60 + 26 = 256). If the time was 1/250, in the usual fraction form, you would need to divide 1 ÷ 250, to get the time in decimals, before multiplying.
But why this “a priori”? The point is that there is a reciprocity failure effect in films that means that long times, generally above 1 second, require compensation, requiring more time than indicated by lightmeters.
To take this effect into account, you can consult the documentation for the film you are using. Manufacturers usually publish a graph with the relationship between theoretical and real time. But easier than that, I have been using, with good results, the website of photographer Denis Oliver, a specialist in long exposure photography. The use is very intuitive, you enter film, measured time, aperture and it tells you the time you should actually use. Even for digital sensors you will find there recommendations.
What is reasonable in pinhole photography
Even if you have some way of drilling extremely small holes or using extremely large film with enormous focal lengths, keep in mind that the time and processing demands will grow exponentially if you go too far in either of these directions. Avoid going beyond f/150 or f/200.
Holes between 0.2 and 1.0 mm for film formats from 35mm to 8×10″ will require still reasonable times for working and processing following the film standards. At least at the beginning of your experiments, staying in this range will avoid frustration. Other point is that I don’t recommend using expired films, old paper or UV processes and dry plates. These materials add an out-of-control aspect because aging or homemade sensitizers don’t follow a standard and it will be very difficult to track back what went wrong.
For now, these are my experiences with pinhole. I really like lenses but, depending on the subject, it is still interesting to photograph with light that is not tamed by any optics.